

| Amicus | |
| Enter Supplier Credits | |
| See Also Submit feedback on this topic | |
| Key Areas > Suppliers > Common Tasks > Enter Supplier Credits |
Glossary Item Box
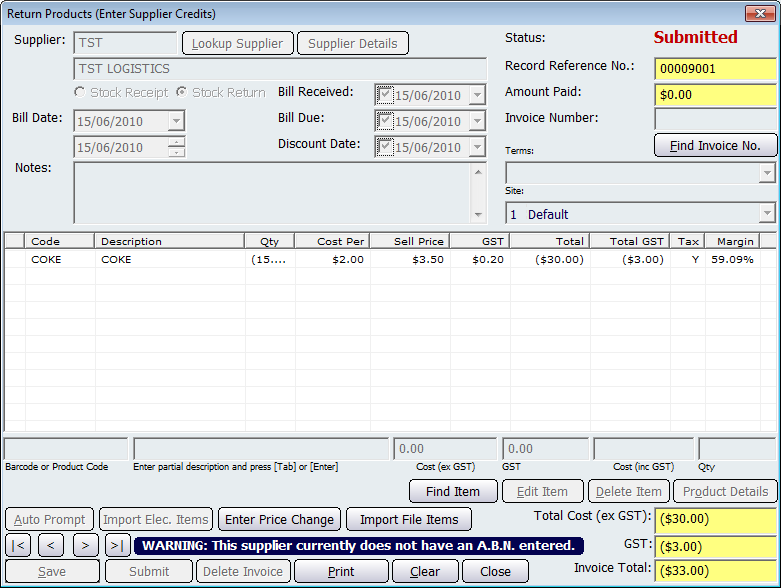
If you receive stock from a supplier that you wish to return for any reason then the Enter Supplier Credit screen will update the record accordingly. The screen is essentially the same as using the Enter Supplier Receipt screen (refer to Enter Supplier Invoice) however instead of receiving products you are returning them at an agreed value between you and the supplier if not at the cost prise.
To create a supplier credit or return invoice, open the Enter Supplier Invoice dialogue by selecting Suppliers followed by Receive Products. You will note that this is the same dialogue but select Stock Return instead of Stock Receipt under the supplier.

Figure : The Receive Products dialogue in Return Products mode
Select the Supplier
By default, you will be prompted to select a supplier number for this invoice. If you know the supplier number, enter it in the Supplier field.
If you want to bring up a list of all suppliers in NBS Amicus, click Lookup Supplier. This supplier listing may be sorted by clicking on the column headings. To quickly search for information in any column, start typing the matching information for the supplier that you are searching for and NBS Amicus will move the cursor to any matching information.
The Supplier Details button allows you to edit the master supplier file for the selected supplier. Be aware that any changes made to the supplier details in this way will affect all associated records in NBS Amicus.
Enter the date of this invoice in the Bill Date field. This date is as per the suppliers invoice.
Enter the Invoice Number (or the reference number) from the supplier invoice. This invoice number is that from the receiving invoice on which the products were gained. However this is not compulsory.
The Bill Received and Bill Due dates are not compulsory however they also can reflect the dates of the original receiving invoice.
Enter Products
Enter the bar code or the product code of the product in the Bar Code or Product Code field. NBS Amicus allows several methods of entering this information.
-
You can either use a bar code scanner and scan the products bar code or product code; or
-
You can manually type the products bar code or product code; or
-
In the Bar Code or Product Code field, you can type the beginning of a product or bar code, followed by an asterisk (*) and a window will open up containing all matching products. You can then select the product you want from this list; or
-
You can also search for the product by entering a partial description in the Enter partial description field and clicking Find Invoice Item or by pressing Enter or Tab.
When you have entered the product you are returning you will be prompted to enter the Cost (ex GST), set the to be that of your agreed return value. If the value is correct, press either Enter or Tab to accept this cost. NBS Amicus will automatically calculate the GST amount per unit.
You will then be prompted to enter the quantity, or number of units, of the product that will be returned. Press either Enter or Tab.
If you enter a product of the same type and price of a product that you have already entered, NBS Amicus will increase the quantity of the product that is already in the supplier invoice.
If you enter a product of the same type but you wish to buy this product at a different price than one previously entered, the new product will be entered on a new, separate line.
The running total of the invoice is displayed in the Total Cost (ex GST), GST and Invoice Total fields.
Importing Products
Unlike the Enter Supplier Invoice screen the Import Elec. Items control is irrelevant and are therefore not used.
If you have been supplier with a .CSV file click the Import File Items to import invoice items stored in this file. Refer to CSV Importing for more information.
Price Summary
Once the invoice has been submitted products can be edited through the Price Summary dialogue, click Enter Price Change Screen to change price information, refer to Price Summary for further information.
Record controls
Buttons to perform actions on the displayed dialogue includes; < and >, allow you to respectively scroll forwards and backwards through the items on the screen one record at a time. To quickly find the first or last items record, click either the |< or >| key respectively. These buttons appear at the bottom of all Add/Edit dialog tabs providing access to all products, customers, suppliers, etc. ',event)">Navigational Arrows, Save, Find Item, Edit Item, Product Details, Delete Item/Invoice, Clear, Import FIle Items, Close, Print, Submit and Auto Prompt',event)">Auto Prompt.