

| Amicus | |
| How to make a basic sale | |
| See Also Submit feedback on this topic | |
| Key Areas > Sales > Common Tasks & Practical 'How To' Guides > How to make a basic sale |
Glossary Item Box
Introduction
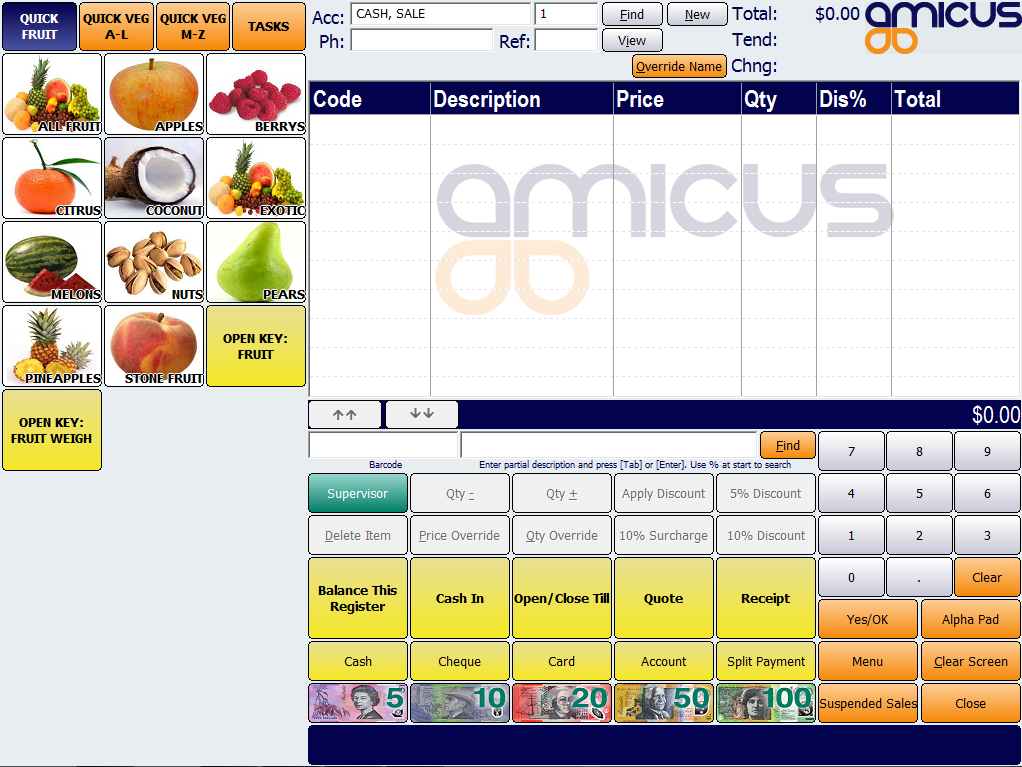
Making sales is designed to be very easy and can be broken into two steps between when a sale is started and finished. Please note that the screen shot used below is of the Touch Sales Screen configured with products typical of a supermarket configuration. Do not be concerned if you are using a different sale screen, as the process remains the same for all sale screen types. Depending on the hardware that your system uses, such as a mouse, keyboard, touch screen or barcode scanner, will affect the way these steps are performed, so please select the option that best matches your systems configuration.
-
Pre Condition - The process described below assumes that the sales screen has already been opened and is in its default state.
-
Step 1 - Adding Items - With your sale screen in front of you, you will now be able to add items to a sale. All product records in Amicus have a unique ID that links a product with a price and other crucial information. This ID is often a barcode, but may also be a short textual code such as "APPLE". When an item has been successfully added, you may or may not hear a 'beep' followed by the product being added to the sale screen list showing the its code, price and other details. To add multiple items, repeat the steps below. Once you have finished adding items, Click/Select the "Yes/Ok" button (also called the "Complete Sale" button on some sale screen types). To add an item, use a method from the list below that best matches your situation;
-
Barcode Scanner - Pass the product in front of the barcode scanner with the barcode facing the scanner.
-
Keyboard - Type the products unique ID into the "Barcode" field. Once complete, hit the "Tab" key (on your keyboard).
-
Mouse or Touch Screen (Method 1) - Click/Select a product from the product pad. (Note: example shows products with images, but your products may appear as text only, or may not be setup in Touch Sales Screen mode).
-
Mouse or Touch Screen (Method 2) - Click/Select the "Alpha Pad" button (located in the bottom right of the sales screen), then, using the on-screen keyboard that is now displayed, type in the product ID. Once complete, Click/Select the "Yes/Ok" button (on the on-screen keyboard).
-
Example
-
Add the product ID 'SAMPLE1' (or scan/enter your own product) using a method described above. ~ An item is added to the sale.
-
Add the product ID 'SAMPLE2' (or scan/enter your own product) using a method described above. ~ An item is added to the sale.
-
Click/Select the "Yes/Ok" button (also called the "Complete Sale" button on some sale screen types). ~ The sale is moved to the finalise sales screen in preparation to choose a payment method.
-
-

-
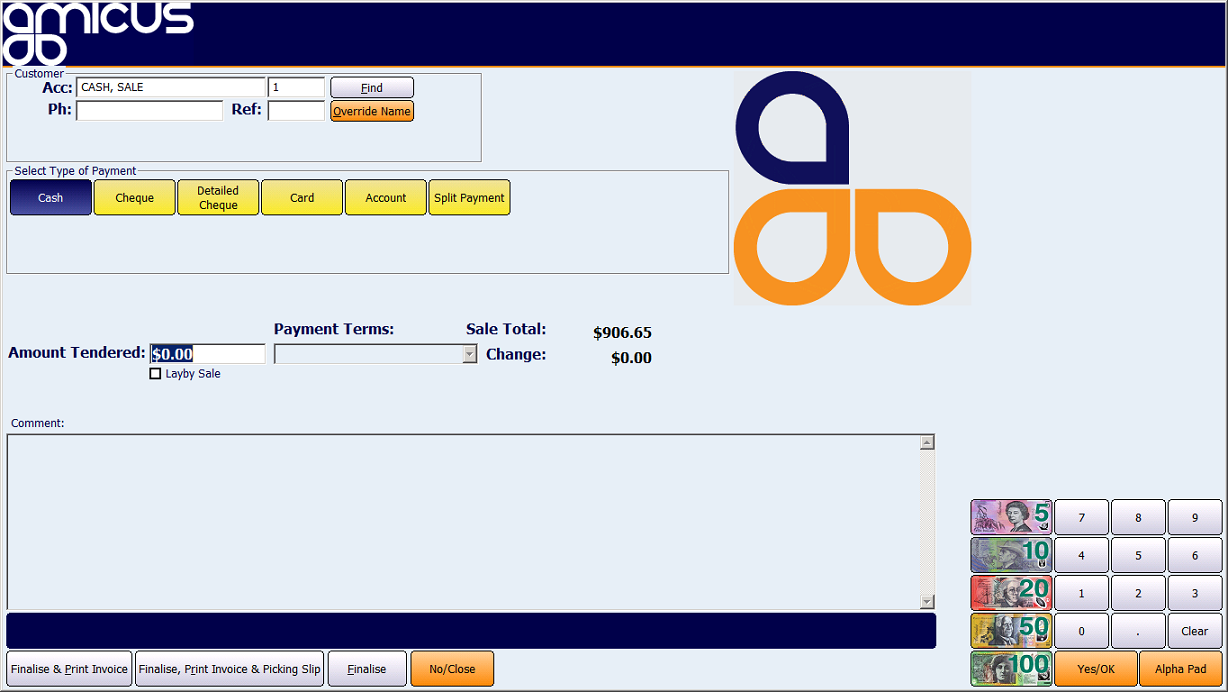
Step 2 - Choosing a method of payment - By default, it is assumed that the required method of payment will be cash unless a particular customer has a different default method assigned. We will now be asked to enter an "Amount Tendered" (how much the customer will be giving us, I.e. a $20 or $50 note). In some configurations, the "Amount Tendered" value will be pre-filled to match the sales total charge. Use one of the following methods to enter an "Amount Tendered" value;
-
Keyboard - Type the numerical value for the amount we wish to tender (I.e. 20 or 10.50).
-
Mouse or Touch Screen (Method 1) - Use the on-screen Number Pad to enter the numerical value for the amount we wish to tender (I.e. 20 or 10.50).
-
Mouse or Touch Screen (Method 2) - Use the on-screen Cash Denominations (Images of Notes such as $5, $10 etc.) to enter a value. Note that if your first denomination is larger than the sale total charge, the sale will automatically finalise. Otherwise, it will allow you to add multiples of Cash Denominations until you explicitly finalise the sale.
-
Example
-
Click/Select the $20 Cash Denomination (or add the numeric value 20). ~ An Amount Tendered has been entered.
-
-

Finalise The Sale - Finalising a sale marks the point at which the sale is committed to the system. After the sale has been committed, it can no longer be modified (though can be reversed. Refer to the How to process refunds & reversals article for more information). Once a sale has been finalised, a new sale screen will appear which will briefly display the total charge, amount tendered and change from the previous sale. Any receipts or other documents will also be printed at this time. There are three finalisation methods; "Finalise & Print Invoice", "Finalise, Print Invoice & Picking Slip" and "Finalise". To finalise a sale, choose one of the following methods;
-
Keyboard (Method 1) - Hit the "Enter" key . This method will select the default finalisation method.
-
Keyboard (Method 2) - Hold down the "Alt" key, then select the underlined character of the finalisation method you prefer (I.e. "Alt" + "p" for "Finalise & Print") . This method will select the chosen finalisation method.
-
Mouse or Touch Screen (Method 1) - Click/Select the "Yes/Ok" button. This method will select the default finalisation method.
-
Mouse or Touch Screen (Method 2) - Click/Select the required finalisation button.
-
Example
-
Click/Select the "Finalise" button. ~ The sale has been committed to the system and a new sale screen has appeared in preparation for a new sale. The previous sales Total Charge, Amount Tendered and Change can be seen briefly.
-