Add and Edit Bank Accounts
From Amicus
| Amicus | |
| Add and Edit Bank Accounts | |
| Submit feedback on this topic | |
| Configuration and Maintenance > Add/Edit Bank Accounts |
Glossary Item Box
You can use the Add/Edit Bank, Add/Edit Branch and Add/Edit Bank Account screens, shown below, to store the details of different bank details within the NBS Amicus system.
Bank
Select Maintenance followed by Bank Accounts then Add/Edit Banks from the File menu.
The bank screen allows you to enter the banks name, abbreviation and the banks logo for use on invoices.
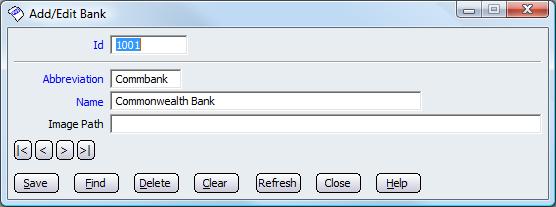
Figure : Add/Edit Bank dialogue
Enter the Abbreviation and Name as they are required properties. If you have an image stored on the local drive enter the images file path. Click save to store the record.
Bank Branch
Each bank has many different branches, for each branch you use, you can enter the address details using this dialogue.
Select Maintenance followed by Bank Accounts then Add/Edit Branches from the File menu.
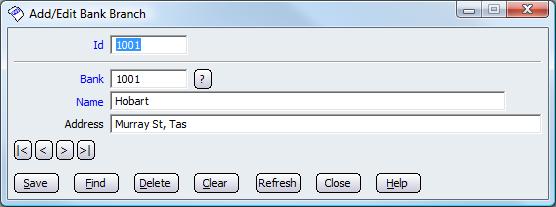
Figure : Add/Edit Branches dialogue
Enter the bank or select one by the ? button, enter the branch Name then followed by the address. Click save to store the record.
Bank Accounts
To access this screen, click Suppliers on the Toolbar and then click Add/Edit Bank Accounts. Alternitavely select Maintenance followed by Bank Accounts then Add/Edit Bank Accounts from the File menu.
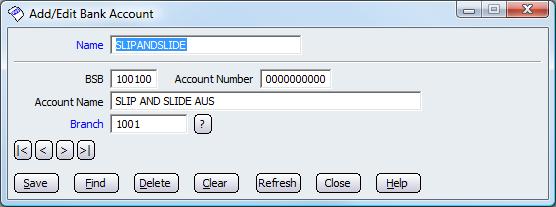
Figure : You can store the details of different bank accounts within NBS Amicus
The Name field contains the name of the account by which you internally refer to it.
The Bank Name field contains the name of the bank where this account is held.
The BSB field holds six characters of the Bank, State & Branch code which is associated with this account.
The Account Number field is where the account number for this particular account is stored.
The Account Name field contains the actual name of the account. For example, it could be the bank account name of one of your suppliers.
Other controls include < and >, allow you to respectively scroll forwards and backwards through the items on the screen one record at a time. To quickly find the first or last items record, click either the |< or >| key respectively. These buttons appear at the bottom of all Add/Edit dialog tabs providing access to all products, customers, suppliers, etc. ',event)">Navigational Arrows, Save, Find, Delete, Clear, Print, Refresh, Close and Help.
Note: Once the details of the different bank accounts have been stored using this screen, the details of a particular bank account can be easily accessed, for example, when processing a payment to a supplier’s account. For information refer to Account Payment.