


| Amicus | |
| Add and Edit Sale Time Discount Rules | |
| See Also Submit feedback on this topic | |
| Configuration and Maintenance > Add and Edit Sale Time Discount Rules |
Glossary Item Box
Amicus allows you to add discount rules that can then be applied from the sales screen. The Add/Edit Sale Time Discount Rule page lets you to configure discount rules and apply them to your products. This allows you to easily control and manage your discounts and to quickly apply them at the sales screen.
To get to the Sale Time Discount Rules screen click on File from the Amicus Toolbar, click on Maintenance then Add/Edit Sale Time Discount Rule.
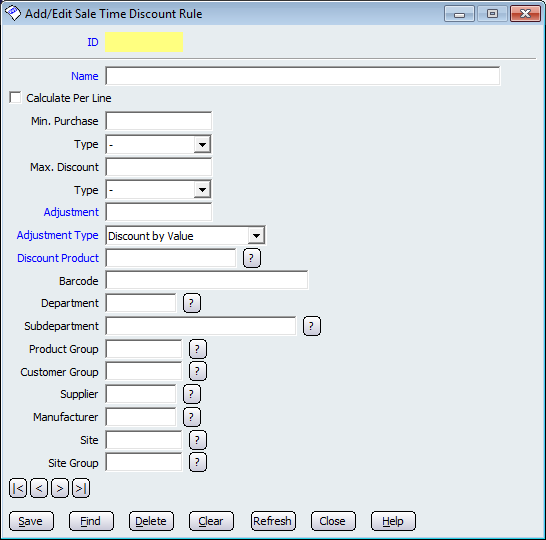
There are various options availible to you so that you can create discount rules that are based on your preferences. Fields that are blue are mandatory and therefore must be filled out (except for the ID field as this is automatically generated when you save the record) before the discount rule can be saved into the database.
Click on the Name field to give the discount rule a name that identifies the discount rule.
The Min. Purchase field allows you to control the minimum purchase amount required for the discount to take effect. Click on the Type dropdown box immediatly below the Min. Purchase field to filter the Min. Purchase based on either the Quantity or Purchase Price.
The Max. Discount field allows you to set the maximum number the discount can reach (if it is left empty then their will be no maximum). The Type dropdown box below the Max. Discount field controls whether the Max. Discount will be based on Quantity or the Purchase Price.
The Adjustment field is the value you want to adjust the price by depending on the Adjustment Type you select (here is an example of a 4Cents Per Litre Discount Rule).
The Discount Product field allows you to select the product from your product list that you want the discount rule to apply to. Click on the ? to bring up a screen with all the products in your database.
Other optional fields on this screen are: Barcode, Department, Subdepartment, Product Group, Customer Group, Supplier, Manufacturer, Site, and Site Group.
Buttons that control the actions performed on this screen include: < and >, allow you to respectively scroll forwards and backwards through the items on the screen one record at a time. To quickly find the first or last items record, click either the |< or >| key respectively. These buttons appear at the bottom of all Add/Edit dialog tabs providing access to all products, customers, suppliers, etc. ',event)">Navigational Arrows, Save, Find, Delete, Clear, Refresh, Close, and Help.