Add an Option
From Amicus
| Amicus | |
| Add an Option | |
| See Also Submit feedback on this topic | |
| Modules & Other Devices > Modules > Hospitality Module > Meal Order (Core) > Menu > Options > Add an Option |
Glossary Item Box
Add
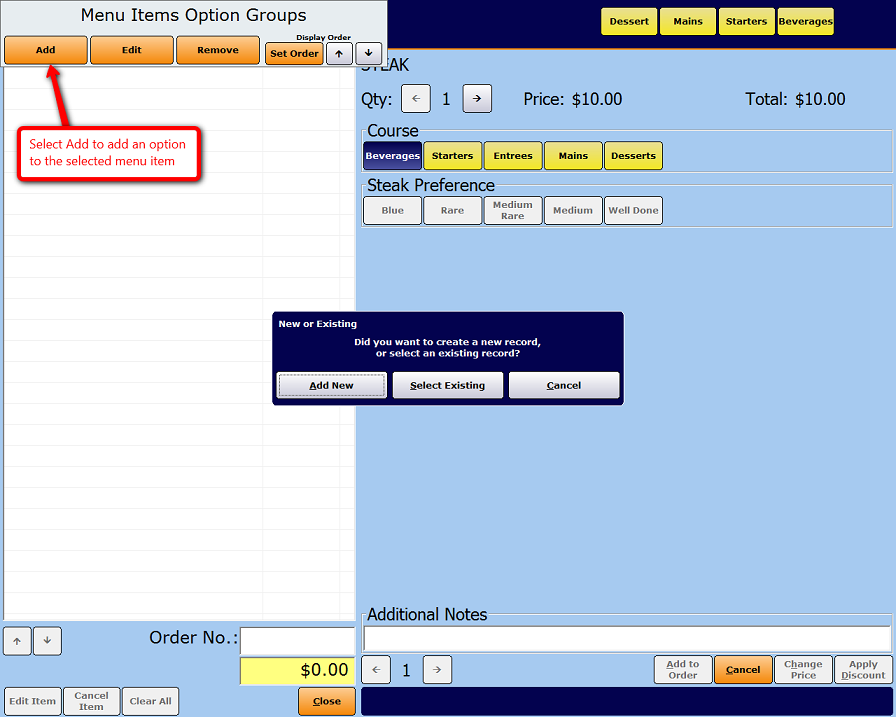
To add an option select the Item then select the Add button on the Menu Items Options Groups screen. A New or Existing dialog will be displayed, enabling the creation of a new, or use of an existing option.
Add New
Select the Add New button to display the Add/Edit Option dialog shown in the figure below. From this screen you can add new options for the selected menu item.
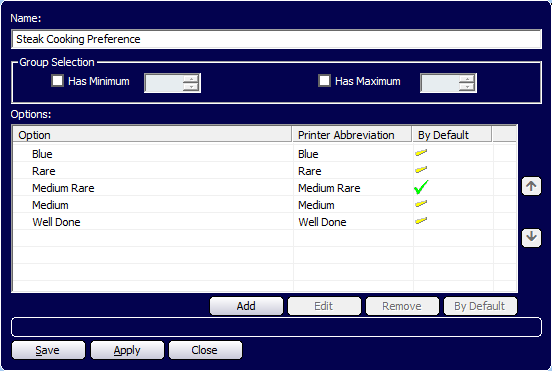
Figure : Add/Edit Options dialog
Name—The name of this options category. This is a mandatory field.
Group Selection
-
Has Minimum—Selecting this checkbox gives the user the choice to add a minimum number of portions that can be added when this option is selected in the Place an Order screen.
-
Has Maximum—Selecting this checkbox gives the user the choice to add a maximum number of portions that can be added when this option is selected in the Place an Order screen.
Options—This is the product in NBS Amicus that will be used for this option. There are several buttons that help with managing options:
Add—Select this button to display the New or Existing dialog shown that enables the creation of a new, or selection of an existing option.
-
Add New—Select this button to display the Add/Edit Options dialog.
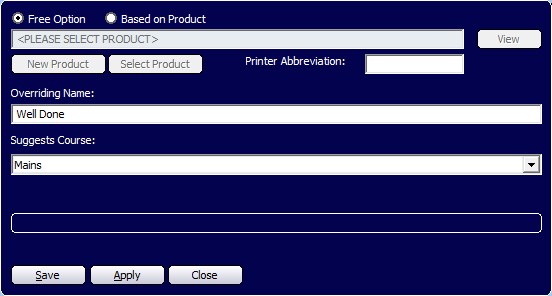
Figure : Add/Edit Options dialog
The Add/Edit Options dialog is used to add or edit an option. It has the following fields:
-
Free Option—This indicates that this option does not have a product associated with it and is therefore free. If this option is selected then the overriding name must be entered.
-
Based on Product—This indicates that this option is associated with a product. If this option is selected then the product must be selected.
-
Product—The product controls are used to select a product if one is required. There are several buttons that help with managing products:
-
New Product—Selecting this button will display the Add/Edit Products dialog to allow a new product to be entered. Whenever the Save button is selected on the Add/Edit Products dialog the product selected on the Add/Edit Options dialog will change. Refer to Add/Edit Products for more information regarding products.
-
Select Product—A list of all products in NBS Amicus will be displayed in the Select Product dialog. Select one of these products to add it to the Add/Edit Options dialog.
-
View—This button will display the Add/Edit Products dialog with details of the selected product so that they can be edited.
-
-
Printer Abbreviation—This is the text that will display on the printer when this option is printed. If this is left blank then the product name will be used.
-
Overriding Name—The name that this option will use instead of the product name.
-
These buttons appear at the bottom of the Add/Edit Options dialog.
-
Save—Saves the current data for the selected settings and closes the Add/Edit Options dialog.
-
Apply—Applies the current data for the selected settings and leaves the Add/Edit Options dialog open.
-
Close—Closes the Add/Edit Options dialog. If changes have been made to the information a confirmation dialog will appear asking whether you want to save the changes.
-
Select Existing—Selecting this button on the Option dialog will display the Select Option dialog. Selecting an option will add it to the Options list.
-
Edit—Select one of the products in the Options field and select the Edit button to display the Add/Edit Options dialog.
-
Remove—Select one of the products in the Options field and select the Edit button to display the Remove Item dialog. Information on this dialog is available in the Remove section on page 16.
-
By Default—This button indicates whether the option will be added by default or not.
![]() —Indicates that this option is not chosen by default.
—Indicates that this option is not chosen by default.
![]() —Indicates that this option is chosen by default.
—Indicates that this option is chosen by default.
Up and Down Buttons—These buttons are used to change the display order. When one of these buttons is pressed the list item is moved up or down respectively.
Figure : Options dialog with added options
These buttons appear at the bottom of the Option dialog.
-
Save—Saves the current data for the selected settings and closes the Option dialog.
-
Apply—Applies the current data for the selected settings and leaves the Option dialog open.
-
Close—Closes the Option dialog. If changes have been made to the information a confirmation dialog will appear asking whether you want to save the changes.