


| Amicus | |
| Stock Transfer | |
| See Also Submit feedback on this topic | |
| Key Areas > Stock Control And Products > Stock Control > Stock Transfer |
Glossary Item Box
If your company uses more than just one physical location to conduct its business, for example, you might have a series of retail outlets plus a warehouse, you’ll want to take advantage of the transfer stock functionality that NBS Amicus provides. Entering the products is preferably completed the same day that the transfer is taking place but can be prepared in advance or in arrears. The user requires stock transfer security access to be granted.
To access the Stock Transfer screen, click on Products from the Amicus Toolbar and then click on Transfer Stock. Alternatively, click on Stock Control from the Main Menu and then click on Transfer Stock. Doing either of these options will open up the Stock Transfer screen.
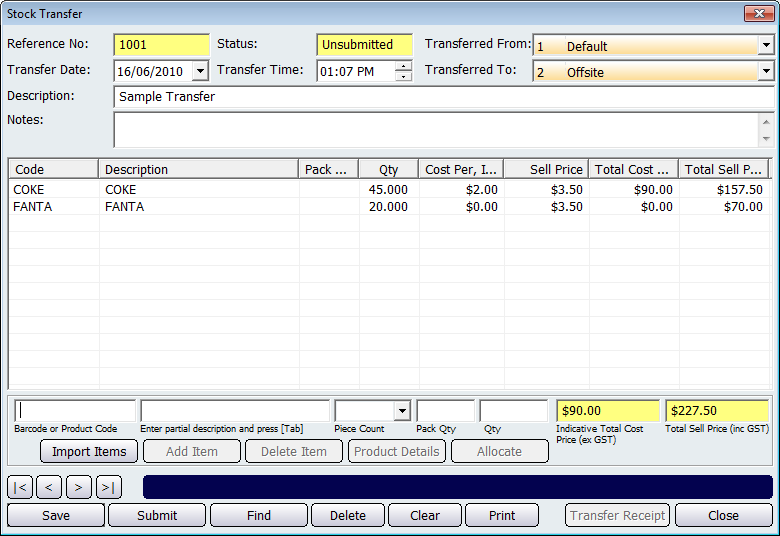
Figure : Recording the transfer of stock between different business locations
Select a location from the Transfer From drop down list box to specify where the stock is to be transferred from, and in a similar fashion, select a destination for the stock from the Transfer To drop down list box. Once you have done this click on the Save button. This will then automatically populate the Reference No and the Status fields and will then allow you to add products to be transferred.
The date and time of transfer of the stock is stored in the Transfer Date & Time fields. NBS Amicus will automatically place information for you in the Status and Reference No. fields to enable you to track any stock transfers which take place.
Enter details about the stock being transferred in the Description and scrollable Notes text boxes.
Use the Bar Code or Product Code field or the Enter partial description and press [Tab] field to specify the products which are to be transferred. From the Select a Product dialog select the required products, enter the Qty and click Add Item. The details of these products will appear in the table shown in the middle of the screen. The information recorded there for each product to be transferred includes its Code, Description, Piece Count, Pack Qty, Qty,
Cost is the price of the item when recieved from the supplier and input a stock receipt in to amicus.
i.e. you recieve x items for $3 and input a stock reciept for that amount. The cost at sale is $3 per item.
',event)">Indicative Total Cost Price (ex GST), Total Sell Price (ex GST).Once you have selected a product to be transferred click on the Add Item button to add it to the stock transfer table. To remove a product from the transfer, select it from the table and then click on the Delete Item button.
In addition you can import products stored in a CSV file by clicking Import Items, Refer to CSV Importing for more information.
To view the details of a product, select it from the table and then click on the Product Details button. This will then open up the Add/Edit Products Details tab with the selected products information populated.
Stock Allocations
To allocate stock that is being transferred to a customer, select the product from the table and click on the Allocate button. This will then open up the Allocate Products To Quotes screen.
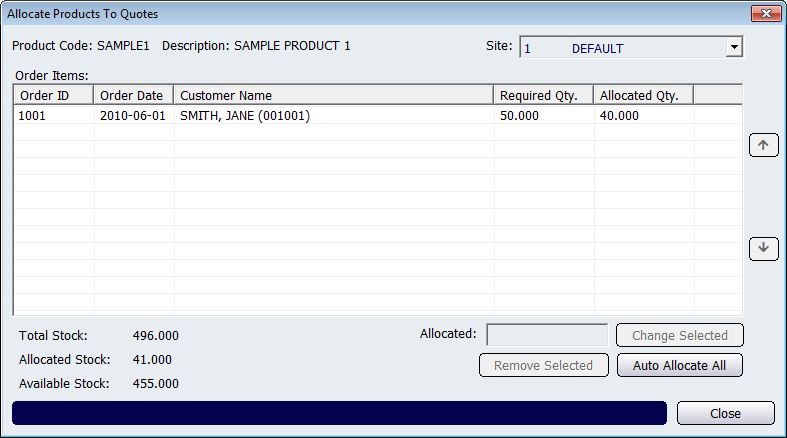
Figure : Allocate Products to Quotes screen
To allocate stock to the customer, select them from the list and then enter the allocated amount into the Allocated field. If you want to change the amount of stock allocated for the customer, enter the revised allocation into the Allocated field and then click on the Change Selected button. This screen also allows you to remove an allocation. To do this select the customer from the list and then click on the Remove Selected button. This will then remove the selected stock from being allocated to the customer. If you want to allocate all of the stock to the customer, then select them from the list and click on the Auto Allocate All button.
Click on the Close button to exit the Allocate Products To Quotes screen.
Buttons
Buttons that perform actions on the Stock Transfer screen include; < and >, allow you to respectively scroll forwards and backwards through the items on the screen one record at a time. To quickly find the first or last items record, click either the |< or >| key respectively. These buttons appear at the bottom of all Add/Edit dialog tabs providing access to all products, customers, suppliers, etc. ',event)">Navigational Arrows, Save, Find, Delete, Clear, Close, Submit, and Print.
Transfer Receipt: Opens the Stock Transfer Receipt screen which provides a list of each item that has or is being transferred.