


| Amicus | |
| Manage Bookings | |
| See Also Submit feedback on this topic | |
| Modules & Other Devices > Modules > Bookings Module > Manage Bookings |
Glossary Item Box
The Manage Bookings screen offers you a centralised point where you can manage and control the bookings that are taking place at your business. To access the Manage Bookings screen click on Booking Module from the Amicus Toolbar and then click on Manage Bookings. Doing this will open up the following screen.
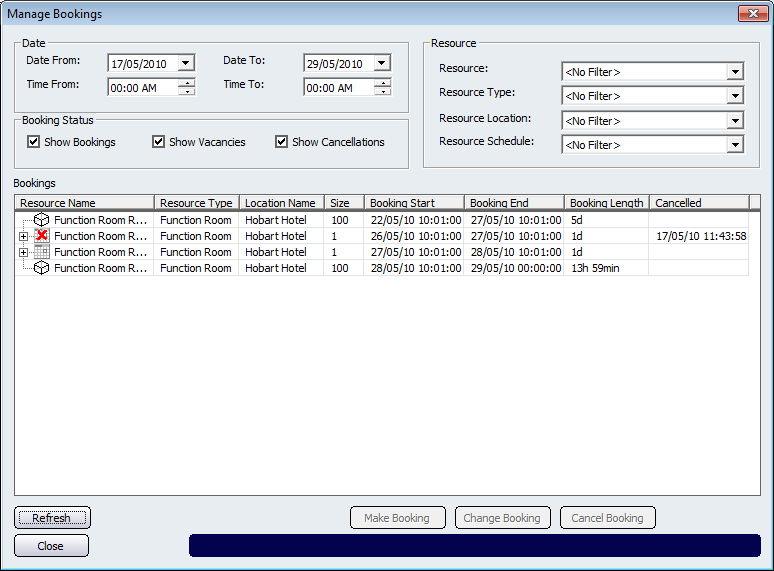
From this screen you can control which bookings are shown based on the filters that you have chosen from the top of the screen. These filters are date filters such as, Date From, Date To,
Only shows the records that start from this time
',event)">Time From, Time To. The Resource dropdown boxes are based on the Resource records that have been created. The Resource filters are: Resource, Resource Type, Resource Location, and Resource Schedule.You can also filter the table based on the Booking Status. Click on the Show Bookings tick box to list resources that have been booked, if you would like to show resources that are vacant then click on the Show Vacancies tick box. Click on the Show Cancellations tick box to populate the table with bookings that have been cancelled.
Once you are satisfied with your filters, click on the Refresh button at the bottom left hand side of the screen to re-populate the screen with the records that have matched your filters.
To make a booking click on the Resource within the table and then click on the Make Booking button. Doing this will open up the Make Booking dialogue.
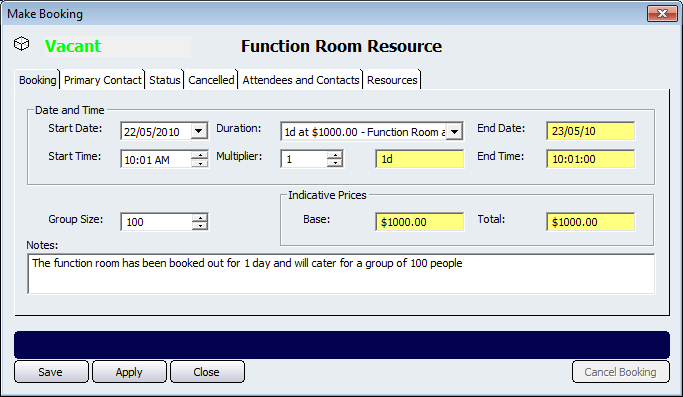
This tab displays information such as the Start Date and Start Time on which the resource will be booked and the Duration of the booking. The duration settings are able to be configured from the Add/Edit Resource Price Group. The Multiplier field allows you to either add or minus the duration time. The End Date and End Time, fields are automatically populated (hence them being yellow) based on the duration. The Indicative Prices are also automatically populated based on the price of the resource. The Group Size button allows you to configure how many people will be attending the booking. The group size must not exceed the capacity of the resource being booked. You will be unable to make a booking for the resource if the group size exceeds the capacity. Click in the Notes field to enter any extra information regarding the booking.
The next tab on the Make Booking screen is the Primary Contact screen.
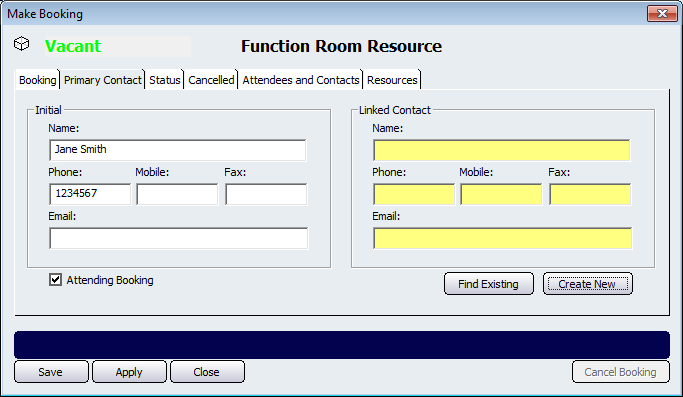
The Primary Contact screen is used to provide information in regards to who is the first point of contact is for the booking. If there are any issues with the booking, then this person will be the first to be contacted. Clicking on the Find Existing button will open up a screen that contains all the customers that exist in your database. The Create New button will open up the Add/Edit Customers Details Tab where you can then add a new customer into your database.
Click on the Status tab to state when the group has arrived and departed.
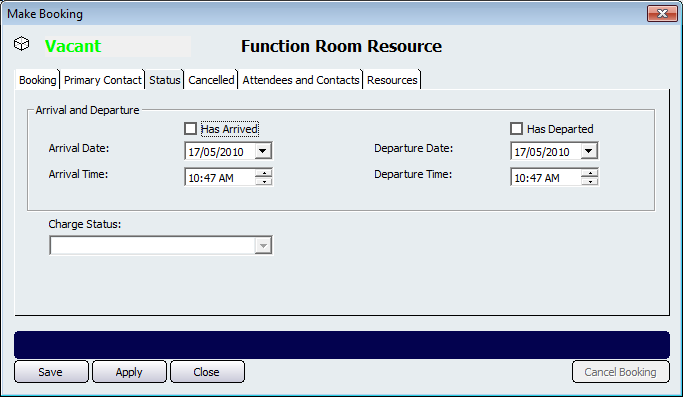
Click on the Has Arrived tick box to set that the group has arrived. When the group has departed click on the Has Departed tick box.
Click on the Cancelled tab to cancel the selected booking.
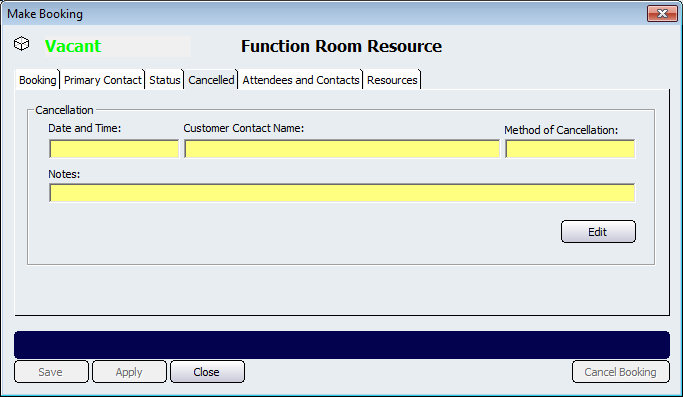
Click on the Edit button to bring up the Enter Cancelled By screen.

From this screen you can enter the Customer Contact Name, the Method of Cancellation and any Notes that accompany the cancellation. Once you have done this click on the Ok button to cancel the booking.
The next tab on the the Make Booking screen is the Attendees and Contacts tab.
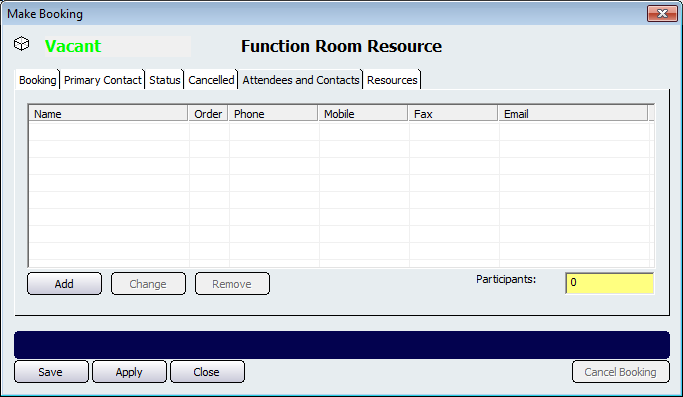
This screen is used to add and edit the people that will be attending the booking. Click on the Add button to add an attendee to the booking. To change a customers details click on the Change button. To remove a customer from attending the booking click on the Remove button.
The final tab on the Make Booking screen is the Resources tab.
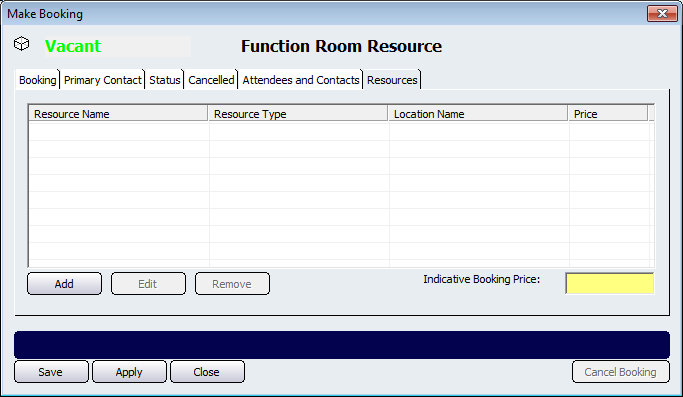
From this screen you can add extra resources to the booking. To do this click on the Add button. Click on the Edit button to edit the resource. Click on the Remove button to remove the resource from the booking.
Buttons that perform actions on the Make Booking screen includes: Add, Apply, Close. The Cancel Booking button will bring you to the Cancellation tab.
Click on the Close button on the Manage Bookings screen to close the screen.