Print Labels and Barcodes
From Amicus
| Amicus | |
| Print Labels and Barcodes | |
| Submit feedback on this topic | |
| Key Areas > Stock Control And Products > Stock Control > Print Labels and Barcodes |
Glossary Item Box
The Print Labels & Barcodes function enables you to print labels and barcodes for all of your products. To access this function, click Stock Control on the Main Menu followed by Print Labels & Barcodes. Alternatively, click on Products from the Amicus Toolbar followed by Print Labels & Barcodes and then click on A4 Sheet Labels. Doing either of these options will bring up the Print Labels & Barcodes screen.
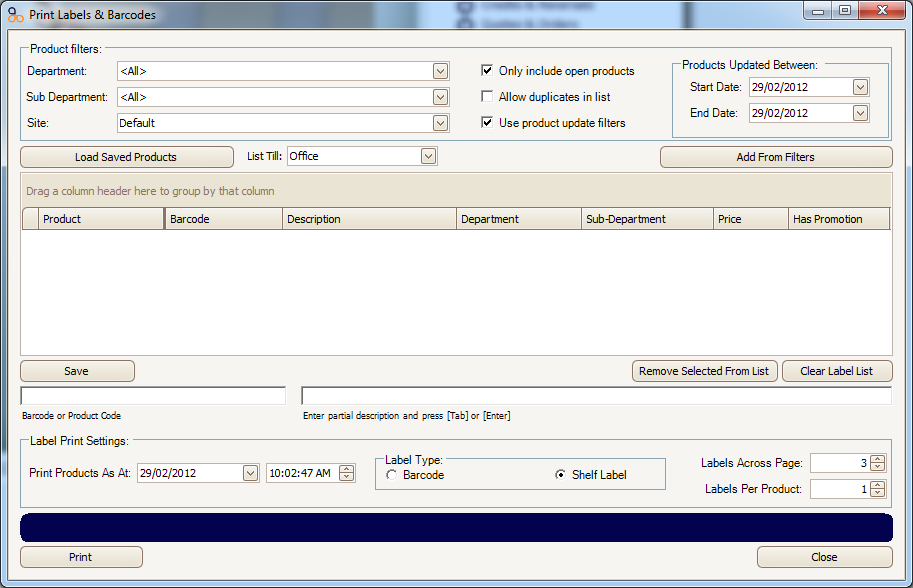
Figure : Using the NBS Amicus system, you can print labels and barcodes for all your products
Note: the printed barcodes created by NBS Amicus conform to Code 39. This is a standard used globally in a large number of diverse businesses. Code 39 is defined in American National Standards Institute (ANSI) standard MH10.8M-1983. The Code 39 character set contains the digits 0-9, the letters A-Z (upper case only), and the following symbols: space, minus (-), plus (+), period (.), dollar sign ($), slash (/), and percent (%). A special start/stop character is placed at the beginning and end of each barcode. The recommended maximum length of barcodes created using Code 39 is 25 characters.
You can select a Department or Product Type, or you can apply a further filter of Sub-Department or Series. If you click the Add From Filters button at this stage, items will be added to the list for all products that have been assigned the selected department/product types and sub-department/series. You can then click Print to print all products currently in the list.
You can also specify a Start Date and an End Date so that only products which have been modified within the specified period will be selected for label & barcode printing. By default, this will include all products changed today.
The Site drop-down list is used to determine the prices that should be printed. It should refer to the site where the labels will be used.
If you need to keep a list for later, you can save the contents of the list on screen at any time by clicking the Save button. Items in the on-screen will be saved to your till list. You may reload these items at any time by selecting the till you wish to load from the List Till drop-down list and clicking Load Saved Products. To permanently remove items from your list, simply click Clear Label List to clear all items, or highlight one or more of them in the list of items and click Remove Selected From List. If any items you are removing belong to a persistent till list, you will be asked if you want to permanently remove them from the list. Items are also automatically removed from a till list when printed.
Another option is to print labels and barcodes for specific products. To do this, enter a barcode or product code into the Barcode or Product Code field, or alternatively, enter part of a product’s description into the Enter partial description … field and press Enter or Tab on the keyboard. If NBS Amicus can find any information that matches the information you entered, NBS Amicus will either return the product information to the Print Labels & Barcodes screen, or NBS Amicus will display the Select A Product screen.
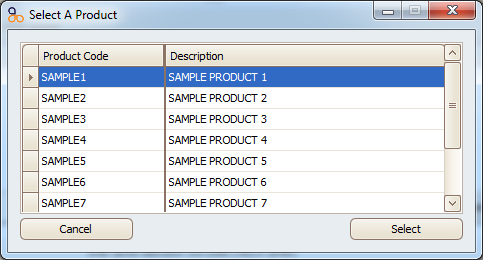
Figure : Select the product for which you want to print labels and barcodes
From this screen, you can select your product by highlighting the appropriate line and pressing Select.
Once you have selected all the products you wish to print labels and barcodes for, you can click the Print button on the Print Labels & Barcodes screen. And to change the print options to suit the format of labels you are using, you can change the contents of the Number of Labels Across the Page field and/or the Number of each Label to Print field.
You can modify the information printed on your labels by accessing the NBS Amicus File menu and clicking Preferences then All Registers... and viewing the Labels tab. From here you can add or edit label layouts, allowing you to adjust the label size, spacing and contents options, as shown on the screen below. The top left corner shows a live preview that will update as you make changes.
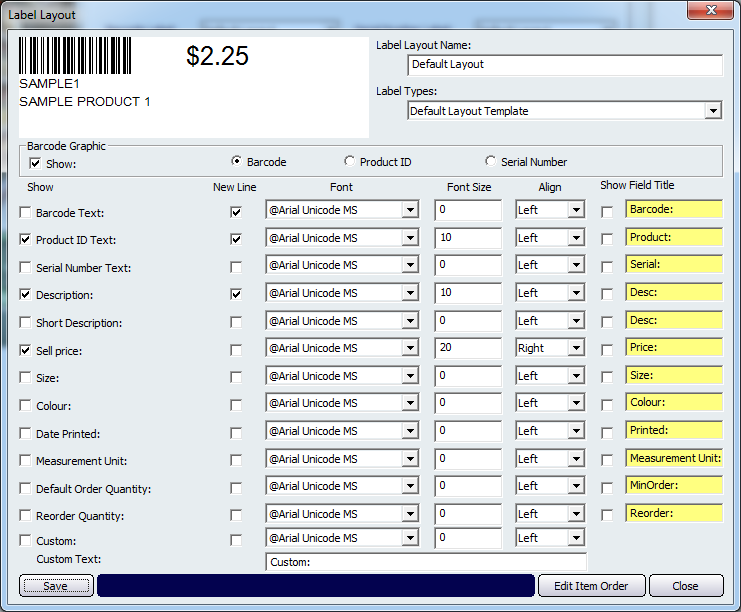
Figure : Use the different options on this screen to format the labels
Additionally, you may also add or edit label types which allows you to adjust margins used on labels. Numbers on the image indicate the corresponding field. For example, 9 indicates the top spacing distance.
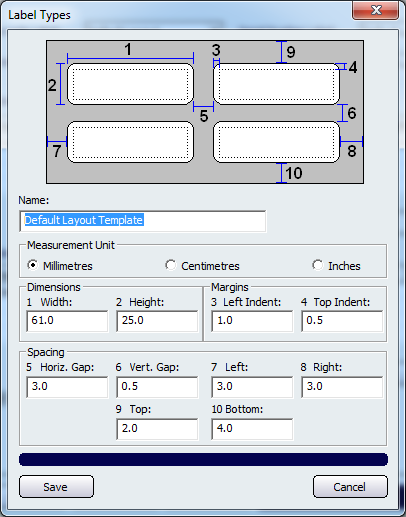
Figure : Use the different options on this screen to adjust label margins
Print Product Labels
Amicus also allows you to print thermal labels for your products. To access the Print Product Labels screen click on Products from the Amicus Toolbar, click on Print Labels and Barcodes and then click on Thermal Labels. Doing this will bring up the following screen.
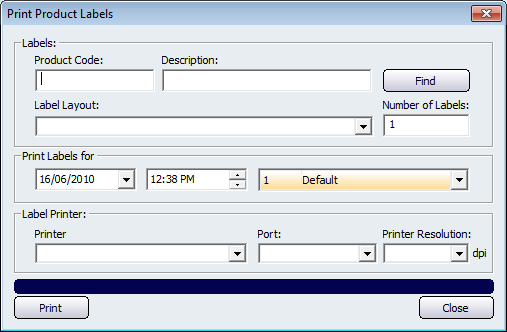
Figure : Print Product Labels screen
There are multiple ways in which you can add a product to the Print Product Labels screen. If you know the code on the product then you can enter it directly into the Product Code field and press either Tab or Enter. You can also enter part of the description of the product in the Description field and when you press Tab or Enter the Select a Product screen will appear that will list all of the products that match what you entered into the description field. Clicking on the Find button will bring up the Select a Product screen with a list of all the product that exist in your database. Select the product from the list and click on the Select button and this will populate the screen with the selected product.
Click on the Label Layout dropdown box to select a layout for the label and enter the number of labels being created into the Number of Labels field.
The Print Label For section allows you to configure the Date and Time and the Site, the labels are being printed for.
Select the Printer, Port, and Printer Resolution and then click on the Print button to print the labels for the selected product. Click on the Close button to exit the Print Product Labels screen.