Products Hire Tab
From Amicus
| Amicus | |
| Products Hire Tab | |
| See Also Submit feedback on this topic | |
| Key Areas > Stock Control And Products > Stock Control > Product Hiring > Products Hire Tab |
Glossary Item Box
The Hire Tab on the Add/Edit Products screen allows you to manage and control the hiring of your products and to configure each hire product in a way of your choosing. To access the Hire Tab click on Products from the Amicus Toolbar, click on Add/Edit Products and then navigate your way to the Hire Tab. Alternatively you can select Stock Control then Add/Edit Products from the Amicus Main Menu and then select the Hire Tab.
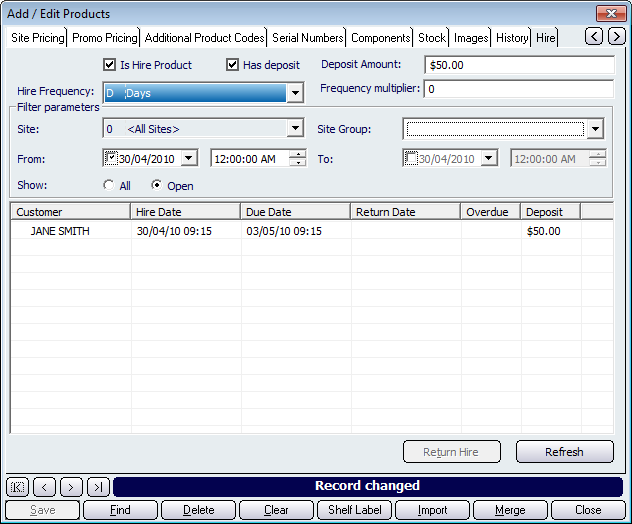
To make a product a hire product, click on the Is Hire Product checkbox and this will make the currently selected product a hire product (note: a product must be selected from the Add/Edit Products Details Tab for this checkbox to be availible). If you want a deposit each time the product is hired out then click on the Has Deposit checkbox. Once you have done this click on the Deposit Amount field and add the deposit required for each time the product is hired. (note: if you have configured, from the Systems Tab for All Tills, the deposit to be a percentage of the price unit cost, then leaving the Deposit Amount field empty will automatically calculate the deposit as being a percentage based on your settings in the Systems Tab).
The Hire Frequency dropdown list allows you to configure the time lengths that each product can be hired out. The lengths of time can either be Hours, Days, or Fixed. The Frequency multiplier is used to multiply the Hire Frequency time lengths. For example, if the Hire Frequency was set to Days and the Frequency multiplier was set to 2 then the minimum amount of hire time would be two days and the minimum increment amount would be 2 days.
The Filter Parameters allows you to configure to only show the hires that meet the filters that you set. The Filter Parameters are: Site, Site Group, From, To, show All or only Open records.
Once you have set the parameters click on the Refresh button and this will populate the table with the records that match the filters. The fields in this table are: Customer, Hire Date, Due Date, Return Date, Overdue, and
Money given during the processing of the hire to ensure that the product is returned in good condition.
',event)">Deposit.When a customer has returned a product that has been hired, click on the customers record (the selected record will then highlight as blue) and then click on Return Hire button. This will the bring up the Return Hire screen.
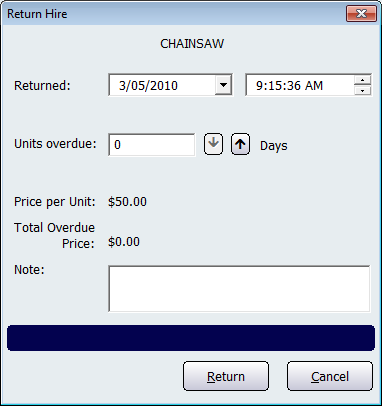
Once you are on this screen, you can select the date and time the product was returned. If the product is returned after its due date then the Units Overdue field will automatically populate with the amount of units the product is overdue. Click on the Return button to set the product as being returned. This will then return you to back to the Hire Screen.
Buttons that perform actions on the Hire Tab screen include: < and >, allow you to respectively scroll forwards and backwards through the items on the screen one record at a time. To quickly find the first or last items record, click either the |< or >| key respectively. These buttons appear at the bottom of all Add/Edit dialog tabs providing access to all products, customers, suppliers, etc. ',event)">Navigational Arrows, Save, Find, Delete, Clear, Shelf Label, Import, Merge, and Close.
 See Also
Amicus Administration User GuideHire Tab
Managing Hires