


| Amicus | |
| Keyboard Settings | |
| See Also Submit feedback on this topic | |
| Preferences > This Register > Devices in This Register > Keyboard Settings |
Glossary Item Box
The Keyboard Settings section on the Devices tab allows you to assign keys to certain functions for this register. This collection of keys and assigned functions is known as a Keyboard Map. Keyboard Maps are especially useful if you are using a programmable keyboard on this register, where you can assign individual keys for any function.
NBS Amicus allows you to have multiple Keyboard Maps. To select the specific Keyboard Map you wish to use, select an entry from the Map Name list box.
To create a new Keyboard Map, or to update an existing one, click the Manage Mappings button on the Devices tab. This will open the Key Mapper screen shown below.
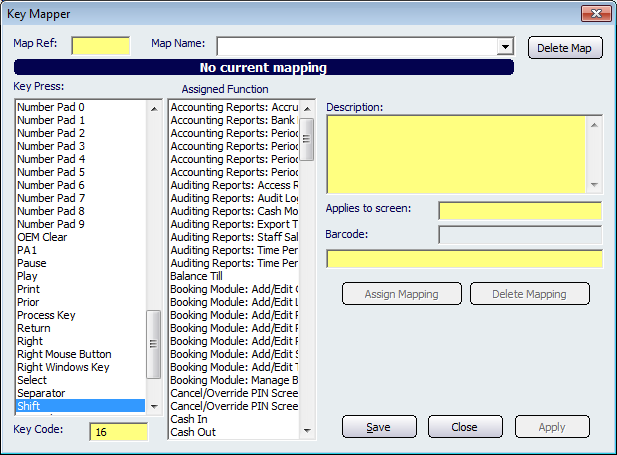
Figure : Use Key Mapper to set up a new keyboard mapping for your register
Type the name of your new Keyboard Map into the Map Name field, or alternatively, if you are editing an existing Keyboard Map, select its name from the entries in the Map Name list box.
Select an entry from the Key Press field. This field contains the available key mappings to which functions can be assigned. Alternatively, you may simply press the key you wish to assign a function to, and the associated code for that particular key press will be displayed in the Key Code field. Another option is to scan a Bar Code that you wish to assign a function to. When you do, its details will be displayed in the Bar Code field.
Next, select the function that you wish to assign to the selected key press from the Assigned Function field. The Description field automatically displays a description of the function that you are about to assign. In a similar fashion, the Applies to screen field displays the details of which screen this function applies to. For example, selecting the sale: Apply Discount entry in the Assigned Function field will cause the word sale to appear in the Applies to screen field.
If you wish to keep this mapping, click the Assign Mapping button to save this individual key mapping.
To delete this individual key mapping, click the Delete Mapping option.
When you have finished mapping your keyboard, click the Save button to save and close the Key Mapper screen.
The Apply option will save and apply your keyboard mappings without closing the Keyboard Mapper screen.
When you click the Close button, and changes have been made to the information on this screen, a confirmation screen will appear asking whether you want to save the changes. The Keyboard Mapper screen will then be closed.
To delete an entire keyboard map, select it from the available keyboard maps listed in the Map Name list and click the Delete Map button.
See Also
Amicus Administration User GuideAdd Key Maps to Product Pad