


| Amicus | |
| Toolbar | |
| Submit feedback on this topic | |
| Preferences > This Register > Devices in This Register > Toolbar |
Glossary Item Box
The Toolbar section of the Devices tab allows you to create, manage and define a default toolbar for this register, such as the toolbar shown below:

Figure : Set up a default toolbar for a register
To choose a default Toolbar for this register, select an entry from the Default Toolbar list.
Creating a Toolbar – To create and manage toolbars, click the Configure Toolbar button to open the Toolbar Configuration screen shown below:
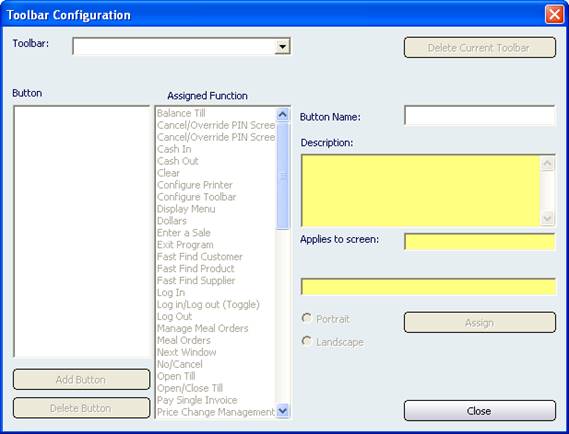
Figure : Customize NBS Amicus by creating your own toolbars
To create a new Toolbar, type a name into the Toolbar field. Alternatively, to edit an existing Toolbar, select its name from the list of available toolbars in the Toolbar list box.
Select a function to assign to a button in the new toolbar from the list of entries in the Assigned Function field. The Description field automatically displays a description of the function that you are about to assign. In a similar fashion, the Applies to screen field displays the details of which screen this function applies to. For example, selecting the sale: Apply Discount entry in the Assigned Function field will cause the word sale to appear in the Applies to screen field.
Type a name for your new toolbar button in the Button Name field, and click the Add Button option to add this function to your toolbar.
Select the Portrait radio button for the buttons in the Toolbar to be displayed down the screen or select the Landscape radio button for the buttons in the Toolbar to be displayed across the screen.
To remove a button from a Toolbar, select the Button to be deleted from the Button list field, and click Delete Button.
To delete an entire toolbar, select the Toolbar from the list of available toolbars in the Toolbar list box, and click Delete Current Toolbar.
To save and close your selections, click the Close button.