How to apply discounts during sale time
From Amicus
| Amicus | |
| How to apply discounts during sale time | |
| See Also Submit feedback on this topic | |
| Key Areas > Sales > Other Screens & Specialised Dialogs > How to apply discounts during sale time |
Glossary Item Box
Introduction
Although Amicus can handle many different types of automated discounting models, it still remains relevant for many businesses and industries to manually apply discounts to sale items or sales. In this article, you will learn the various ways in which a discount can be manually applied.
-
Method 1 - Using the pre-defined discount buttons - By default, Amicus allows three pre-defined discount buttons which can be configured to reduce by a percentage amount of your choosing (discount), or increase (surcharge). To apply a discount of this type, simply Click/Select the desired button. When a sale item, or items are selected (see image below), then the effect will apply only to the selected items. When no sale items are selected (see image below), then the effect will apply to the entire sale. Where an affect has been applied to an entire sale, the effect will continue to apply to newly added items, until the effect is turned off. Refer to the Discounts article to learn more about these buttons.
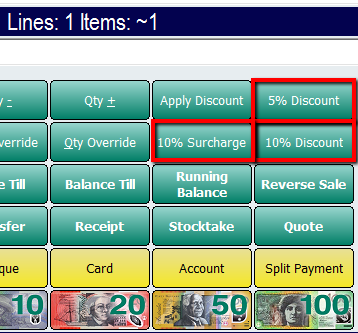
Figure : Sale Discount Buttons, showing pre-defined buttons.

Figure : Sale Screen Extract, showing a selected sale item.

Figure : Sale Screen Extract, showing an unselected sale item.
-
Method 2 - Using the "Apply Discount" button - To Access this dialog, simply Click/Select the "Apply Discount" button, or by pressing the user defined key that links to the "Sale: Apply Discount" action (refer to the Key Mapping article for more information) In regards to selected and unselected sale items, this button works in the same way. Unlike the pre-defined buttons however, this button will allow the user to specify a specific percentage to reduce or increase the value(s) by. It does this by presenting the user with an "Enter Discount" dialog. To use this dialog, simply toggle between the "Discount" and "Surcharge" radio buttons, apply your required value and select a discount type (if applicable). You may also optionally choose to toggle the Discount effect on or off for the entire sale using the "Apply Discount to All Sale Items" checkbox. Note that all fields in yellow are pre-filled with information and are read only.
Figure : Enter Discount Dialog, showing key components.
Configuration Requirements
-
None
Additional Preferences / Information
-
It is Possible to assign a keyboard shortcut to this "Enter Discount" dialog, using the "Sale: Apply Discount" action. Refer to the section on Keyboard Settings for more information.