Enter Supplier Invoices
From Amicus


| Amicus | |
| Enter Supplier Invoices | |
| See Also Submit feedback on this topic | |
| Key Areas > Suppliers > Common Tasks > Enter Supplier Invoices |
Glossary Item Box
The steps involved in using the Receive Products (Enter Supplier Invoices) screen are essentially the same as using the Enter Invoice Sale screen (refer to How to Make a Sale Using the Invoicing Screen), except that you are purchasing items and not selling them.
To enter an invoice, click Suppliers on the Main Menu followed by Enter Supplier Invoices. You can also access the Receive Products screen by clicking on Suppliers from the Amicus Toolbar followed by Receive Products. Alternatively, click Stock Control on the Main Menu followed by Receive Products.
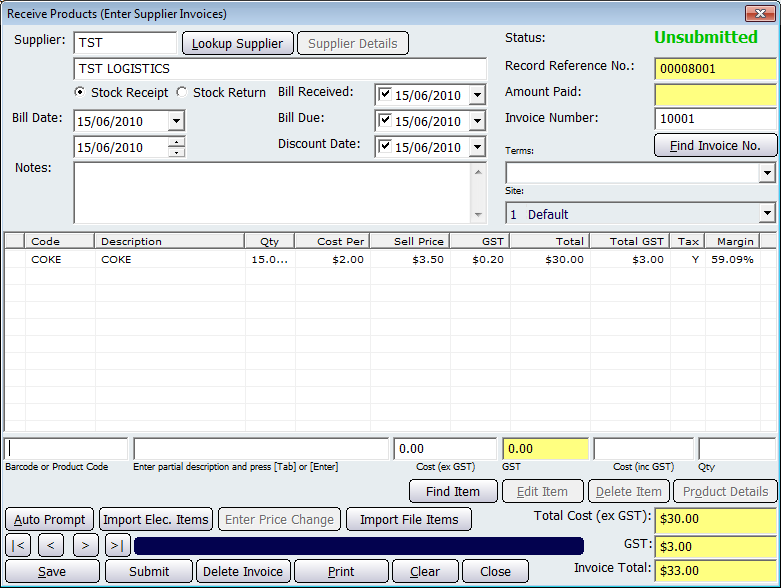
Figure : Creating a supplier invoice
Select a Supplier
By default, you will be prompted to select a supplier number for this invoice. If you know the supplier number, enter it in the Supplier field.
If you want to bring up a list of all suppliers in NBS Amicus, click Lookup Supplier. This will bring up a list of suppliers that exist in your Amicus database. Select the supplier from the list and then click on the Select button to select the supplier. The Supplier Details button allows you to edit the master supplier file for the selected supplier. Be aware that any changes made to the supplier details in this way will affect all associated records in NBS Amicus.
Enter the date of this invoice in the Bill Date field. This date is as per the suppliers invoice.
Enter the Invoice Number (or the reference number) from the supplier invoice.
Enter the date that you received the invoice in the Bill Received field. If the tick box is not ticked then this field will be greyed out and NBS Amicus will assume that you have not yet received this supplier invoice.
The Bill Due field is used to record the due date for this supplier invoice. If the tick box is left unchecked, NBS Amicus will display this invoice as outstanding.
Enter Products
Enter the bar code or the product code of the product in the Bar Code or Product Code field. NBS Amicus allows several methods of entering this information.
-
You can either use a bar code scanner and scan the products bar code or product code; or
-
You can manually type the products bar code or product code; or
-
In the Bar Code or Product Code field, you can type the beginning of a product or bar code, followed by an asterisk (*) and a window will open up containing all matching products. You can then select the product you want from this list; or
-
You can also search for the product by entering a partial description in the Enter partial description field and clicking Find Invoice Item or by pressing Enter or Tab.
Once you have selected the product you wish to buy, you will be prompted to edit the unit cost excluding GST for this product. This is stored in the Cost (ex GST) field. By default NBS Amicus will display the current unit cost for this item. If the cost is correct, press either Enter or Tab to accept this cost. Alternatively you may edit this cost by simply typing the new unit cost and then pressing either Enter or Tab to save your typed details.
NBS Amicus will automatically calculate the GST amount per unit. If this is correct, press either Enter or Tab to accept this amount. Alternatively you may edit this cost by simply typing the new unit GST and then pressing either Enter or Tab to save your typed details. NBS Amicus calculates the GST as one eleventh (1/11) of the cost including GST to four (4) decimal places, so occasionally the rounding of the GST amount may vary by one cent from the amount displayed on supplier documentation.
If you wish the system to calculate the cost excluding GST and the GST amount per unit from the cost including GST, enter the cost including GST into the Cost (inc GST) field. Press either Enter or Tab to save this amount.
You will then be prompted to enter the quantity, or number of units, of the product that you wish to buy. Once the information has been entered, press either Enter or Tab.
The Edit Item function allows you to manually edit some details about the product, such as the quantity or cost. Depending upon the options stored for the individual product, enter the number of units of the product being purchased and the unit cost for each product.
The Product Details button allows you to open the master record for the product and change the details as necessary. Any changes made to the master product record will update any associated records in the NBS Amicus system.
Enter all the products for this supplier invoice in a similar way. As you enter each item, it will appear in the purchase list.
If you enter a product of the same type and price of a product that you have already entered, NBS Amicus will increase the quantity of the product that is already in the supplier invoice.
If you enter a product of the same type but you wish to buy this product at a different price than one previously entered, the new product will be entered on a new, separate line.
To delete an item altogether, select the relevant line from the purchase list and click Delete Item.
To clear or cancel a supplier invoice, select the Clear option to delete all information currently entered for this supplier invoice.
The running total of the invoice is displayed in the Total Cost (ex GST), GST and Invoice Total fields.
Once all items have been entered into the supplier invoice, and all costs and quantities are correct, the next step is to Save the supplier invoice and to Print it out to send to your supplier.
Once the invoice has been submitted products can be edited through the Price Summary dialogue, click Enter Price Change Screen to change price information, refer to Price Summary for further information.
Importing Items
Click Import Elec. Items to open the Import Electronic Items wizard. Refer to Import Information for further information.
If you have been supplier with a .CSV file click the Import File Items to import invoice items stored in this file. Refer to CSV Importing for more information.
Record controls
Buttons to perform actions on the displayed dialogue includes; < and >, allow you to respectively scroll forwards and backwards through the items on the screen one record at a time. To quickly find the first or last items record, click either the |< or >| key respectively. These buttons appear at the bottom of all Add/Edit dialog tabs providing access to all products, customers, suppliers, etc. ',event)">Navigational Arrows, Save, Find Item, Edit Item, Product Details, Delete Invoice/Item, Clear, Import File Items, Close, Print, Submit and Auto Prompt',event)">Auto Prompt Entry.