


| Amicus | |
| Add Areas and Tables | |
| See Also Submit feedback on this topic | |
| Modules & Other Devices > Modules > Hospitality Module > Meal Order Table Service > Areas > Add Areas and Tables |
Glossary Item Box
To add an Area or Table to your table service screen select the Add button and this will display the Area or Table dialog. This dialog allows you to add a new area or table to your table service screen. Note: You can only add tables into areas. If no areas exist then you must first create an area in which the tables will be located.
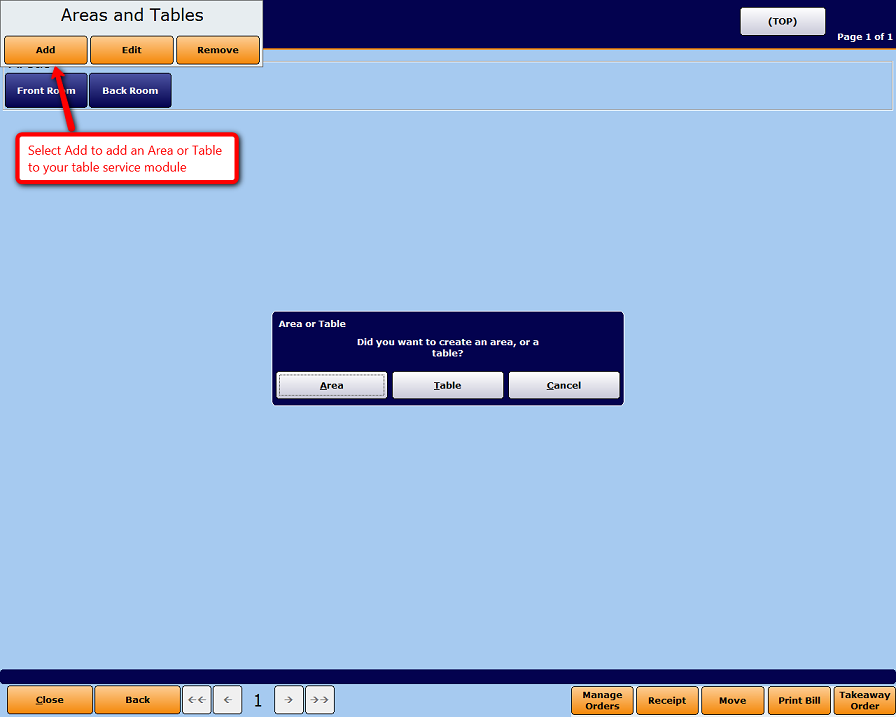
Figure : Area or Table dialog
Areas
New areas can be created by selecting the Area button from the Area or Table dialogue. Selecting Area will display the Add/Edit Area dialog.
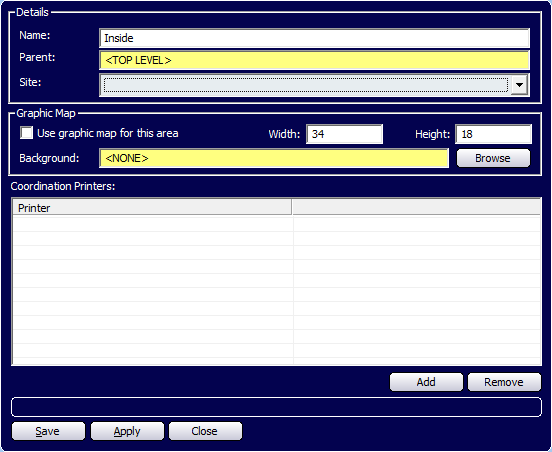
Figure : Add/Edit Area dialog
The details of the new area can be entered into this screen.
Name—The name of this area. This is a mandatory field.
Parent—Enter the parent area for the new area. In this example there is no parent so ‘<TOP LEVEL>’ is entered to inform you that the area being created is at the top level.
Site—The site where the area is located.
Graphical Map—The graphical map is a table allocation & arrangement interface. Refer to Graphical Map.
Select the Use graphical map for this area checkbox to enable the graphical map screen, in addition enter the Height and Width of the area, you can interpret the unit measurements in your own way, however we recommend that you use Metres or Feet.
Background—The background section allows you to add a picture to the background of the area. To add a picture click on the Browse button. This will then open up an Image Selection dialogue where you can select the background picture from the list of pictures that exist in your database.
Coordination Printers—The printer that prints the orders for items in this area. A printer can be included using the Add button or cleared using the Remove button.
These buttons appear at the bottom of the Add/Edit Area dialog.
Save—Saves the current data for the selected settings and closes the Add/Edit Area dialog.
Apply—Applies the current data for the selected settings and leaves the Add/Edit Area dialog open.
Close—Closes the Add/Edit Area dialog. If changes have been made to the information a confirmation dialog will appear asking whether you want to save the changes.
Added Areas
When areas have been added to the Add/Edit Areas/Tables screen they are displayed as blue buttons in a group called Areas. The parent area will be displayed in the header.
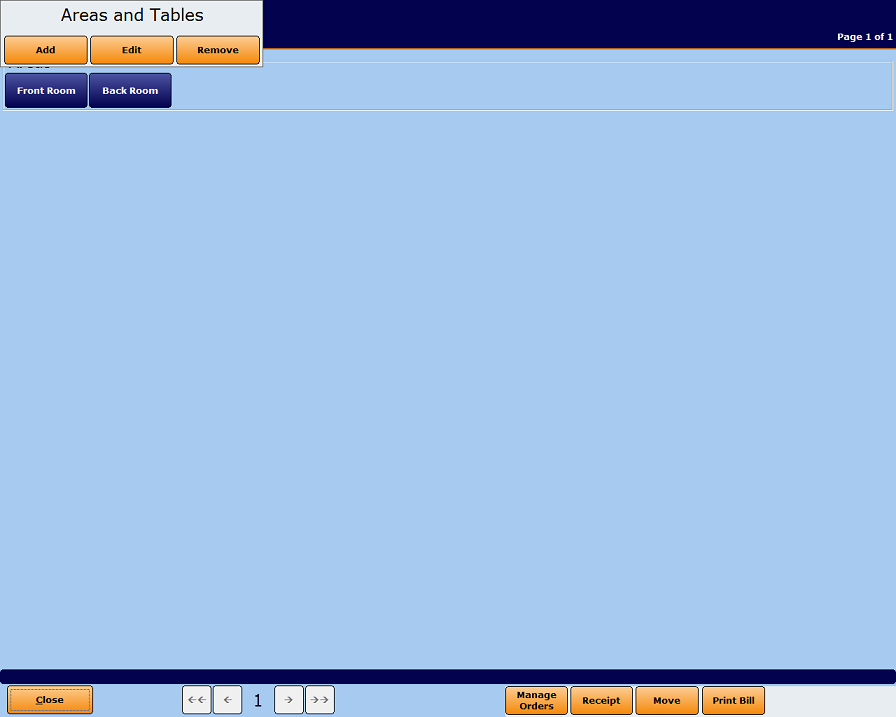
Figure : Areas added to Inside area
Add/Edit Area/Tables screen buttons
These buttons will appear on the Add/Edit Areas/Tables screen.
Bread Crumbs—Select any of the bread crumb buttons to return to the parent screen.
Back—Select this button to return to the previous screen.
Close—Select this button to close the dialog.
Page Navigation—Navigation buttons appear when there are too many areas or tables to all fit on the Add/Edit Areas/Tables screen. These buttons allow the user to go to the first, previous, next and last page.
Tables
New tables can be created by selecting Table from the Areas and Tables dialog. Doing this will open the Add/Edit Table dialog.
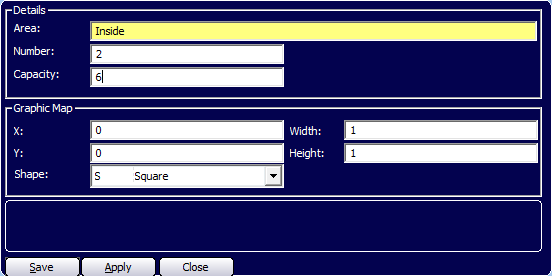
Figure : Add/Edit Table dialog
The details of the new table can be entered into this screen.
Area—The name of the area the table belongs to. This field must have an area name.
Number—The table number.
Capacity—The maximum number of people who can sit at this table.
The Graphical Map details only affect the dimensions of the tables displayed on the Graphical Map if it has been enabled.
X,Y—The X and Y coordinants of the table displayed on the grid.
Width, Height—The width and height of the table.
Shape—The tables shape, you can choose from either square or circular shapes.
These buttons appear at the bottom of the Add/Edit Table dialog.
Save—Saves the current data for the selected settings and closes the Add/Edit Table dialog.
Apply—Applies the current data for the selected settings and leaves the Add/Edit Table dialog open.
Close—Closes the Add/Edit Table dialog. If changes have been made to the information a confirmation dialog will appear asking whether you want to save the changes.
Added Tables
When tables have been added to the Add/Edit Areas/Tables screen they are shown as green buttons in a group called Tables. The parent area will be displayed in the header.

Figure : Tables added to Back Room area