Columns for Instance Lists
This grid allows you to specify column details used by the standard shipped instance lists.
If you have created your own snap-in instance list (an option for Windows applications), then none of the details specified in this grid apply.
Use these values to control how instance list values are displayed:
- Column Sequence: Zero here means that this column will not be displayed. Any other value determines where this column will be displayed relative to other displayed columns from left to right.
- Column Type: This is the identifier that the Framework uses to determine which column to put a value into when it extracts information from the instance list. Additional columns must be used contiguously within type (i.e.: you can't use additional alphanumeric columns 1, 4 and 5 in you programs. You must use 1,2 and 3, even if you choose to display just columns 1 and 3).
- Column Caption: This is the heading that will be shown at the top of this column on the instance list.
- Column Width: This is the percentage width that this column will have when displayed in the instance list. A zero value means use the remainder of the instance list. If you don't want a column to appear, set its Column Sequence to zero.
- Column Decimals: This is the number of decimal places that will be shown, for columns of type additional numeric.
- Edit Code: Edit codes can be applied to numeric additional columns. To set an edit code for a numeric value, select the edit code from the dropdown on the instance list definition grid. The edit code identifier appears first followed by an example of the resulting display format. The edit codes available map to the standard LANSA codes 1,2,3,4,A,B,C,D,J,K,L,M,N,O,P,Q,Y and Z. Default is no edit code is applied. Note that:
- This feature is for VLF-WIN only.
- Perfect real or implied visual decimal point alignment between positive and negative values may not be achievable. Depending upon the font being used the visual impact may be better or worse.
- Values sent to MS-Excel may not be interpreted as numeric values because trailing CR, “-“ or breaking space pad characters (X0A) may not be automatically considered to be numeric content by MS-Excel.
- Date/Time Output Format: Select the output format for Date/Time additional columns. The available formats are for both Date and DateTime values and correspond to all the formats available for the AsDisplayString intrinsic function for both RDMLX Date and DateTime fields. The default value is eight character system format, SYSFMT8. This property is only applied to Date/Time additional columns.
- UTC Conversion: Change this property if a Coordinated Universal Time (UTC) conversion is required for the DATETIME value shown on the instance list. The default value, Local -> Local, represents no conversion. The value Local -> UTC assumes that the value added to the instance list is local time and removes the UTC offset from that value and displays the converted DATETIME value (now UTC) on the instance list. Similarly, the value UTC -> Local assumes a UTC value was added to the instance list and coverts that to local time. This property is only applied to Date/Time additional columns with DATETIME values.
For example, the Employees business object has a Visual ID1 of the employee name, a Visual ID 2 of the employee code/ID and additional alphanumeric and numeric columns defined. You might enter details into the grid like this:

This causes the shipped instance list to display an instance list like this (web or Windows)
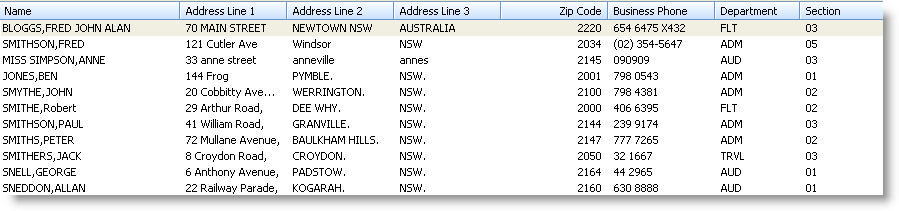
Note that at run time, for Windows applications only, the end-user may resize columns or even change the order of columns (using drag and drop), and the Framework will remember these changes. So these settings are just a starting point, for Windows Frameworks.
Windows applications also have the option of using a snap in instance list, instead of the shipped instance list. To add more features to your displayed instance list you should investigate using your own snap-in instance list. For more details, refer to Optionally Create your own Instance List.
This property is in the Business Object Instance List/Relations tab.