Step 2. Create a Details Command Handler for Department Sections
In this step you will create a Details command handler which will show the employees in the selected Section.
1. Start the Program Coding Assistant.
2. Select the Department Sections business object in the iii HR application.
3. Select the Command Handler -> Details.
4. Select Web – using WAM components as the platform.
5. Select Skeleton Command Handler:
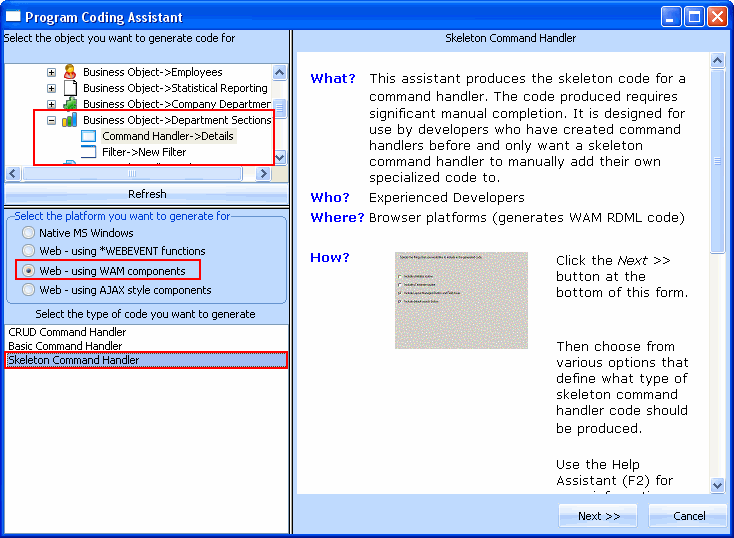
6. Click Next.
7. Make sure the option Include Default Save Button and Logic is not selected.
8. Click Generate Code.
9. In the Generated Code page specify iiiCOM13 as the name of your command handler and Section Details as the description. (iii are your initials. If you are using an unlicensed or trial version of Visual LANSA, you must always use the three characters DEM to replace iii).
10. Click Create.
11. Wait until you see a message stating that the component has been created.
12. Switch to the Visual LANSA editor.
13. Locate the comment saying Map fields used in this form.
14. Add these statements underneath the comment:
Def_list Name(#WAM_LIST) type(*working) Fields(#EMPNO #SURNAME #GIVENAME)
Web_Map For(*both) Fields(#WAM_LIST)
The WAM_LIST working list specifies the fields to be shown on the command handler. The Web_Map statement displays the fields.
Your code will now look like this:

15. Add this code in the routine handling the #avFrameworkManager.uInitialize event to determine which section is selected:
Invoke #avListManager.GetCurrentInstance Found(#Ret_Code) AKey1(#DEPTMENT) AKey2(#SECTION)
Ignore the error message. Your code will now look like this:

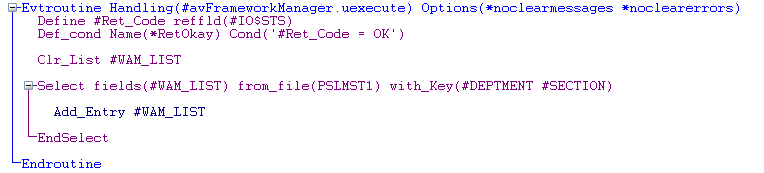
16. Add this code in the routine handling the #avFrameworkManager.uExecute event:
Define #Ret_Code reffld(#IO$STS)
Def_cond Name(*RetOkay) Cond('#Ret_Code = OK')
Clr_list #WAM_LIST
Select fields(#WAM_LIST) from_file(PSLMST1) with_Key(#DEPTMENT #SECTION)
Add_Entry #WAM_LIST
EndSelect
If the return code from the avListManager.GetCurrentInstance method is OK, this code selects the employee fields from the PSLMST1 logical view and adds them to the command handler.
Your code will now look like this:
16. Compile the command handler.
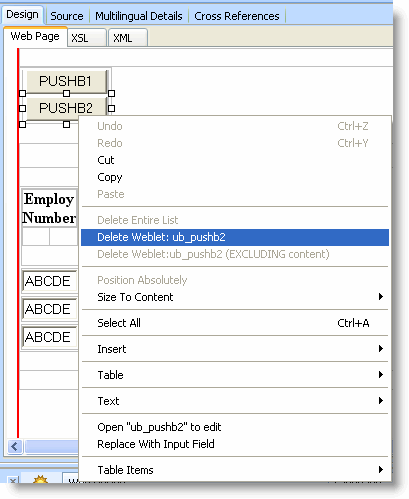
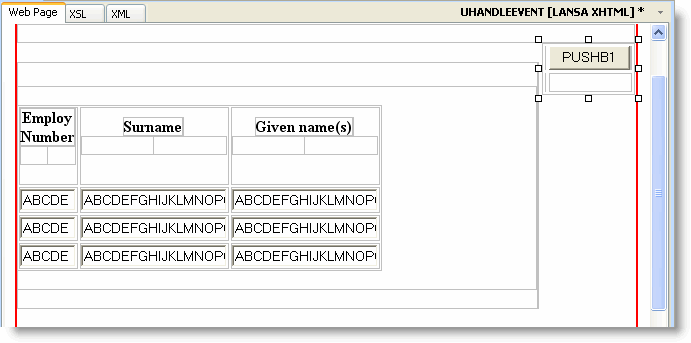
17. Display the Design tab to see the command handler user interface.
You will only need one of the buttons created by the Program Coding Assistant in the command handler:
18. Select PUSHB2 and right-click, then select the option Delete Weblet: ub_pushb2
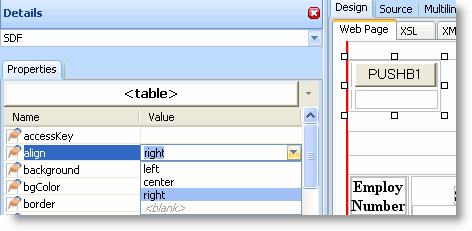
19. To align the remaining button on the right, select the table containing it, display the Details tab and set the Align property to right:
Your command handler now looks like this:
20. Save and compile the command handler.
21. Check the WAM and its associated layout weblet into the server with the Compile option selected.
22. In the Framework, snap the command handler in the Details command of the Department Sections business object.
23. Save the Framework and upload the details to the server.
24. Execute the Framework as a Web application.
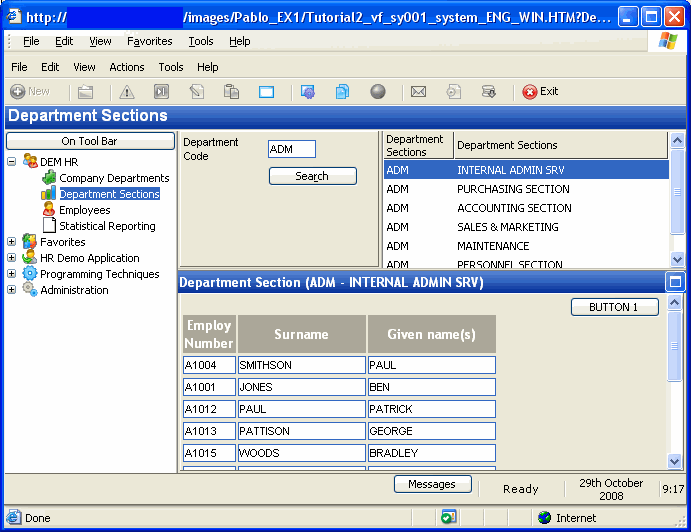
25. Test your command handler.
26. Close the application.