Step 3. Create a Hidden Filter for Company Departments
In this step you will create a hidden filter that loads the Company Departments to the instance list when you select 1. the Company Departments business object in the navigation pane. With a hidden filter there is no end-user interaction and the filter is not visible.
1. Start the Framework.
2. Start the Program Coding Assistant.
3. Select the iiiHR application and then the Company Departments business object, then New Filter.
4. Select Web – Using WAM components as the platform.
5. Select A skeleton filter as the type of component you want to create.
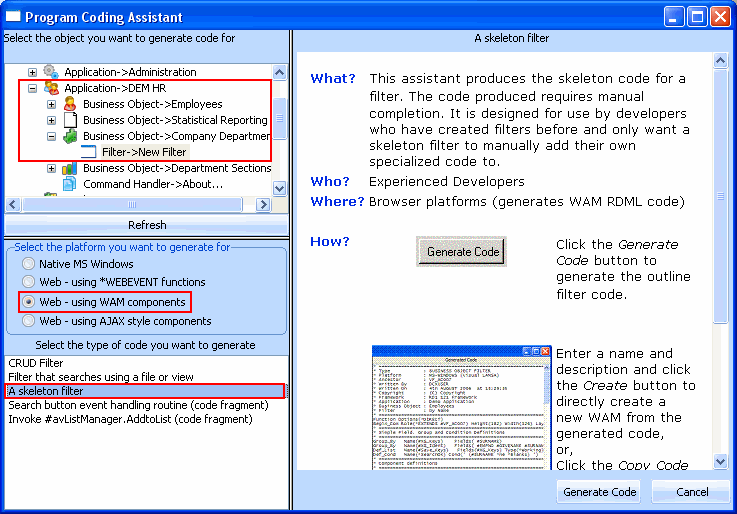
It is recommended that you use the Program Code Assistant when creating WAM filters or command handlers to make sure they meet all the Framework rules.
6. Click Generate Code.
7. In the Generated Code page specify iiiCOM11 as the name of your filter and Departments Hidden Filter as the description. (iii are your initials. If you are using an unlicensed or trial version of Visual LANSA, you must always use the three characters DEM to replace iii).
8. Click Create.
After a brief delay a message is shown indicating the WAM has been created.
9. Switch to the Visual LANSA editor to see your filter skeleton.
10. Locate the event routine handling the #avFrameworkManager.uexecute event.
11. In the event routine add a statement to indicate that the filter will be hidden:
Set Com(#thisfilter) Avhiddenfilter(true)
12. Add these statements to start updating the instance list and then clear it:
Invoke Method(#avListManager.BeginListUpdate)
Invoke Method(#avListManager.ClearList)
13. Select Departments and their descriptions from the DEPTAB file:
Select Fields(#DEPTMENT #DEPTDESC) From_File(DEPTAB) With_key(#DEPTMENT ) Generic(*yes)
Invoke #avListManager.AddtoList Visualid1(#DEPTMENT) Visualid2(#DEPTDESC) AKey1(#DEPTMENT)
EndSelect
14. Lastly indicate that the instance list update is complete:
Invoke Method(#avListManager.EndListUpdate)
You code will now look like this:

15. Select the Compile option in the Verify menu.
16. Ensure that the All webroutines option is selected for the Generate XSL option.
17. Ensure the compilation was successful.
18. Check in your changes to the server:
a. Right-click the WAM to bring up the associated pop-up menu and choose the Check in option.
b. Ensure that the All webroutines option is selected for the Generate XSL option.
c. Click OK to check the changes in.
d. Wait until the compiles have finished.
Now that you have compiled your new filter and are ready to test it, you need to snap it into the Framework.
19. In the Framework, close the Program Coding Assistant.
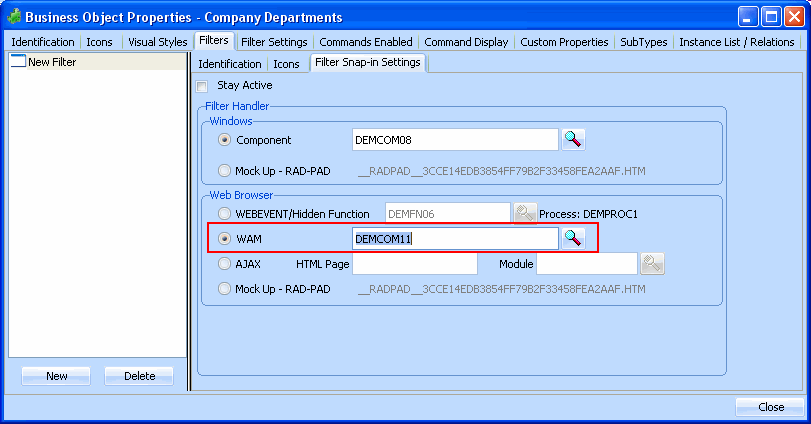
20. Select the iii HR application and double-click on the Company Departments business object.
21. On the resulting Business Object Properties dialog, click on the Filters tab.
22. Select the New Filter which is created by default.
23. Click on the Filter Snap-in Settings Tab.
24. Click on the WAM property radio button in the Web Browser group box.
25. Type the name of your WAM filter (iiiCOM11) into the entry field.
26. Close the Company Departments’ properties.
27. Save the Framework. Accept the prompt to upload the Framework and wait while the upload completes.
28. Use the (Framework) menu and select the option to Execute as Web Application... Accept the default options and press OK.
29. Select the iii HR application in the web Framework and then the Company Departments business object
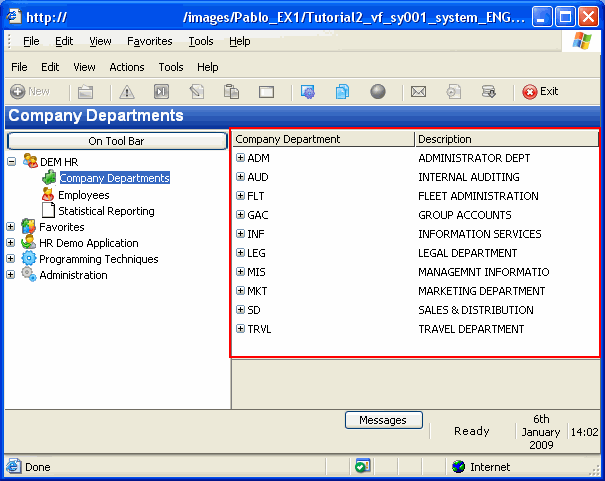
30. Expand a Department. Notice that no Department Sections are loaded. You will create the relationship handler that loads the sections in the next step.
31. Close the application.