Step 2. Define Transformation Map
LIC007 - Extract Database to CSV File
In this step you will add the file PSLMST – Personnel to the map and add a text file (CSV) and define its fields. You will then define the basic mapping between the two objects.
1. From the tab, use the  button to open .
2. In , use the menu option:
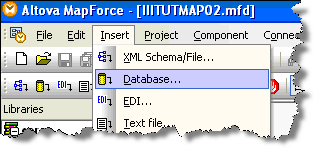
3. Select in the and click the button.
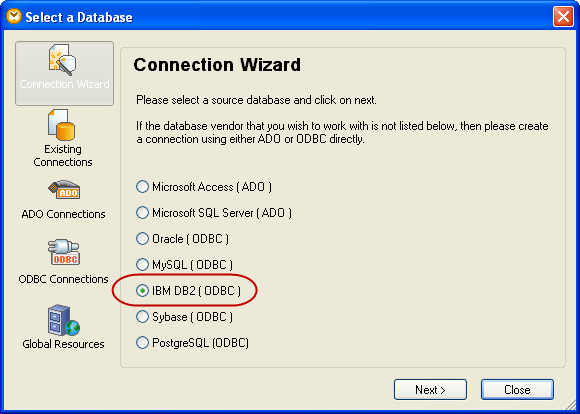
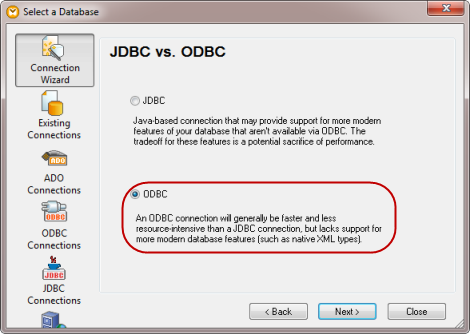
4.On the next dialog, select ODBC:
5. If you already completed the earlier LIC003 tutorial exercise, then you will already have defined a DSN that you can again use here. In that case, select the 'Use an existing Data Source Name' option and follow the prompts to select the DSN you created earlier. Then proceed to step 8.
Otherwise, select the 'Create a new Data Source Name' option. Click the Connect button.
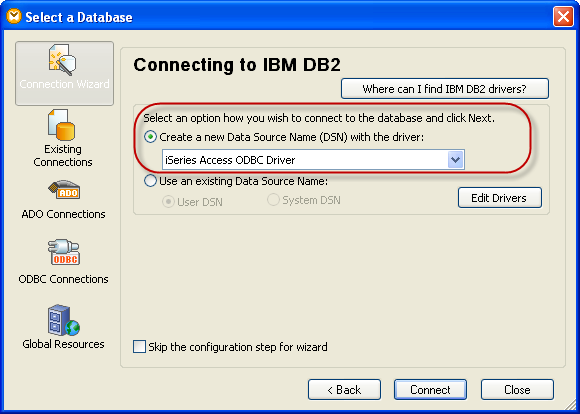
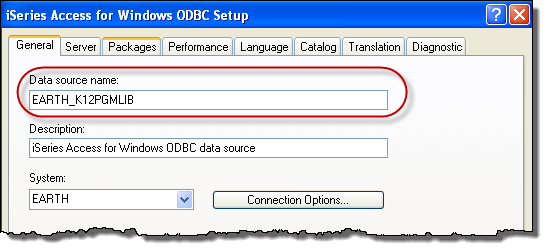
6. Enter a Data Source Name of <server>_<library>, where <server> is the IBM i and <library> is the specific library which will be the default for this connection - this should be the library containing the Personnel Demonstration system files, for example, LICLICLIB.
Do not click at this point.
7. Select the tab. Enter an SQL default library of <library> where <library> is the library containing the Personnel Demonstration system files, for example, LICLICLIB.
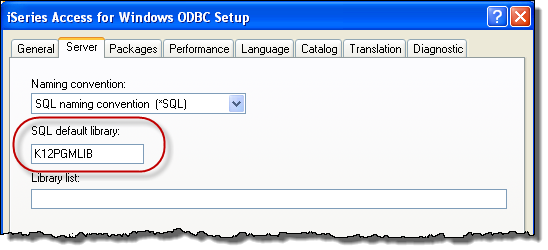
Then click .
8.Signon to the iSeries when the login dialog appears, using your iSeries user id and password.. You may need to signon three times (this depends on the configuration of IBM i Access security options).
9. In the Insert Database Objects dialog, the highlighted area shows the first IBM i library or the first database schema or collection. Select the arrow icon and select the required library, schema or collection from the drop down list. As before, the required IBM i library will depend on the LANSA Composer installation, for example, LICLICLIB. On a Windows server, the schema name is LC_DTA.

10. Select the file DEPTAB – Department Table.
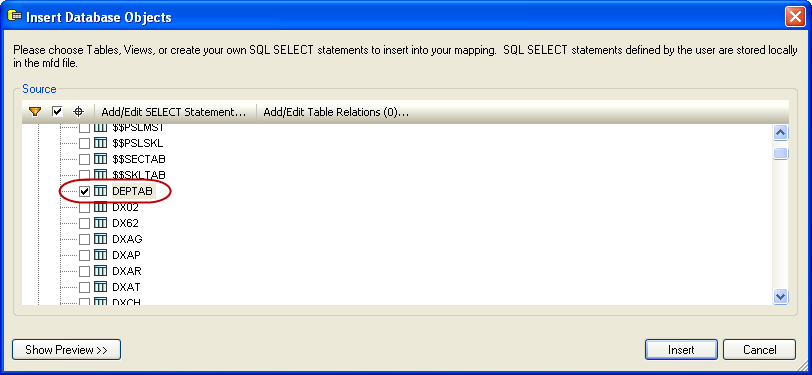
11. Then scroll down and select file PSLMST – Personnel.
12. Select the button (highlighted above).
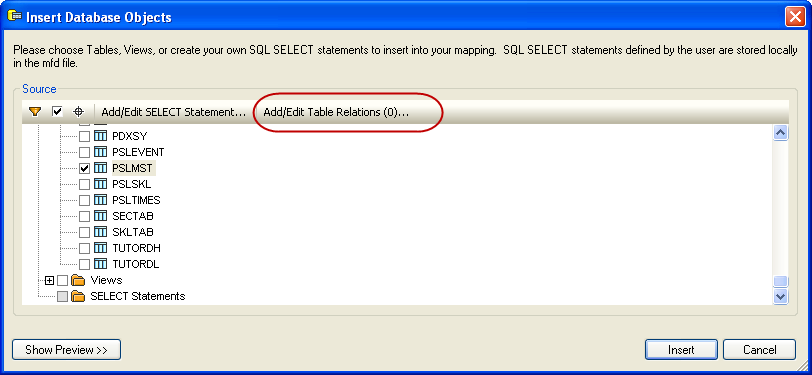
13. In the dialog, begin by selecting the button.

14. In the left hand column, select table DEPTAB and then column DEPTMENT. In the right hand column, select table PSLMST and then column DEPTMENT.
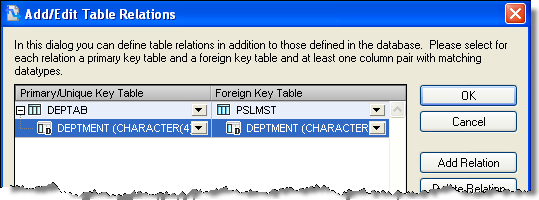
15. Click the button.
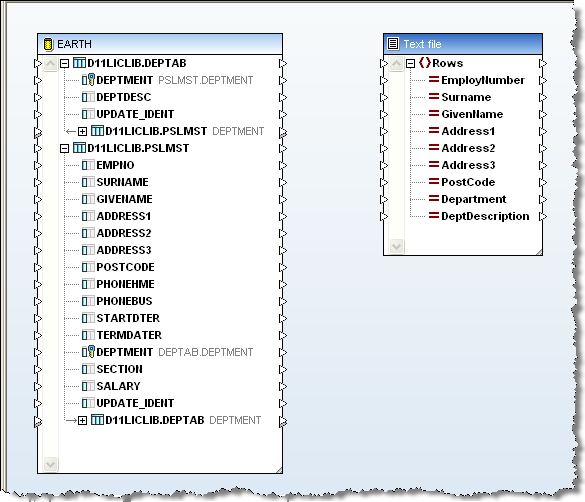
16. Continue by clicking the in the dialog. Your map should look like the following:

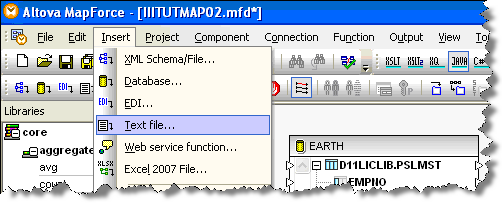
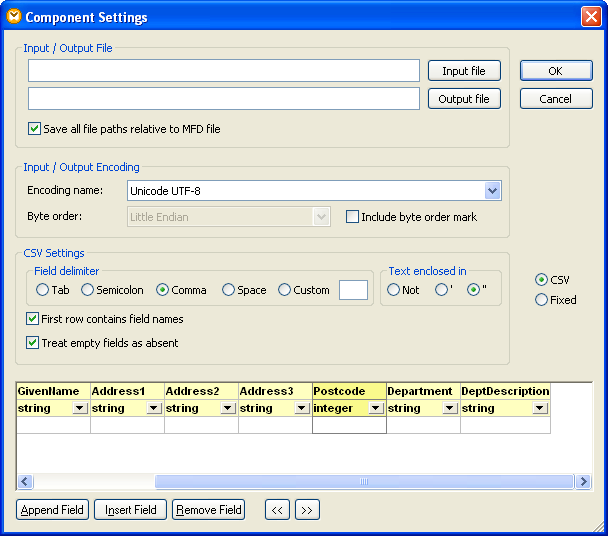
17. Add a text file using the Insert / Text File menu option.
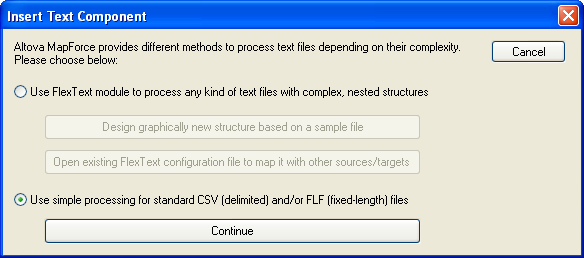
18. Select the radio button – and click .
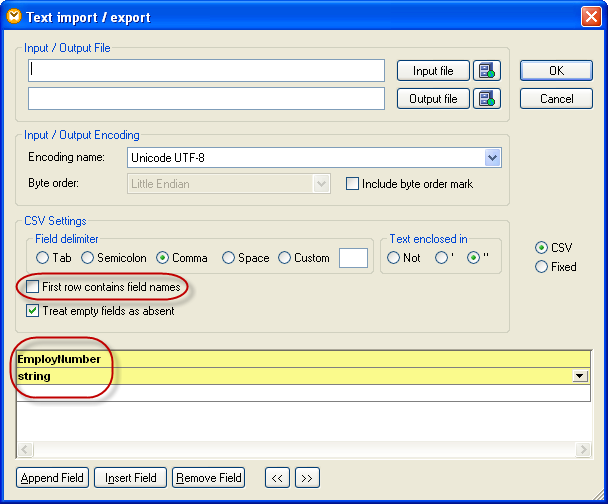
19. Ensure the checkbox First row contains field names is NOT checked. Initially there will be one field only defined. Click in the top line and replace Field 1 with EmployNumber.
20. Continue to add new fields by pressing the Append Field button and adding the following fields:
a. Surname
b. GivenName
c. Address1
d. Address2
e. Address3
f. PostCode
g. Department
h. DeptDescription
21.Change the field PostCode to Integer.
22.Check the checkbox First row contains field names .Your form should now look like the following:

23. your changes by clicking the button.
Your form should now look like the following:
24.Click to insert the text file.
Your map should now look like the following:
25.Expand the DEPTAB table below table PSLMST and then define the required mapping between fields in tables PSLMST and DEPTAB and fields in the text file.
When mapping the DEPTDESC field, it is important that you select the instance of DEPTAB/DEPTDESC that is nested below PSLMST. This ensures that the database table relation you defined in step 14 is effective and that you pick up the DEPTDESC value that corresponds to the DEPTMENT (department code) that is in PSLMST.
Your map should now look like the following:
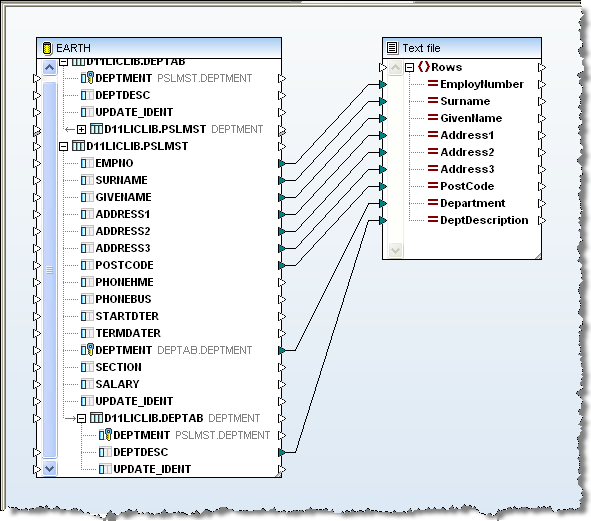
Mapforce will display a message box, because at this stage the input database file is not connected to in the output text file. Click and continue. You will be completing this link in the next step.

Note ODBC DSN
In general database components are qualified with the database schema name. On IBM i, this corresponds to the IBM i library name.
In the context of , it would not be satisfactory for the prepared to contain hard-coded references to database tables in a named library, which is what would happen if did nothing else.
For , the map definition (the .mfd file) is modified BEFORE MapForce generates the Java code. The modification (if found to be necessary) is made to a temporary copy of the map definition (.mfd) file that is used only for the step (the original map definition file is NOT changed). The nature of the modification is to automatically switch on MapForce's own "Strip schema names" option in the database component, and thereby rely on MapForce's own code generator to get the unqualified database references correct. (This MapForce option was not available in earlier MapForce versions.)
One other consideration is that "strip schema names" may lead to a "Prepare Map failure" due to the required file(s) not being found if:
- the map uses SQL SELECT and/or SQL-WHERE components, AND
- the ODBC DSN in use does not specify an appropriate library list.
This means that in such cases it will be necessary to use a DSN that specifies an appropriate SQL default library and/or library list.
This and related issues are discussed and described more fully in in Appendix C of the . It is recommended reading if you work with that reference IBM i databases in.
Further note:
Even when own "Strip schema names" option is used (whether by the map designer or applied automatically by the step as described above), does NOT strip schema names from user-entered SQL - in other words, from any SQL entered using MapForce's SQL SELECT feature.