Spawn Pane
From Oracle Insurance Rules Palette
Spawn Pane
Spawn is the term used to describe an activity that was system generated as a result of another activity being processed. A transaction can be configured to spawn other transactions through the Spawn pane. The configuration can be customized for each transaction or Spawn sections can be copybooked and used across multiple transactions.
If the spawn section of a transaction is configured in a copybook, the copybook should be at the plan level because transactions reside at the plan level.
If an activity that spawned other activities is deleted or recycled, then the spawned activities will be deleted or recycled as well, unless the transaction is of the type Nonreversible-Nonreversing. A Nonreversible-Nonreversing transaction cannot be deleted or recycled by another activity, even if the transaction that spawned it is reversed or recycled. The Nonreversible-Nonreversing transaction can be deleted or recycled if a user has the proper security access, which will cause all of the spawns to be deleted as well.
Spawning using Nonreversible-Nonreversing transactions should be extremely limited as spawned transactions could exist on the policy when the original parent transaction no longer exists.
Deleting Spawns
A spawned activity should never be deleted or recycled in a production environment. Best practice is to delete or recycle the originating parent activity, which will in turn delete/recycle the spawn. This prevents activity data from becoming corrupt.
In the rare cases when a spawn needs to be deleted in a development environment, a Delete checkbox is provided on the Activity screen. Users with the proper security privileges will be able to check that box and gain access to the delete and recycle icons next to spawned activities.
A Delete checkbox can be added on the Policy, Client, Plan and Company Activity screens in OIPA. The security for this button is configured at the PolicyActivity, ClientActivity, PlanActivity and/or CompanyActivity levels.
Transaction with Spawn
Sections of Spawn Configuration Pane
-
The first section on the Spawn pane is the Copybook section. Click the green plus sign to expand this section. This is used when an entire Spawn section from a different transaction needs to be copied and used in the transaction you are configuring. If the Include checkbox is checked then a Lookup field will appear so that the transaction with the Spawn section you want to copy can be selected. All other fields on the Spawn pane will be disabled if a copybook is used. Refer to the steps below for instructions on adding a spawn copybook.
-
Directly below the Copybook section is the first gray table, which holds a list of spawns the transaction will trigger. The Transaction to spawn column displays a list of transactions that will be spawned. Highlight a transaction in the list and double click in a cell to edit the information. Refer to the steps below for instructions on adding transactions to this table.
The SPAWNCODE indicates when the transaction
should be spawned. A list of SpawnCodes from AsCodeSpawn in the AsCode
table are listed below. The SpawnCode selected
will determine if additional columns in the table are available. For
example, if the spawn's occurrence is based on a date field then select
the field value for SPAWNCODE and the FIELD combo box will be enabled
so that the correct variable can be chosen from the combo box. Double-click
in a column to see if the option can be used with the type of SpawnCode
selected.

Transactions to Spawn listed on Spawn Pane
|
Code Value |
Description |
|---|---|
|
01 |
Immediate: spawn on the effective date. |
|
02 |
One Year: spawn a year from the effective date. |
|
03 |
Field Value: spawn on a date defined from a field in the activity. |
|
04 |
1 Business Day: spawn on the next business day. |
|
05 |
One Month: spawn a month from the effective date. |
|
06 |
Segment: spawn one for each segment. |
|
07 |
1 Quarter: spawn one quarter from the effective date. |
|
08 |
Spawn multiple: spawn an activity for each Pattern Field (Field0, Field1, etc.). |
|
09 |
Policy: spawn an activity for each policy in the plan. |
|
10 |
SpawnMultiFields: This spawn code is used with transactions that have MultiFields. On selecting this spawncode, the MultiFields column on the screen is enabled with two options: Yes and No. Yes- spawns the current activity's MultiFields to the spawned activity. No- MutiFields values will not be spawned. If this attribute is not present, No will be assumed. |
-
The Spawn Condition section gives the user the option to configure a condition when the transaction should be spawned. If no condition is given then the transaction will always be spawned.

Spawn Condition Statement
-
Spawn fields allows the user to indicate the variables from the processed activity that should be passed to the spawned transaction. Select an option from a combo box in the FROM field, which is filled with all the fields and math variables available in the spawning transaction. If no selection is made in the FROM field, the field will not be spawned. In a majority of cases all FROM fields will be filled in. FROM fields allow date entry and are sorted by the datatype of the TO fields.
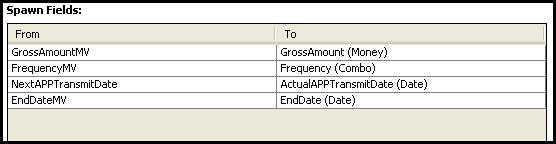
Spawn Fields Section
on Spawn Pane
-
The bottom section is used to define suspense, if needed. Checking the box next to suspense or multisuspense will activate the attribute fields allowing additional parameters to be entered.
-
Suspense Attributes: Select a type from the drop down box and enter a value. The value must be at least the value of the Activity field; it cannot be less.
-
Multisuspense Attributes: Enter the name of a Collection type math variable in the Collection field. Then select a type and enter a maximum number of suspense records to include in the collection.
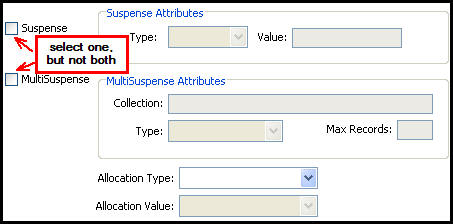
Suspense Attribute Section on Spawn Pane
-
The Quick Search section on the far right side of the pane is used to add a new spawn to the transaction. To add a spawn, type the transaction name in the Quick Search box. A filtered list reveals all available transactions in the Transaction box. Highlight the desired transaction and select the Add button. The transaction will be added to the spawn list. Use the Up, Down and Remove buttons to set the order of spawns or remove spawns from the list.
Quick Search Section on Spawn Pane
An activity is an instance of a transaction. When an activity is selected, the transaction configuration is executed.
Insert an entire Spawn section from a CopyBook or configure the Spawn section through the Spawn pane.
Insert Entire Spawn Section from CopyBook
-
Navigate to the transaction and click the Spawn pane.
-
Expand the CopyBook section at the top of the pane.
-
Click the Include box.
-
Click lookUp and select the CopyBook from the CopyBook Lookup window.
-
Click OK. The CopyBook spawn information will be added to this pane.
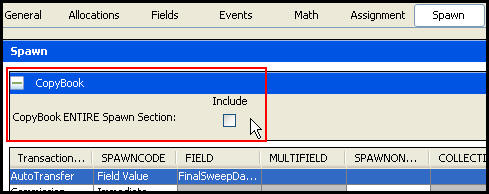
CopyBook Section on the Spawn Pane
Steps to Create a Spawn
-
Select the Spawn pane.
-
Search for the transaction to spawn from the Quick Search box.
-
Select the transaction name from the Transactions list.
-
Select Add, which adds the transaction to be spawned.
-
Use the Up or Down button to move the spawn to the correct order. This is important if one activity relies on the output of another activity.
-
Select the SpawnCode from the drop-down box. The SpawnCode determines how or when the transaction should be spawned. Additional fields in the table will become available based on the SpawnCode selected. Double-click in a column to see if the option is available with the type of SpawnCode selected.
-
Set the Spawn Condition if the spawn should only occur when some condition result is true. If left blank, the spawn will always occur.
-
Select the spawn fields needed to complete the spawn. The To section automatically populates with the applicable math variables or fields for the activity the values are going to. The From section has drop-down boxes to select a field or math variable that stores the values needed to pass to the activity being spawned. The From value will be passed to the specified To field of the spawned transaction.
-
Click the suspense option needed. Only one can be selected.
-
Select the attributes needed for suspense from the fields provided.
-
Check-in the transaction to save the changes to the database.
Use the Remove button next to the first gray table to remove a spawn from the list.
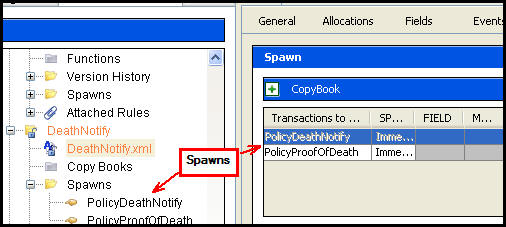
After a spawned activity is created, it will be listed in the rule’s folder. A finger icon will appear next to each of the spawns. When the icon is double-clicked, the spawned transaction's folder opens.