Inquiry Screen Configuration
Inquiries can be configured to display in OIPA in three places: the Main Menu, the Client screen or Policy related screens. The type of inquiry is identified when a new Inquiry screen is created.
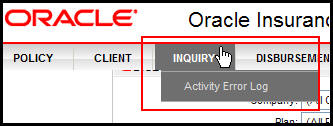
Inquiry screens configured to display on the Main Menu will appear in OIPA under the Inquiry heading on the Main Menu.
Main Menu Inquiry Screen in OIPA
Inquiry screens configured to display at the Client level will appear in OIPA on the Client screen. The Inquiry link will appear on the Secondary Menu.

Client Level Inquiry in OIPA
Policy level inquiries have undergone significant changes. Their contextual properties have been revised to include six new override levels, which replace prior versions’ Primary Company level. The new override levels are Subsidiary Company, Product, Plan, Subsidiary Company and State, Product and State, and Plan and State. Policy level inquiries do not have Global versions. Inquiry screens configured to display at the Policy level will continue to appear in OIPA on the Policy screen. The Inquiry link will appear on the Secondary Menu.
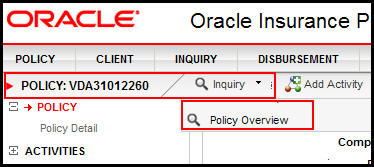
Policy Level Inquiry Screen in OIPA
Steps to Create an Inquiry Screen
-
Open the Main Explorer tab.
-
Open the appropriate company folder.
-
Right-click on Inquiry Screens and select Add Inquiry.
-
Enter a name for the Inquiry. It should reflect the purpose of the Inquiry so that OIPA users can identify its purpose.
-
Select an inquiry type from the drop down box. This will determine the screen where the Inquiry screen will be available to OIPA users. If Main or Client level inquiry is selected, then skip to step 8. If Policy level inquiry is selected, then continue with the following steps.
- Click Next.
- Select the override levels. When a new override of an existing inquiry is created, the Override Wizard will check if selected override level (Company, Product, Plan, etc…) already exists. If it does, a validation message will appear, indicating that the override already exists.
-
Click Finish. The new Inquiry screen will be listed in the appropriate level folder under the Inquiry screen node.
Once an Inquiry screen has been created, check it out and configure it. View the XML Configuration Guide topic in the Help menu. Inquiry screen configuration is located in Business Rules | Screen Rules | Inquiry Screen.
Make sure to also set the proper security settings to allow OIPA users to view the Inquiry.
Valuation Date on Inquiry Screen
To make the Valuation Date available on Inquiry screens, the PolicyValues rule needs to be configured with the following math variable:
<MathVariable VARIABLENAME="ValuationDate" TYPE="FIELD"
    DATATYPE="DATE">Valuation:Policy:EffectiveDate</MathVariable>
Functions and CopyBooks
CopyBooks and Functions configured within Main Menu and Client level inquiries are resolved at the Primary Company context. CopyBooks and functions configured within policy level inquiries are resolved at the Policy context.
Currency Representation on Inquiry Screen
A currency type can be displayed on dynamic fields on the Inquiry screen in both the Input and Output sections.
In the Input section, this is accomplished by using the “Money” <DataType> element value, currency codes (THD, USD, etc…) for the <Currency> element, and a single currency code for the <DefaultCurrency> element.
In the Output section, this is accomplished by using the “ToCurrency” function math variables that are passed to dynamic fields with a “Money” <DataType>.
Inquiry screen has a new attribute configured as "Total" for te output column specification wherein if the Column Data is numeric, a total of the results would display. The total that referred is the entire results set, that is added to the Column to fetch the value results for the numeric column data at the bottom of the grid via configured SQL statement.
Copyright © 2009, 2014, Oracle and/or its affiliates. All rights reserved. Legal Notices