Create Unique Identifier Number
The Identifier field data type can be used when a company needs to generate an ID that is built from characters and/or numeric parts. The numeric parts may be incremented and therefore provide a unique characteristic to the IDs constructed with the same elements. An example would be the generation of a claim number for a death claim process that is unique among other claim numbers.
Identifier fields can also be called in transaction configuration. A transaction can contain a math variable that is configured to pull a value from an Identifier field, then pass that number to a spawned transaction. The scenarios below provide examples of the various ways Identifier fields are used in OIPA.
 The new Activity Confirmation Screen uses Identifier fields and Identifier math variables to meet specific requirements for unique confirmation numbers for activities and spawned activities. For more information, see Activity Confirmation Screen.
Use the Identifier field type to create a field on a screen where the Identifier number will be used. When a new policy is created and saved for the first time, this identifier number will populate the Identifier field on the screen. For example, the Policy screen may have an Identifier field to capture the unique number. When a new policy is saved, the field is automatically populated with the unique ID.
-
Create a parent transaction that uses a math variable to pull a value from an identifier field. When the transaction processes as an activity in OIPA, the Identifier fields configured in the transaction are populated and the value of the math variable is listed in the Math link of the Activity Detail window.
-
Use the MultiFields business rule to set the number of identifier fields that should be populated when the activity processes.
-
Create a child transaction that is spawned from the first transaction and pulls a value from an identifier field of the original transaction. When the transaction processes as an activity in OIPA, the value of the math variable is listed in the Math link of the Activity Detail window.
Scenario 1
A configuror creates a field on the Policy screen that will generate an ID. When the policy is created and saved for the first time, the identifier number will automatically populate the field on the Policy screen.
Add an Identifier Field to the Policy Screen
-
Open a Company | Plan in the Main Explorer.
-
Open the Plan Rules folder and check out the PolicyScreen business rule.
-
Click the Fields pane and drag an Identifier field onto the Configuration area.
-
Click the new field. This will open the Field Properties Window.
-
Enter a Field name and Display name.
-
Scroll down to the Parts section and click the ellipsis
 button next to Parts. This will open the Parts
window.
button next to Parts. This will open the Parts
window. -
Select a Part type from the Type drop down box.
-
Enter the corresponding information for the type of Identifier chosen.
To generate a unique Identifier number, the Identifier field must contain a SEQUENCE Part type.
-
Click Add. The information will be listed in the Parts tree at the top of the window.
-
Click OK when all Identifier information has been listed.
-
Save the changes by clicking the Save button on the menu bar.
Prototype Samples in Rules Palette
The PolicyScreen business rule was overriden and configured to demonstrate the identifier field. Navigate through the following folders in the Main Explorer to locate the configuration sample: Companies | Prototype Company | Subsidiary Companies | Prototype Child Company | Plans | Dynamic Prototype Plan | Plan Rules | PolicyScreen. Open the PolicyScreen and click the Fields pane. The identifier field is there and the properties can be viewed from the Field Properties Window.
View New Feature in OIPA
View this configuration in OIPA by logging into the Company | Plan you identified in the steps above. Create a new policy. Add policy details and click the Save button. The identifier field should be disabled and should show the unique ID generated by the system.
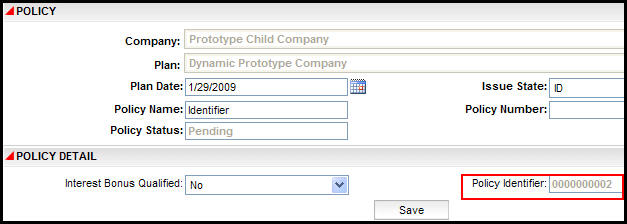
Identifier Field on Policy Screen
A configuror creates a transaction that uses a math variable to pull a value from an Identifier field. This transaction also references the MultiField business rule and spawns a second Identifier transaction. Create the spawned transaction first so that it can be referenced in the main transaction.
Create the Spawned Transaction
-
Open the Company | Plan in the Main Explorer for the new transaction.
-
Right-click on the Transaction node and select New Transaction.
-
Select the Transaction Type from the drop down box.
-
Enter a Processing Order. It should be after the processing order of the transaction that will spawn this one.
-
Click Finish. The new transaction will display in the Configuration area.
-
Add a text field to the Fields pane.
-
Click the Math pane.
-
Drag a Field math variable onto the screen.
-
Enter a name for the math variable.
-
Scroll down to the Prefixes field, click in the field then hold down CTRL and press the space bar. This will bring up a list of all available Prefixes. Select Activity.
If you cannot see the Prefix field, then grab the
horizontal scroll bar at the bottom of the Math Pane section and drag
it to the right. A vertical scroll bar will appear.
Drag the vertical scroll bar down until the fields
are visible.
-
Scroll down to the Value field, click in the field then hold down CTRL and press the space bar. This will bring up a list of available values. Select the value you want to use.
-
Check in the transaction to save the configuration.
-
Add a translation value when the message window appears.
-
Add security for the transaction.
-
Add the transaction to the EligibleTransactionByPolicyStatus business rule.
Create the Parent Transaction
-
Open the Company | Plan in the Main Explorer for the new transaction.
-
Right-click on the Transaction node and select New Transaction.
-
Select the Transaction Type from the drop down box.
-
Enter a Processing Order. It should be before the processing order of the spawned transaction created above.
-
Click Finish. The new transaction will display in the Configuration area.
-
Click the Fields pane.
-
Drag an Identifier field onto the screen.
-
Click the new field. This will open the Field Properties Window.
-
Enter a Field name and Display name.
-
Set the Clear on Recycle element according to the way the identifier number should be handled if the activity is recycled:
-
To keep the same confirmation number for the recycled activity, set it to No.
-
To generate a new confirmation number each time the activity is recycled, set it to Yes.
-
-
Scroll down to the Parts section and click the ellipsis
button next to Parts. This will open the Parts
window. -
Select a Part type from the Type drop down box.
-
Enter the corresponding information for the type of Identifier chosen.
To generate a unique Identifier number, the Identifier field must contain a SEQUENCE Part type.
-
Click Add. The information will be listed in the Parts tree at the top of the window.
-
Click OK when all Identifier information has been listed.
-
Save the changes by clicking the Save button on the menu bar.
-
Drag a Multifields element onto the screen and click on it.
-
Click the ellipsis
button on the Multifield line in the Field Properties window. A Multifield window opens. -
Select the Multifield rule to associate with this Multifields element and click OK.
-
Click on the Math pane.
-
Drag an Identifier math variable onto the screen.
-
Enter a name for the Identifier math variable.
-
Scroll down to the Parts section and click the Parts node.
-
Select a Part type from the Type drop down box.
-
Enter the corresponding information for the type of Identifier chosen.
To generate a unique Identifier number, the Identifier field must contain a SEQUENCE Part type.
-
Click Add. The information will be listed in the Parts tree below the Parts node.
-
Click on the Spawn pane.
-
Select the child transaction from the Transactions list and click Add.
-
Configure the Spawn Fields to map the Identifier math variable in the parent to the text field in the child transaction.
-
Check in the parent transaction.
-
Add a translation value when the message window appears.
-
Add security for the transaction.
-
Add the transaction to the EligibleTransactionByPolicyStatus business rule.
Prototype Samples in Rules Palette
There are two transactions configured to demonstrate identifier field functionality. Navigate through the following folders in the Main Explorer to locate the configuration sample: Companies | Prototype Company | Subsidiary Companies | Prototype Child Company | Plans | Dynamic Prototype Plan | Transactions | Policy Transactions.
-
IdentifierFields: uses a mathvariable to pull a value from an identifier field. When the transaction processes as an activity in OIPA, the Identifier fields configured in the transaction are populated and the value of the mathvariable is listed in the Math link of the Activity Detail window. This transaction also uses the MultiFields business rule to set the number of identifier fields that should be populated when the activity processes.
-
IdentifierSpawn: spawned from the first transaction and pulls a value from an identifier field of the original transaction. When the transaction processes as an activity in OIPA, the value of the mathvariable is listed in the Math link of the Activity Detail window.
-
The following sequences have been added to the AsSequence table for use in generating identifiers:
-
ClientID
-
EffectiveDateID
-
MultiFieldID
-
PolicyFieldID
-
View New Feature in OIPA
View the prototype example in OIPA by logging in and selecting the Company | Plan you used when creating the screen and transactions above. Create a new policy and click the Activities link. Select the Identifier Fields transaction first and click OK. Process it from the Activity screen. The Identifier Spawn activity will appear on the Activity screen. Process it. After it processes, click the Activity Detail icon to the left of the activity. Check the Entry Fields link and the Math link.
Copyright © 2009, 2014, Oracle and/or its affiliates. All rights reserved. Legal Notices