RoleScreen Rule
The Role screen rule allows the configuration of fields specified on the Role Details screen in OIPA. Each role, such as beneficiary, insured, owner or payer, can have configured fields for capturing relevant data required by the business.
If you want to change the roles that are available to users in OIPA for a particular company, then you must edit the Roles section of the PolicyScreen business rule.
Note: In the RoleScreen action/events/screenmath sections, all Plan, Policy, Client and Address details are accessible through PLANFIELD, POLICYFIELD, CLIENTFIELD and ADDRESSFIELD type math variables.
General Pane
The General Pane displays the name and properties of the RoleScreen business rule.
RoleScreen Pane
Roles are managed through the RoleScreen pane of the RoleScreen business rule. The roles that are currently available will be displayed on the left side of the screen in the navigation tree. Click on a node to open it in the Configuration Area. There are three nodes under each rule:
- Ordinal: An optional element that contains the Order field. In the Order field, a user can enter an integer value specifying the order in which roles should display on the policy's Role screen in OIPA. For example, a role with an Order of 01 will be the first role displayed, a role with an Order of 02 the second, and so on. The Rules Palette will return an error if a negative or non-integer value is entered into the Order field.
- Fields: An element that allows for visual configuration of fields on a policy's Role screen in OIPA.
- Events: An element that allows for the configuration of ActionEvents, which provide the ability to perform actions on a field when an event occurs on the screen. This node functions the same way as other configurable ActionEvents—see the Events Pane page for more information on configuring events.
Steps to Add a New Role
- Navigate to the Global Rules Explorer | Business Rules | Plan Rules folder. Open the RoleScreen business rule, taking care to find the appropriate override level.
- Click the RoleScreen pane.
- Click Add New. The New Role field will display in the right-hand side of the pane.
- Select a role from the drop-down box. This box is populated with roles from AsCodeRole.
- Click the Add New button below the drop-down box. The new role will display in the left navigation tree.
- Expand the new role to view the subnodes.
- Click Ordinal to assign a display order to the role. This determines its position in the list when available roles are displayed in OIPA.
- Click Fields to add fields to the Role screen for this role.
- Click Events to configure events for this role.
Once roles have been added to the Role screen, they are available for use in OIPA.
A role can be removed by selecting the role and then clicking Remove.
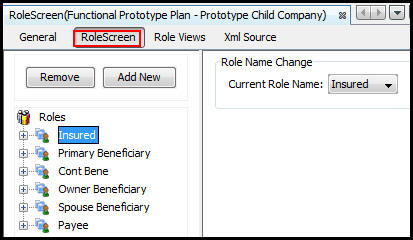
RoleScreen Pane on the RoleScreen Business Rule
Role Views
Roles can be grouped into specific views for display in OIPA. When a role view is selected in OIPA, only those roles assigned to that view will be visible to the user.
Role views can be created using the Role Views pane, or they can be created directly in the XML Source Pane. Refer to the XML Configuration Guide in the Help menu of the Rules Palette for additional details on the elements and attributes supporting views. Navigate to Business Rules | Screen | RoleScreen.
Steps to Manage Role Views Using the Role Views Visual Editing Pane
- Navigate to the Global Explorer | Business Rules | Plan Rules folder. Open the RoleScreen business rule, taking care to find the appropriate override level, and check out the rule.
- Click the Role Views pane. The Navigator window will display in the bottom left corner of the screen, directly below the Global Explorer window.
- Click the Display Status node in the Navigator window. The role statuses will display in the Role Views pane. Select the statuses a role must be in to be eligible for a role view. Hold down the Ctrl key to select multiple statuses. The Display Status section is optional, so if no display statuses are selected, then role views will be eligible for all role statuses.
- Click the Role Views node in the Navigator window. All existing role views will display under the node.
- To delete an existing role view, right-click on the role and select Remove Role View.
- To add a new role view, right-click on the Role Views node and select New Role View. This will open the Role Views pane.
- Type a name for the role view in the View Name field. Acceptable name values can be any combination of text and numbers. The role view name is a required item and if it is not entered then a business error will be produced.
- Select the roles that will display when the view is selected in OIPA. This drop-down box is populated with the roles that are defined in the <Role> section of the RoleScreen business rule. At least one role must be selected. Hold down the Ctrl key to select multiple roles for the view. If all roles will be available in this view, then click the All Roles checkbox above the Roles drop down list.
- Type the optional Table XML data in the box provided for that purpose.
- <Table> is the opening/closing element for the table. This is the table in OIPA that displays the role information.
- <Column> is the opening/closing element for each column in the table.
- <Display> defines the heading for each column that will appear in the table.
- <Name> identifies the field that holds the information that should be populated in the defined column.
- <Group> identifies the screen that contains the field defined in the <Name> element.
- <DataType> defines the type of data that will be displayed.
- Check in the RoleScreen business rule to save all changes.
To edit an existing role view, make sure the RoleScreen business rule is checked out, then click the name of the view in the Navigator window. The existing information will display in the Role Views pane. All information is available for update. Click the Save button at the bottom of the pane when all updates are complete.
If a role is removed from the RoleScreen business rule, meaning it is deleted from the <Role> section, and that role was included in a role view, then it should be manually removed from the role view in the XML Source pane.
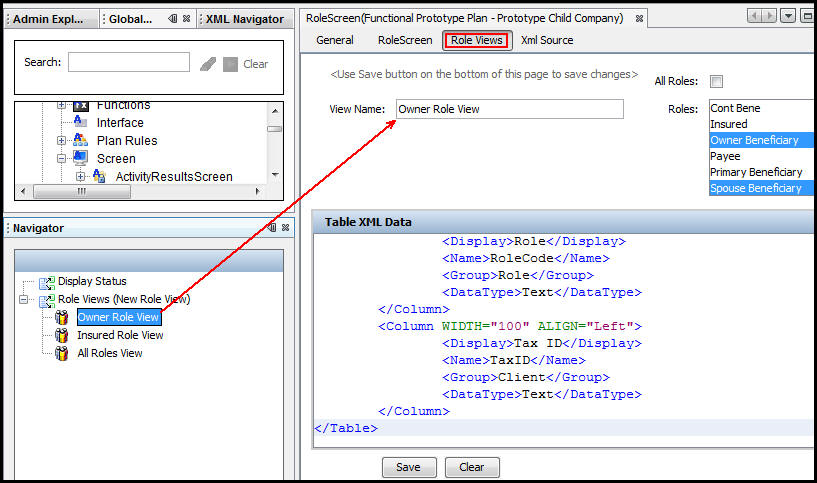
Role Views Pane of Role Screen
Button Security
Security is applied to the buttons on the Role screen in the Admin Explorer. Open the Security folder to reveal the options for applying security.
Steps to Add Security to Buttons
- Open Admin Explorer | Security | Application Security | Security Groups.
- Select the Security Group that has access to the Role screen.
- Open Plan Security | Name of the Company | Plan Pages.
- Right-click the PolicyRole node and select Check out to open it in the Configuration Area.
- Check the box next to each button the users in the security group will have access to in OIPA.
- Check in the file to save the changes to the database.
XML Source Pane
Configuration can also be done in XML via the XML Source pane. Configuration for the additional screen tags must still be done through the XML Source pane.
The XML Source pane includes XML Editor functionality that enhances the configuration experience. More detailed information on configuration using the XML Source pane can be found in the XML Source Editing section of this document.
Among the tags that are configured on the XML Source pane is the <DisplayRoleFields> element, which allows you to control the display of roles on OIPA's Role screen. If this element has a value of Yes, then the roles will display in a drop-down list on the Roles screen. If this element has a value of No, then the roles will display as a series of checkboxes. Additionally, if this element has a value of Yes, the information entered on the Role screen when adding a new role will be validated against other policy and role information. Validations will also be performed upon deleting and updating roles, with error or warning messages displayed when a role that is not allowed to be updated/deleted is updated/deleted. Refer to the RoleScreen Actions and Events Prototype for a complete explanation of configuring Role screen validation.
Please see the XML Configuration Guide topic in this help system for a list of all elements, attributes and values needed for configuration. View Business Rules | Plan Rules | Role Screen.
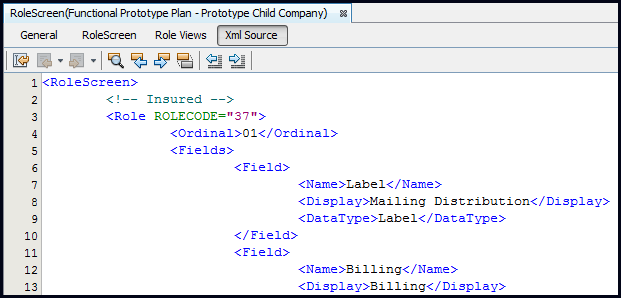
RoleScreen XML Source Pane
Copyright © 2009, 2014, Oracle and/or its affiliates. All rights reserved. Legal Notices