Assignment Pane
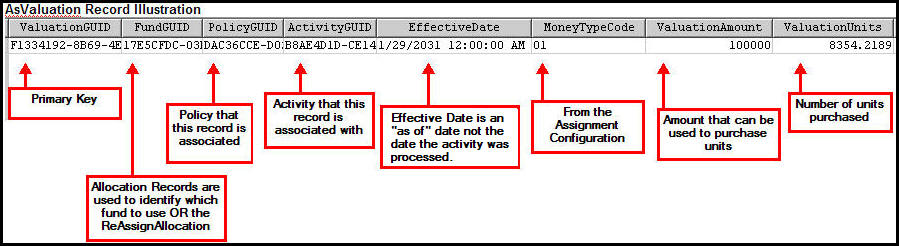
The Assignment pane allows for visual configuration of assignments that are made to a policy through transaction processing. The Assignment element, located in the transaction XML, describes how values should be assigned to the policy and written to the valuation database tables for the Valuation process. AsValuation is the table that holds all of a policy’s records that describe how each activity either moved money in or out. Assignment uses allocations and writes a record for each allocation by assignment and money type.
Assignment allows money to be deposited, withdrawn or transferred from the funds. Allocation provides a request as to how to affect each fund, such as a deposit, withdrawal or transfer. Valuation is the result after money movements are completed.
The Rules Palette offers a variety of ways to assign money-in and money-out. Depending on the assignment chosen, the Rules Palette will require certain input and the Oracle Insurance Policy Administration system will process money in or out in a certain manner. For a complete list of assignment types, see the XML Configuration Guide in this help system. Assignment information can be found under Transaction Rule | Transaction Elements | Assignment Elements.
An assignment must have a money type associated with it, since money can be applied to a policy from different sources and it must be tracked for auditing and tax purposes. Money types are stored, edited and updated via the AsCodeMoneyType table in the Codes Names folder in the Admin Explorer window. Each money type is assigned a code value that is included in the assignment, which also allows for it to process and display the money values correctly.
Valuation Associations
Valuation Associations
AsValuation Record Illustration
AsValuation record from database
There are four buttons on the Assignment pane.
-
Expand: shows the attribute and money type node under each assignment.
-
Collapse: hides the attribute and money type node under each assignment.
-
Remove: removes assignments, attributes or money types.
-
Add: adds assignment, attributes or money types.

Assignment Pane and Assignment Buttons
Insert an entire Assignment section from a CopyBook or configure the Assignment section through the Assignment pane.
Please see the XML Configuration Guide topic in this help system for a list of all elements, attributes and values needed for configuration. View Transaction Rules | Transaction Elements | Assignment Elements.
Insert Entire Assignment Section from CopyBook
-
Navigate to the transaction and click the Assignment pane.
-
Expand the CopyBook section at the top of the pane.
-
Click the Include box.
-
Click lookUp and select the CopyBook from the CopyBook Lookup window.
-
Click OK. The CopyBook assignment information will be added to this pane.
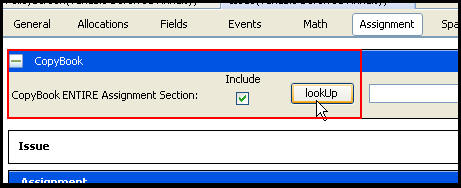
CopyBook Section on Assignment Pane
Steps to Configure an Assignment
-
Navigate to the transaction or create a new transaction.
-
Check-out the transaction’s XML file.
-
Open the Assignment pane.
-
Select
 Assignments.
 -
Right-click and select Add or select the Add
 button. A new assignment will be added with two
nodes: attributes and money types. If the assignment requires a money type configuration element, then it will be automatically added.
button. A new assignment will be added with two
nodes: attributes and money types. If the assignment requires a money type configuration element, then it will be automatically added.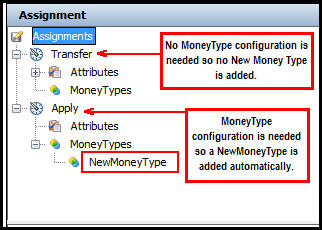
Assignment Pane of a Transaction with Two Types Added
-
Select an assignment from the Assignment type drop-down box.
-
Right-click on the attributes node under the new assignment and select Add. A new attribute will appear.
-
Click the new attribute. The bottom portion of the screen will display the attribute options that can be configured.
-
Configure the attribute.
-
Right-click on the money type node under the new assignment and select Add.
-
Select a money type from the Name drop down box on the bottom section of the screen.
-
Select a fund if applicable.
-
Select a money type from the drop-down box.
-
Click Save to save the changes to the database.
-
Check-in the file once all necessary assignments have been added.
Copyright © 2009, 2014, Oracle and/or its affiliates. All rights reserved. Legal Notices