Configure Requirements
After a requirement definition is created, additional criteria and can be configured. A visual editor is available to assist with requirement configuration.
Requirements Visual Editor
When a requirement is checked out, the visual editor will open in the Configuration Area. There are five panes available to assist with visual editing. Each pane is described below.
General Pane
This pane displays the information entered when creating the requirement definition. Much of the information on this pane cannot be edited, but you can double-click in the other fields to update information. The Requirement Description is what the OIPA user will see when requirement information is displayed.
Fields Pane
This pane is similar to the Fields pane for transactions, with the exception that multifields are not applicable to requirements. The fields defined here will display on the Requirement Detail window in OIPA. This window opens when the requirement icon next to an activity is clicked. Then right-click on a requirement and select Requirement Detail. The fields are populated with values from the GeneratePendingRequirements business rule.
Events Pane
This pane is similar to the Events pane for transactions. Fields must be configured if events are used.
Criteria Pane
There are two sections on this pane: Requirement
Groups and Requirement Criteria. These sections
can be collapsed by clicking the ![]() Collapse icon or expanded by clicking the
Collapse icon or expanded by clicking the
![]() Expand icon.
Expand icon.
-
Requirement Groups: provides a method of attaching multiple criteria together. Each group listed will have its own set of criteria defined in the Requirement Criteria section below. You will only see the criteria associated with the group you have selected. Clicking a different group will reveal the specific criteria assigned to that group. You can create a group without any associated criteria. Groups are saved to the AsRequirementGroup table.
-
Add: The Add button adds a new row. Double-click in the row to add the group information. Click Save on the Tool Bar to save the new group or just check-in the file.
-
Delete: The Delete button removes the selected group and all associated criteria. A confirmation window will appear to verify the delete. After the confirmation is verified, the Delete button changes to UnDelete. A group is deleted immediately if it was recently added and the file has not been checked-in. If the group existed previously, then the delete happens after the file is checked back in.
-
Revert: The Revert button reverts all changes made to the Group section.
-
Requirement Criteria: used as a reference for the system when it is determining whether or not to generate requirements for an activity. These are the fixed criteria the math variables are matched to in the GeneratePendingRequirements business rule in order to determine if the requirement is needed. You can associate multiple criteria with a Requirement Group. Criteria are saved to the AsRequirementCriteria table.
-
Add: The Add button adds a new row. Double-click in the row to add the criteria information. Click Save on the Tool Bar to save the new criteria or just check-in the file.
-
Delete: The Delete button removes the selected criteria. The Delete button changes to UnDelete when clicked. A criterion is deleted immediately if it was recently added and the file has not been checked-in. If the criterion existed previously, then the delete happens after the file is checked back in. When UnDelete is enabled, click it to remove the Delete check mark next to a row. This allows a delete to be reversed before the file is checked-in.
-
Revert: The Revert button reverts all changes made to the Criteria section.
Requirement Criteria should be configured to make the set of criteria within each Requirement Group mutually exclusive with respect to each other Requirement Group's set of Criteria. This would make it impossible for any given activity to satisfy more than one set of criteria. This is often done by using PlanGUID as one of the criteria in each group but it can be done using other methods as well.
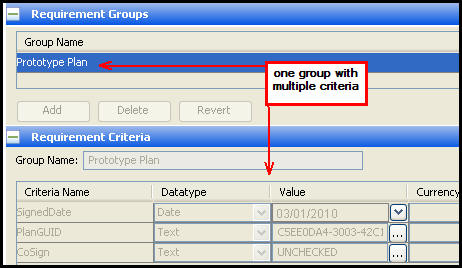
Criteria Pane of a Requirement in Admin Explorer
XML Source Pane
This pane displays the XML source code for the Requirement Details screen. There are several important points concerning requirement XML:
-
The default XML for a requirement is just an empty <RequirementDefinition> parent tag. No further XML configuration is necessary to check in the requirement.
-
The requirement cannot be checked in if this tag does not exist. It must be present in the XML Source pane.
-
Fields must be configured if events are needed.
Navigate to Requirements | Requirement Detail in the XML Configuration Guide for more information on configuring this pane.
XML Definition Pane
This pane contains the necessary configuration for processing a single requirement. There are a few important points concerning requirement definition XML:
- The default XML for a requirement definition is just an empty <Requirement> parent tag. No further XML configuration is necessary to check in the requirement.
- The requirement cannot be checked in if the parent tag does not exist.
Navigate to Requirements | Requirement Definition in the XML Configuration Guide for more information on configuring in this pane.
XML Results Pane
This pane contains the configuration for the Requirement Results screen. The requirement results on the Requirement Result screen may be formatted as a collection of fields, a text document or a table depending on the type of information contained within the result. There are a few important points concerning requirement result XML:
- The default XML for a requirement result is just an empty <RequirementResults> parent tag. No further XML configuration is necessary to check in the requirement.
- The requirement cannot be checked in if the parent tag does not exist.
Navigate to Requirements | Requirement Results in the XML Configuration Guide for more information on configuring this pane.
Configuring a Requirement
-
From the Admin Explorer tab open Administration | Requirements and expand the relevant requirement node.
-
Expand the node for the relevant override level and check out the requirement.
-
Click on the Criteria pane.
-
Click Add in the Requirement Groups section and click in the highlighted field.
-
Type the Requirement Group name. This is required.
Criteria do not have to be added initially. The Rules Palette allows this section to remain empty; however, before the requirement can be used in OIPA, criteria must be added.
-
Scroll down and click Add in the Criteria section then click inside the highlighted field. The Add button is only enabled if a requirement group was created.
-
Type the Criteria name. Criteria must have unique names within the same group. The Criteria names can be reused if they are used only once in each group.
-
Select a datatype.
-
Enter a value.
-
Select a Currency if the datatype is money.
- Provide any additional configuration on the XML Definition and/or XML Results panes.
-
Right-click on the XML file and select Check in to save the changes to the database.
Copyright © 2009, 2014, Oracle and/or its affiliates. All rights reserved. Legal Notices