Assign Users to Security Groups
Security must be assigned to each user of the OIPA system. After the security groups are created, OIPA users are added and associated with a security group. A security manager will need to send the user name and password information to the user once the user has been added.
Steps to Add a New User
-
Click the Admin Explorer tab and open the Security | Application Security folders.
-
Right-click on the Users folder and select Add New.
-
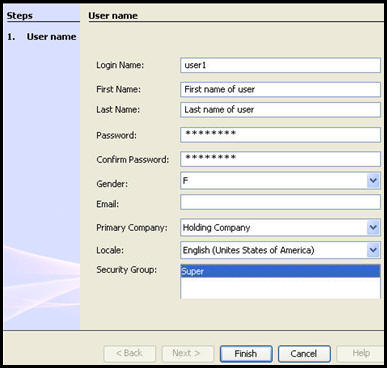
Enter the user information as shown in the image below. This is where the user's log-in name and password are created. Send this information to the user once it has been saved.
-
Select the primary company the user will be working with.
-
Select the locale where the user is based. The locale determines the language that dynamic fields and transaction names will display in when the user logs into OIPA.
-
Select the Security Group to assign to the user. If the security group is associated with a company that is different from the Primary Company selected in this record, then the user will have access to the company identified in the security group when logged into OIPA. The security group company takes precedence.
-
Select Finish when all of the information has been selected. The user information will appear as an individual XML file under the User node.
New User Security Wizard
Steps to Edit User Information
-
Click the Admin Explorer tab and open the Security | Application Security folders.
-
Open the Users folder.
-
Double-click on the user folder to edit. It will reveal the XML file.
-
Double-click the XML file to open it in the Configuration Area.
-
Make the changes to the user file.
-
Click Save on the Tool bar when finished. This will save the changes to the database.
-
Close the file when finished. This is done by clicking the Close icon
 next to the name of the file at the
top of the Configuration Area.
next to the name of the file at the
top of the Configuration Area.
Steps to Delete a User
-
Right-click on the XML file in the user's folder.
-
Select Delete User.
-
Select Yes on the Delete Confirmation window. The user will be removed.
Copyright © 2009, 2014, Oracle and/or its affiliates. All rights reserved. Legal Notices