Work With Security Groups
A security group is made up of a set of privileges that are assigned to users, granting them access to pages, plans and transactions (activities) in OIPA. Users that need full access to OIPA can be assigned to a security group that provides the highest level of security to all pages, plans and transactions, giving them unrestricted access to OIPA. Other users may need more restricted access, therefore, a security group can be created to define the level of access those users will need in OIPA. Depending on the granularity with which security groups are defined, users may belong to multiple security groups. In this situation, the actual security provided to a user is the union of the security information.
Where conflicts occur - when security access to a specific item is indicated in more than one security group - the highest level of security defined by the competing security groups is honored.
Security groups can be created, edited and deleted from the Application Security folder in the Admin Explorer.
Explanation of Security Folder Organization
The main security folder resides in the Admin Explorer. Security is divided at the top level into two folders: Application Security and Palette Security. Application Security defines the pages, buttons, fields and activities a user can access in OIPA. Palette Security defines the configuration tasks that users can perform in the Rules Palette.

Main Security Folders in Admin Explorer
Application Security Folder Structure
Application Security is divided into two main folders: Users and Security Groups. The Users folder is where users are created, maintained and assigned to security groups.
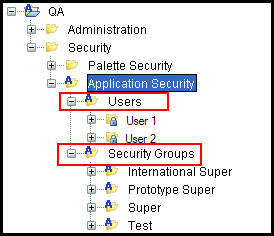
Application Security Folders in Admin Explorer
The Security Groups folder contains all the various combinations of security privileges that can be assigned to OIPA users. Every security group has a unique folder listed under the Security Group section. The security group is divided into three sections: Company, Plan and Transaction.
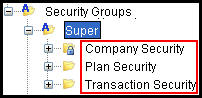
Security Group Folders in Admin Explorer
-
Company Security: Identifies the company the security group will be able to access in OIPA. Only one primary company may be identified.
-
Plan Security: Identifies all the plans associated with the company that was chosen in the Company Security file. Each plan is broken into individual pages where security can be assigned on a page by page basis.
-
Transaction Security: Places specific security around transactions that will process as activities in OIPA.
Steps to Create a new Security Group
-
Click the Admin Explorer tab and open the Security | Application Security folder.
-
Right-click the Security Groups folder and select New Security Group.
-
Enter a name for the new security group.
Each security group should only grant access to one primary company. Multiple primary companies cannot be viewed in OIPA. If a user needs access to multiple primary companies, then separate security groups should be created for each company and the user should have multiple login IDs.
-
Select Finish. The new security group will be listed in the Security Groups folder.
-
Double-click on the name of the security group that was created. This will reveal the Company Security, Plan Security and Transaction Security folders. Only the Company Security folder is enabled.
-
Double-click the Company Security folder to reveal the XML file. Double-click the XML file to open it in the Configuration Area.
-
Add or remove any checked options.
- Check in the XML file to save the changes. All other security folders for the security group are now enabled.
Steps to Edit a Security Group
-
Click the Admin Explorer tab and open the Security | Application Security folders.
-
Open the Security Groups folder and double-click on the security group to edit.
-
Right-click on the XML file and select Check-out.
-
Select or de-select checkboxes next to the privileges to edit.
-
Right-click on the XML file and select Check-in. This will save the changes to the database.
Steps to Delete a Security Group
-
Open the Security folder in the Admin Explorer tab.
-
Open the Security Groups folder.
-
Open the specific security group folder that should be deleted.
-
Right-click on the XML file and select Delete Security Group.
-
Select Yes when the confirmation messages appears.
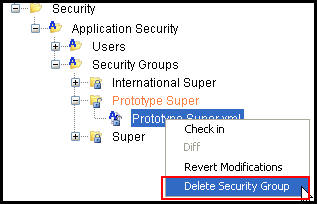
Security Groups Right-Click Options
Copyright © 2009, 2014, Oracle and/or its affiliates. All rights reserved. Legal Notices