Add a New Plan
For individual Products, new plans are added to companies through the Main Explorer tab. Once a new plan is added, security must be assigned to it or it will not be visible in OIPA. When a plan is created, the plan information is written to the AsPlan table. Plan information can be edited by right-clicking on the plan name and selecting the Edit Plan option. This will open the Plan Maintenance window.
For group Products, new plans are added in the application itself.
A plan cannot be deleted once it has been created.
Plan Rules
Some business rules are automatically created and attached to a new plan. In OIPA, the Plan Screen, Segment Screen, Policy Screen, Policy Values Screen, Values Screen, EligibleTransactionsByPolicyStatus and PolicyAllocation Screen business rules are automatically created and can be found in the Plan Rules folder under the new plan. Any other business rules needed by the plan must be added by creating rule overrides from the Global Rules Explorer folder.
Steps to Create a New Plan
-
Right-click on the plan folder where the new plan should be added.
-
Select New Plan. The New Plan wizard will appear.
-
Enter the plan information.
-
Company Name: This field is disabled and is populated with the Company name associated with the plan.
-
Product: The Product field will only be visible if Products are turned on in the Web Application Utility during installation. When Products are on, this field is pre-populated with the Product name and disabled as the new plan must be created under a Product.
- New Plan Name: This is a required field. Enter the name of the plan. The plan name may not be the same name within a company, but the plan name may be the same across primary and subsidiary companies.
-
Currency Code: Select the default currency for monies applied to this plan. If the currency code is not listed, go to Admin Explorer and open the Currency folder. Add the new currency code to the Currency Editor. Refer to the Currency section for detailed steps on adding a new currency code.
-
Market Maker: Select the Market Maker you plan to use for any currency conversions. If the Market Maker is not listed, go to Admin Explorer and expand the Market Maker folder. Open the Market Maker Editor and add the new Market Maker. Refer to the Market Maker section for more details.
-
Plan Effective Date: This field is pre-populated with the current system date. The date can be changed, but must be earlier chronologically than the Plan Expiration Date.
-
Plan Expiration Date: Select the date when this plan will expire. If the date entered in this field is earlier than the Plan Effective Date, an error will occur.
- Point In Time Valuation: Only two options can be selected for a new plan that does not yet have policies associated with it. Select Yes for Point in Time valuation or No for Traditional valuation. The Transitioned option is not available as there are no existing policies to transition. Once policies are added to this plan, the valuation type cannot be changed.
- Mixed Valuation: This field will be disabled. It is only enabled for existing plans if Point In Time Valuation is set to Transitioned.
-
Select Finish when all of the plan information has been entered. The Finish button will only become enabled when all of the required plan information is entered.
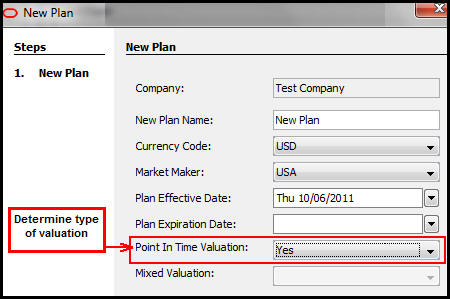
New Plan Wizard with Valuation Highlighted and Product Functionality Off
Agreement Plans
Plans can also be created at the agreement level by using the Agreement screen in OIPA. If the user has the proper security settings enabled, an Add button will display above the Plan Agreement Details section of the screen, which will allow for the creation of agreement-level plans. Once saved, these plans will display in the Rules Palette.
Copyright © 2009, 2014, Oracle and/or its affiliates. All rights reserved. Legal Notices