Activity Filters
From Oracle Insurance Rules Palette
Activity Filters
The Activity Filter editor is located in the Admin Explorer tab's Administration folder. This editor is used to configure filters that control the activities that display on OIPA's various activity screens. Using activity filters will ensure that only relevant activities will display on any given activity screen.
The editor is divided into two sections: Filter - General and Details. The only field that can be edited in the Filter - General section is the Name field. Once a filter is created, the other fields in the Filter - General section are locked down. The Details section is used to specify which transactions should display on the activity screen being configured. These can be edited at any time.
Types of Activity Filters
Activity filters are based on three criteria: activity screen, company, and filter level. Available activity screens are Client, Plan and Policy. When creating an activity filter, the filter level is specified using the Company, Product (if Products are enabled), Plan, Security Group and/or User fields of the New Activity Filter wizard. The Activity Filter folder hierarchy in the Admin Explorer is based on these same criteria.
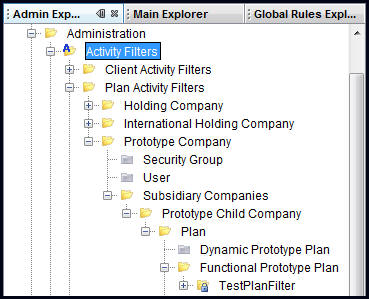
Activity Filters Folder Structure
Only one activity filter can exist at a given level (i.e. no two filters can exist for the same combination of activity screen, company and Product/plan/security group/user), and activity filter configuration options differ depending on the activity screen for which the filter is being created:
Client Screen Activity Filters
Creating an activity filter for this screen will control the activities a particular security group or user sees on the Client Activity screen in OIPA. Activity filters can only be created at the primary company level for the Client Activity screen. Additionally, Product- and Plan-level activity filters are not available for the Client Activity screen.
Plan Screen Activity Filters
Creating an activity filter for this screen will control the activities a particular security group or user will see on the Plan Activity screen in OIPA. Product- and Plan-level activity filters can be created for the Plan Activity screen if the filter corresponds to a subsidiary company. Security Group- and User-level filters can be created if the filter corresponds to a primary company.
Policy Screen Activity Filters
Creating an activity filter for this screen will control the activities a particular security group or user will see on the Policy Activity screen in OIPA. Product- and Plan-level activity filters can be created for the Policy Activity screen if the filter corresponds to a subsidiary company. Security Group- and User-level filters can be created if the filter corresponds to a primary company.
Configuration Requirements
In addition to the Activity Filters node in the Admin Explorer, there is an AsCode table created for ActivityFilters: AsCodeFilterType. This table holds code values for each filter type, and can be modified by navigating to Admin Explorer | Administration | Code Names | AsCodeFilterType.
Steps to Create a New Activity Filter
Only one filter can exist at a given level. No two filters can exist for the same combination of activity screen, company and Product/plan/security group/user.
- Navigate to the Admin Explorer.
- Open the Administration folder and locate the Activity Filters folder.
- Right-click on the Activity Filters folder and select Add New Activity Filter. The New Activity Filter wizard will open.
- Select the activity screen to which the filter applies from the Activity Screen drop-down box. This is a required field. When an activity screen is selected, the Company field becomes enabled. If Client is chosen, then the Security Group and User fields are enabled, while the Product (if applicable) and Plan fields are disabled.
- Select a company from the Company drop-down box. This is a required field. Activity filters can be created for primary companies or subsidiary companies--however, if Client was chosen in the Activity Screen field, only primary companies will be available for selection.
- Enter a name for the filter in the Name field. This is a required field. Activity filter names can be identical, but only if the filters are for different activity screens.
- If Products are enabled in the environment, then select one from the Product drop-down box. This is an optional field. This field will only be enabled if Plan or Policy was chosen from the Activity Screen field.
- Select a plan from the Plan drop-down box. This is an optional field. This field will only be enabled if Plan or Policy was chosen from the Activity Screen field. Additionally, if a Product was selected, then only the plans corresponding to that Product will be available for selection.
- Select a security group from the Security Group drop-down box. This is an optional field. This field will only be enabled if Client was chosen in the Activity Screen field, or if a primary company was chosen in the Company field. If the security group is selected, then the User field will become disabled.
- If needed, select a user from the User drop-down box. This field will only be enabled if Client was chosen in the Activity Screen field, or if a primary company was chosen in the Company field. This is an optional field. If a user is selected in the User field, then the Security Group field will become disabled.
The system will return a warning message when the filter is checked in if a duplicate name exists, in order to verify that the user is aware of the shared names. If the user tries to check in an activity filter with an identical name to another filter for the same activity screen, then the system will return an error message.
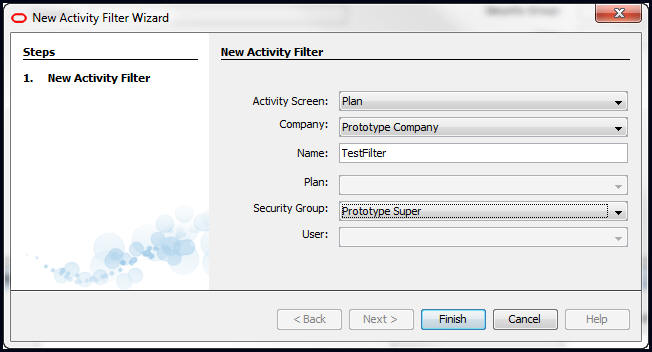
The New Activity Filter Wizard
Steps to Edit or Delete an Activity Filter
- Navigate to the Admin Explorer.
- Open the Administration folder.
- Open the Activity Filters folder and locate the filter to be edited or deleted.
- Right-click on the filter's XML file. To edit the filter, select Check out. To delete the filter, select Delete.
- If editing the activity filter, make the needed changes. In the Filter - General section of the Configuration Area, only the Name field can be edited. In the Details section, use the >> and << buttons to move transactions between the Included Transactions and Excluded Transactions boxes. Only the transactions listed in the Included Transactions box will be displayed in OIPA.
- Save any changes to the database by right-clicking on the activity filter's XML file and selecting Check in.
If checking in an activity filter with a name already held by another filter for the same activity screen, the system will return an error message, and the check in will be stopped. If checking in an activity filter with a name held by another filter for a different activity screen, the system will display a warning message, but check in will proceed.
An activity filter must have at least one transaction in the Excluded Transactions box to be checked in.