Child Funds
Child funds are used when the same fund is offered with different versions or bands. The Parent fund is always created first with the general information for the fund. Then specific child funds are created with the actual version of the fund that a client would elect in OIPA.
Lateral funds are another type of fund that can be associated with a parent fund. A parent fund can have a child fund or a lateral fund, but not both. Lateral funds and child funds are mutually exclusive.
If benefit funds are needed, then they are added after child funds as they must be attached to a child fund in a one-to-one relationship.
High Level Steps to Generate Child Funds
- Configure the FundScreen business to support child funds and any extra fields needed for the fund information.
- Make sure Parent funds were created using the Fund wizard in Admin Explorer.
- Use the ChildFunds.xml file to create child funds.
- Associate funds with plans.
- Set fund status, if applicable.
Step 1: Configure the FundScreen business rule
The FundScreen business rule needs to be configured to indicate to the system that child funds will be allowed for a particular company. A <ChildFund> section is included at the beginning of the rule indicating whether child funds and benefit funds are supported and defining the types of parent funds that can have child and benefit funds. Usually only one field is created for child funds and the field is a combo field that stores the type of child funds that could potentially be created.
The <ParentFundFields> section holds fields for additional information for the fund, which carry over to any child or benefit funds.
- In the Global Explorer, navigate to Business Rules | Screen | FundScreen.
- Locate the FundScreen business rule in the Company Overrides folder or create a new override of this rule for the applicable company.
- Configure the <ChildFunds> element.
- Include the ALLOW="Yes" attribute.
- Add a <Fund TYPE=”##”>Yes</Fund> element for each type of fund that needs to support child funds.
Add an <Fund TYPE=”##”>No</Fund> element for each type of fund that does not support child funds.
- Configure the <ChildFundFields> element.
- Configure the <Field> elements for any the type of child funds that need to be created.
Step 2: Create Parent funds via fund wizard
Create the parent fund that the child funds will be associated with. This can hold general information, but clients will never be enrolled into this as a fund.
- Navigate to the Admin Explorer.
- Expand the Administration folder.
- Expand the Funds folder.
- Right-click on the Company Level folder and select Add New Fund. The New Fund Wizard will appear.
- Type the fund information in the fields provided. Each field is described below.
- Fund name: The name of the fund being entered.
- Fund Type: This is the type of fund being created. Populated by AsCodeFundType. Edit these options through the Code editor in the Admin Explorer.
- Currency code: This is the currency of the fund, which defaults to the currency code of the Primary Company or System Properties. Populated by AsCurrency, which can be edited in the Currency editor in the Admin Explorer.
- Calendar code: This is the calendar that the fund is traded on. Populated by AsCodeCalendar. An Override Offset checkbox is available to selected if the fund type is Unit Linking. If this box is checked, Fund Offset Days can be selected directly below.
- Fund Offset Days: This drop-down box is only enabled if the Fund Type is Unit Linked and the Override Offset is checked. Enter the number of days to use as the offset for processing. When entered, an entry is made for the fund in AsPriceOffset, which links to AsFund via a FundGUID.
- Select Finish. If the Finish button is not enabled, required fund information may be missing. When complete, the Fund Detail pane opens for the new fund in the Configuration Area.
Step 3: Use the ChildFunds.xml file to create Child Funds
The ChildFunds.xml file is used to actually create the child funds. It takes the <ChildFundField> information from the FundScreen configuration, lists all possible permutations of field values and provides a default child fund name. Using the check boxes, select the child funds to create.
- Navigate to the Admin Explorer and open the Company | Parent Fund folder.
- Expand the ChildFunds folder.
- Check out the ChildFunds (name of fund).xml file.
- In the Create Funds pane, default child funds are listed. They are created using the <Fields> information from the <ChildFundFields> in the FundScreen business rule. If needed, rename the default fund name for any child fund that needs to be created by selecting in the box and renaming the fund.
- Check the select box for any child fund that needs to be created.
- Right-click on the ChildFunds(Plan Name).xml file and select Check in. Child funds are automatically created in the Child Funds node in the Admin Explorer. Notice that the information from the Parent Fund is carried over to the Child Fund, which can’t be changed, and the additional Child Fund Relation fields are listed in the selection from the Create Funds pane.
Step 4: Associate Funds with Plans
To associate child funds with a plan, use the Plan to Fund method. The parent fund must first be associated with the plan, before child funds can be associated. Navigate to the plan in the Funds node and make the associations there.
- In the Admin Explorer, expand Administration | Funds.
- Expand the Primary Company Name | Subsidiary Companies | Subsidiary Company Name | Plans | Plan Name.
- Expand the Parent Funds folder.
- Check out the Parent Fund xml file.
- Select the funds from the Available Funds box and select the arrow to move them to the Attached Funds box.
- Check in the file.
- Expand the Child Funds folder.
- Right-click on the Child Funds xml file and select Check out.
- Select the Child Fund Relation Fields that are listed in the top box under Child Funds that should be available for the plan. Remember the Child Fund Relation Fields are the fields that were configured to define the type of class or band that the fund is going to be.
- Select the Apply Relation Filter, which loads the child funds with matching relation field values selected in the Available Funds box. The list is an alphabetized multi-select list box of available child funds related to the parent funds associated to the plan.
-
Use the arrow buttons between the Available Funds and Attached Funds box to define the child funds that will be associated with the plan.
- Check in when complete.
Step 5: Set Plan Fund and Plan Fund Status information
Plan fund information such as removal method, removal precedence and deposit level tracking are handled at the parent fund level. Plan fund status records are not created in the AsPlanFund table for child funds. All child funds adhere to the plan fund status information set for the parent fund.
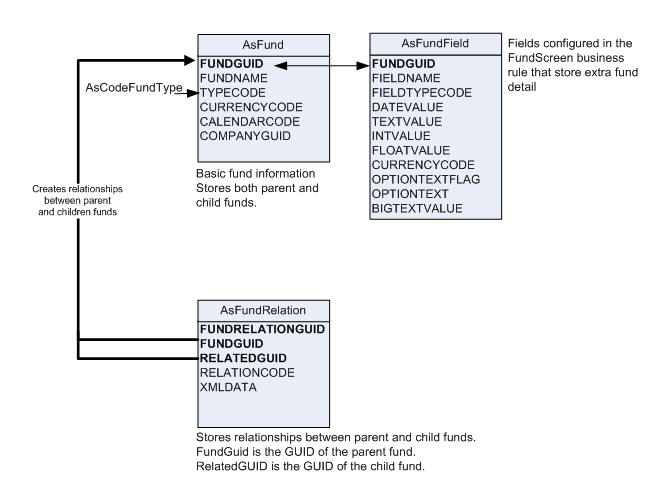
OIPA Fund Database Tables
Copyright © 2009, 2014, Oracle and/or its affiliates. All rights reserved. Legal Notices