Localization Editor
The Localization Editor manages multiple translations for the display of transaction names and dynamic fields as well as any messages that appear on the screen in the Oracle Insurance Policy Administration (OIPA) system. The user can create locales and add and edit existing translations. Currency decimal displays can also be set.
When a locale is created it should be associated with a particular country. Within those various locales, a translation value can be assigned to the transaction names, dynamic fields and screen messages. When a user is assigned a specific OIPA security group, the user is also associated with a locale. The locale selected will determine what language the transaction names and dynamic fields will display in when populated in the OIPA system. Translation values are stored in the AsTranslation table.
The Localization Editor is accessed from the Tools tab of the Main Menu.
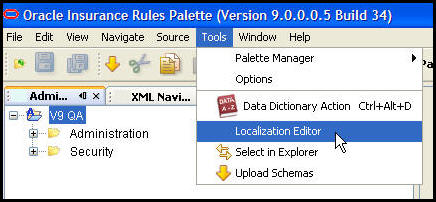
Localization Editor Option on the Tools Drop Down Menu
Steps to Create a New Locale
-
Click Tools from the Main Menu.
-
Select Localization Editor. The editor will open.
-
Right-click on one of the locale folders and select New Locale.
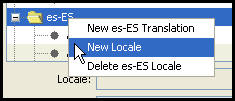
Locale Right-Click Options
-
Click to select a country from the left side of the screen.
-
Click to select a language from the right side of the screen.
-
Click OK. The new locale will display with a folder icon. All translations associated with that locale will be listed beneath it.
Delete a locale by right-clicking on the locale folder and selecting Delete Locale. A delete message will appear next to the locale and it will be removed when the Localization Editor is closed.
Make sure to enter the new locale in AsCodeLocale so that the translations can be associated to a user for viewing in OIPA.
Steps to Add a Translation
-
Open the Localization Editor.
-
Right-click on the locale folder for the country where the new translation will be added and select New Translation.
-
Enter a mnemonic for the message in the Translation Key field. The mnemonic should be in latin characters and should be descriptive enough to indicate what message it represents. For example, MinPremViolation would be the mnemonic for the message for a minimum premium violation.
-
Enter the translation in the Translation Value field.
-
Click OK.
Note: In a development environment, you must restart the application server after adding a new translation in order to see the new translation in OIPA.
Steps to Edit Existing Translations
-
Click on the field that contains the translation to edit. The translation value will be displayed at the bottom of the Localization Editor.
-
Enter the new translation value.
-
Continue updating any other translation values.
-
Click OK when finished. The changes will be saved to the database.
Steps to Control Decimal Displays
-
Open the Localization Editor from the Tools window.
-
Right-click on a locale and select New Translation. The New Translation Unit window will open.
-
Enter Number.Decimal for the Translation Key.
-
Enter the value.
-
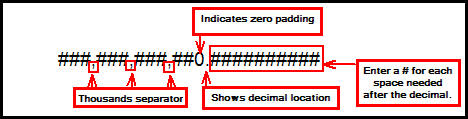
Use # for each number.
-
Use a comma to separate thousands.
-
Use a zero just before the decimal place to indicate zero padding. If zero padding is not needed, use a #.
-
Use a period to indicate the decimal place.
-
Use a # for each decimal place needed.
-
Click OK to save the new translation.
Copyright © 2009, 2014, Oracle and/or its affiliates. All rights reserved. Legal Notices