Step 1. Review iiiStartDate Field Visualization
REP002 - Field Visualizations
In this step you will review the standard field visualization created for DateTime field type and you will add another visualization to the iiiStartDate field.
A field can have several visualizations defined for it. The default visualization which is used is determined by its DefaultVisualization property.
1. Open the iiiStartDate field in the Editor.
2. Select the tab.
You will notice that there is a visualization VisualDateTime already defined which shows a Datetime Entry Field. This is the way the Start Date field was displayed (edit box with a drop-down calendar) in the Test Fields application you created in the previous exercise.
(If your partition is web-enabled, the field may also have a default weblet visualization.)
3. Press the  toolbar button to add a calendar visualization to the Start Date field.

Notice that the field now has two visualizations: VisualDateTime and VisualCalendar.
4. Double-click the VisualCalendar in the list to display its properties in the tab.
5. Locate the DefaultVisual property and notice it is set to False.
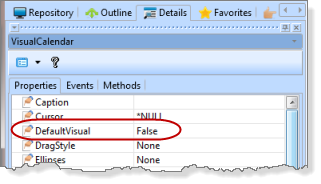
6. Double-click the VisualDateTime visualization to display its properties. Its DefaultVisual property is True which means this is the default way the field will be displayed on a form.
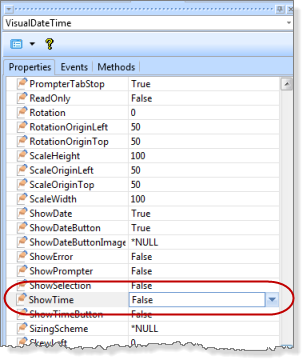
7. Do not change the DefaultVisual property. You want to keep the Date Entry Field drop-down visualization because it takes up less room than the calendar on the form.
8. Notice that the VisualDateTime shows both the date and time. You will not need to see the time in the Start Date field. To hide it set the property to False.
Although LANSA also has a field type Date, the use of the DateTime type is recommended because LANSA manages DateTime fields if you move the data from one time zone to another. Typically, data can be represented in the local time zone but saved in the database as UTC (Universal Time).
9. Save and close the field.