Step 7. Update and Delete Last Record Read
FRM035 - Maintain a Simple Database Table
In this step you will learn about updating and deleting based on the last record fetched instead of using the WITH_KEY parameter.
In order to use the last record read, it is important that users cannot change the key once a record has been fetched. It is equally important that a FETCH has been performed before the update or delete is requested. In order to ensure this, you need to enable and disabled fields and buttons at the appropriate times.
A new button must also be added to allow the user to reset the form after a record has been fetched.
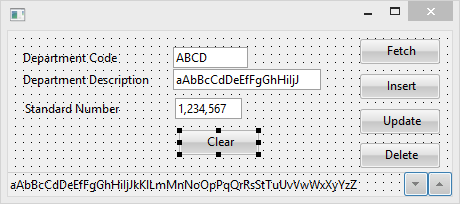
1. Drop a push button onto the form.
a. Set the button and to CLEAR.
b. Create a event routine for the CLEAR button.
2. Your form should appear like this:
3. To centralize your code, you will create a SUBROUTINE that can be called whenever the form needs to be reset. This subroutine needs to reset all fields to their default values and enable the Fetch and Insert buttons, as well as the DEPTMENT field. The Update and Delete buttons are disabled until a record has been fetched.
Your code should appear as follows:
SUBROUTINE NAME(INITFORM)
#FORMDATA := *DEFAULT
#UPDATE.Enabled #DELETE.Enabled := False
#DEPTMENT.Enabled #FETCH.Enabled #INSERT.Enabled := True
ENDROUTINE
4. In the event routine, execute your INITFORM subroutine.
Your finished code should appear as follows:
EVTROUTINE HANDLING(#CLEAR.Click)
EXECUTE SUBROUTINE(INITFORM)
ENDROUTINE
5. In the form's Initialize event routine, execute your INITFORM subroutine.
EVTROUTINE HANDLING(#com_owner.Initialize)
SET COM(#com_owner) CAPTION(*component_desc)
EXECUTE SUBROUTINE(INITFORM)
ENDROUTINE
6. Change the event routine code so that the Department Description field, Fetch and Insert button are disabled, and the Update and Delete buttons are enabled if a record has been successfully retrieved.
Your finished code should appear something like the following:
EVTROUTINE HANDLING(#FETCH.Click)
FETCH FIELDS(#DEPTMENT #DEPTDESC) FROM_FILE(DEPTAB) WITH_KEY(#DEPTMENT)
IF_STATUS IS_NOT(*OKAY)
MESSAGE MSGTXT('Error retrieving Department')
ELSE
#DEPTMENT.Enabled #FETCH.Enabled #INSERT.Enabled := False
#UPDATE.Enabled #DELETE.Enabled := True
ENDIF
ENDROUTINE
7. Remove the WITH_KEY parameter on the UPDATE and DELETE commands. The commands should appear simply as follows:
UPDATE FIELDS(#FORMDATA) IN_FILE(DEPTAB)
DELETE FROM_FILE(DEPTAB)
Also, after the update or delete has completed successfully, be sure to execute your INITFORMS subroutine.
FRM035 – Appendix contains a complete sample solution for form iiiMntDept.
8. Compile and execute the form.
When the form first appears, only , and are allowed.
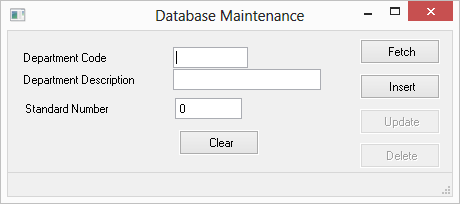
a. Add some new test data.
b. one of your newly inserted records.
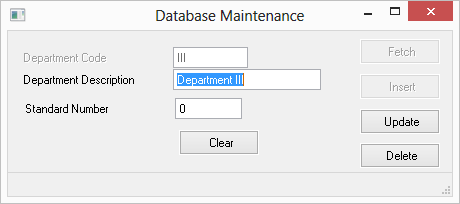
The Update and Delete buttons are now enabled while the Fetch and Insert buttons are disabled.
The Department Code is disabled to prevent the user from changing this code. You can now Update the record or Delete it. The Clear button will reset the form so that a different record can be fetched or more records inserted.
9. Close your form and close the form in the editor.