If you want to create subtotals or show other summary information for subsets of a table, you create groups using an aggregate query. Each group summarizes the data for all the rows in the table that have the same value.
For example, you might want to see the average price of a book in the titles table, but break the results down by publisher. To do so, you group the query by publisher (for example, pub_id). The resulting query output might look like this:

When you group data, you can display only summary or grouped data, such as:
- The values of the grouped columns (those that appear in the GROUP BY clause). In the example above,
pub_idis the grouped column. - Values produced by aggregate functions such as SUM( ) and AVG( ). In the example above, the second column is produced by using the AVG( ) function with the
pricecolumn.
You cannot display values from individual rows. For example, if you group only by publisher, you cannot also display individual titles in the query. Therefore, if you add columns to the query output, the Query Designer automatically adds them to the GROUP BY clause of the statement in the SQL pane. If you want a column to be aggregated instead, you can specify an aggregate function for that column.
If you group by more than one column, each group in the query shows the aggregate values for all grouping columns.
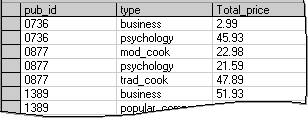
For example, the following query against the titles table groups by publisher (pub_id) and also by book type (type). The query results are ordered by publisher and show summary information for each different type of book that the publisher produces:
SELECT pub_id, type, SUM(price) Total_price
FROM titles
GROUP BY pub_id, type
The resulting output might look like this:

- In the Database window, click Queries
 under Objects, click the query you want to open, and then click Design on the database window toolbar.
 - Start the query by adding the tables, views, or functions you want to summarize to the Diagram pane.
When you create a query, you are retrieving data from a table, view, or function. To work with any of these objects in your query, you add them to the Diagram pane.
 Add a table, view, or user-defined function to the query
- In the Database window, click Queries
 under Objects, click the query you want to open, and then click Design on the database window toolbar.
 - In the Diagram pane, right-click the background and choose Add Table from the shortcut menu.
- In the Add Table dialog box, select the Tables, Views, or Functions tab.
- In the list of items, double-click each item you want to add.
- When you finish adding items, click Close.
The Query Designer updates the Diagram pane, Grid pane, and SQL pane accordingly.
Alternatively, you can drag objects onto the Diagram pane. You can drag a table, view, or inline function from the database window.
You can also drag columns or tables from the Database Designer or paste them from the Clipboard.
Tables and views are automatically added to the query when you reference them in the statement in the SQL pane.
The Query Designer will not display data columns for an table, view, or inline function if you do not have sufficient access rights. In such cases, only a title bar and the * (All Columns) check box are displayed for the table, view, or inline function.
 Add an existing query to a new query
- If necessary, click SQL
 to show the SQL pane.
 - In the SQL pane, type a right and left parentheses () after the word FROM.
- Open the Query designer for the existing query . (You now have two Query Designers open.)
- Display the SQL pane for the inner query – the existing query you are including in the new, outer query.
- Select all the text in the SQL pane, and copy it to the Clipboard.
- Click in the SQL pane of the new query, situate the cursor between the parentheses you added, and paste the contents of the Clipboard.
- Still in the SQL pane, add an alias after the right parenthesis. For more information on SQL aliases and subqueries, see the Microsoft SQL Server documentation.
- In the Database window, click Queries
- Right-click the background of the Diagram pane, then choose Group By from the shortcut menu. The Query Designer adds a Group By column to the grid in the Grid pane.
- Add the column or columns you want to group to the Grid pane. If you want the column to appear in the query output, be sure that the Output column is selected for output.
The Query Designer adds a GROUP BY clause to the statement in the SQL pane. For example, the SQL statement might look like this:
SELECT pub_id FROM titles GROUP BY pub_id - Add the column or columns you want to aggregate to the Grid pane. Be sure that the column is marked for output.
- In the Group By grid cell for the column that is going to be aggregated, select the appropriate aggregate function.
The Query Designer automatically assigns a column alias to the column you are summarizing. You can replace this automatically generated alias with a more meaningful one.

The corresponding statement in the SQL pane might look like this:
SELECT pub_id, SUM(price) AS Totalprice
FROM titles
GROUP BY pub_id