- Open a form, report, or data access page in Design view.
- Do one of the following:
 Move a control and its label together
- Click the control or its label.
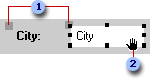
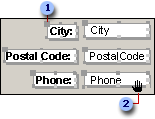
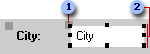
When you click either part of a compound control in forms and reports, Microsoft Access displays the move handles for both controls, as well as the sizing handles for the control that you clicked. On data access pages, when the control is selected, the label is not automatically selected. If you move the control, the label goes with it. But if you move the label, the control does not move.
- Move the pointer over the border (not the move handle) of either the control or its label. After the pointer changes to an open hand, you can drag the control or controls to a new position.
 Move handles of a control in a form or report.
 When the pointer changes to an open hand, you can drag the control.
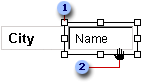 Move handle of a control in a data access page When the pointer changes to an open hand, you can drag the control.
Move a control and its label separatelyIn a data access page, you can't move a control separately from its label, but you can select the label and move it separately from the control.
- Click the control or its label.
- Do one of the following:
- In a form or report, place the pointer over the move handle in the upper-left corner of the control or label, and the pointer changes to an upward-pointing hand.
 When the pointer changes to an upward-pointing hand, you can drag the control.
- In a data access page, place the pointer on any edge of the label, and the pointer changes to an open hand.
- Drag the control or label to its new position.
Notes
- The parts of a compound control remain related, even if you move the individual parts separately.
- To move an attached label to another section without moving the control, you must use the Cut and Paste commands. In a form or report, if you move a label to another section, the label will no longer be related to the control.
Move two or more controls at the same time- Select the controls by holding down the SHIFT key as you click each control.
- Pass the pointer over the border (not the move handle) of any selected control until it turns into an open hand, and then drag the controls to a new position.
 Move handle When the pointer changes to an open hand, you can drag the controls.
 - Click the control or its label.
- When you move a control in a form or report, you can maintain its horizontal or vertical alignment with other controls by holding down the SHIFT key while selecting and moving the control. You can move the control horizontally or vertically only, depending on which direction you move it first.
- If you need to make small adjustments to the placement of a control, you might find it easier to press the appropriate arrow keys. If Snap to Grid is on when you use the arrow keys to move a control, Access aligns the control to the grid.
- If you want to temporarily override the current Snap to Grid setting, hold down the CTRL key while you're placing, moving, or sizing a control. For example, if Snap to Grid is turned on, you can hold down the CTRL key and move a control anywhere on the form, report or data access page without aligning it to the grid. Releasing the CTRL key restores the current Snap to Grid setting.
- Open a form, report, or data access page in Design view.
- Select the control or controls that you want to resize. To select more than one control, hold down the SHIFT key and click each control, or drag a rectangle over the controls.
- Drag the sizing handles until the control is the size you want.
Move handle
Sizing handles
If you select more than one control, all the controls change size as you drag the sizing handle of one control.
Note In data access pages, you can't resize a drop-down list box vertically. The vertical size of the drop-down list box is based on the font setting of the data in the control.
Size controls uniformly relative to each other on a form or report
- Open a form or report in Design view.
- Select the controls that you want to size by holding down the SHIFT key and clicking each control, or by dragging a rectangle over the controls.
- On the Format menu, point to Size, and then click one of the following commands:
- To Tallest Makes the controls as tall as the tallest selected control.
- To Shortest Makes the controls as short as the shortest selected control.
- To Widest Makes the controls as wide as the widest selected control.
- To Narrowest Makes the controls as narrow as the narrowest selected control.
Size controls uniformly relative to each other on a data access page
How you size controls relative to each other depends on whether you have Microsoft Internet Explorer 5.01 with Service Pack 2 (SP2), or 5.5 or later installed.
- Open a data access page in Design view.
If you have Internet Explorer 5.5 or later installed
-
Select the controls that you want to resize by holding down the SHIFT key and clicking each control.
Make sure that the control that you want to align the other controls to is the last control you select and that its sizing handles are white.
 The sizing handles of the primary selection are white.
 - On the Format menu, point to Size, and then click one of the following commands:
- Height Makes the controls as tall as the primary selection.
- Width Makes the controls as wide as the primary selection.
- Both Makes the controls as tall and as wide as the primary selection.
If you have Microsoft Internet Explorer 5.01 with Service Pack 2 (SP2) installed- On the Format menu, click Alignment and Sizing to display the Alignment and Sizing toolbar.
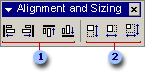 Align Left, Align Right, Align Top, and Align Bottom buttons
Size Height, Size Width, and Size Height and Width buttons
Align Left, Align Right, Align Top, and Align Bottom buttons
Size Height, Size Width, and Size Height and Width buttons - Make sure the control that is the size you want is selected.
- Do one of the following:
- To resize just one control, click the button that you want on the Alignment and Sizing toolbar, and then click the control that you want to resize.
- To resize several controls, lock the button that you want on the Alignment and Sizing toolbar by double-clicking it, and then click the controls that you want to resize.
To release the lock, click the same or a different button on the Alignment and Sizing toolbar, or press ESC.
-
Resize a control to fit its contents
You can resize a label, command button, image control, or unbound object frame to fit its contents. Also, if you increase the font size for a control, you can resize the control to accommodate the larger font.
- Open a form, report, or data access page in Design view.
- Select the control or controls that you want to resize.
- On the Format menu, point to Size, and then click To Fit.
Resize a control by using the grid
- Open a form, report, or data access page in Design view.
- If the grid isn't already displayed, on the View menu, click Grid.
- Select the controls that you want to resize.
- On the Format menu, point to Size, and then click To Grid.
Add a picture to the command button
Add a picture to a command button or a toggle button on a form
- Open a form in Design view.
- Click the command button or toggle button, and then click Properties
 on the toolbar to open its property sheet.
 - Click the Format tab, and in the Picture property box, type the path and file name for a .bmp, .ico, or .dib file. If you're not sure of the path or file name, click the Build button
 to open the Picture Builder.
In Microsoft Paint, you can create a file with a picture and caption for a button. Draw the picture and caption on a background of any size, and then select only the portion that will fit on the button. On the Edit menu, click Copy To and specify a file name in the Copy To dialog box.
Add a picture to a command button on a data access page
-
Open a data access page in Design view.
-
Click the command button you want to add the picture to, and then click Properties
on the toolbar. -
Click the Format tab, and in the BackgroundImage property box, specify the location of image you want to use in the following format:
url("http://WebServerName/FileName")
-
Do one of the following:
-
To specify that only one image appears on the button, set the BackgroundRepeat property to no-repeat.
-
To specify that copies of the image appear in a horizontal line on the button, set the BackgroundRepeat property to repeat-x.
-
To specify that copies of the image appear in a vertical line on the button, set the BackgroundRepeat property to repeat-y.
-
-
Set the position of the image in the BackgroundPositionX and BackgroundPostionY property boxes.
Change the command button caption
- Open a form, report, or data access page in Design view.
- Click the label or button, and then select the label text or button text.

- Type the new text.
See the event procedure behind the command button
The following procedure describes how to display an event procedure created by the Command Button Wizard on a form. In a data access page, you have to create the event procedure yourself.
- In form Design view, right-click the command button created by the Command Button Wizard.
- On the shortcut menu, click Build Event.