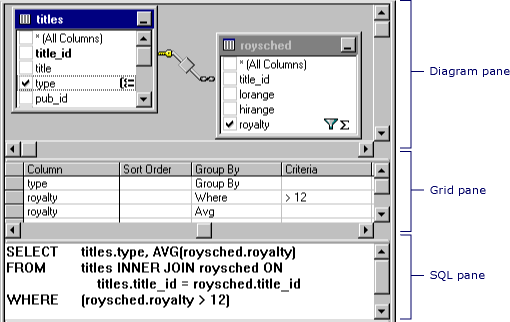
- The Diagram pane displays the tables, views, and in-line functions that you are querying. Each rectangle represents a table, view, or in-line function and shows the available data columns as well as icons that indicate how each column is used in the query. Joins are indicated by lines between the rectangles.
- The Grid pane contains a spreadsheet-like grid in which you specify options, such as which data columns to display, what rows to select, how to group rows, and so on.
- The SQL pane displays the SQL statement for the query. You can edit the SQL statement created by the Query Designer or you can enter your own SQL statement. It is particularly useful for entering SQL statements that cannot be created using the Diagram and Grid panes, such as union queries.
You can create a query by working in any of the panes: you can specify a column to display by choosing it in the Diagram pane, entering it into the Grid pane, or making it part of the SQL statement in the SQL pane. The Diagram, Grid, and SQL panes are synchronized
The Diagram pane presents a graphic display of the tables, views, user-defined functions, or subqueries in your query. It also shows any join relationships among them.
In the Diagram pane you can:
- Add or remove tables, views, user-defined functions, or subqueries and specify data columns for output.
- Specify columns for ordering the query.
- Specify that you want to group rows in the result set.
- Create or modify joins between tables, views, user-defined functions, or subqueries.
When you make a change in the Diagram pane, the Grid pane and SQL pane are updated to reflect your change. For example, if you select a column for output in a table, view, user-defined function, or subquery window in the Diagram pane, the Query Designer adds the data column to the Grid pane and to the SQL statement in the SQL pane.
 About the Diagram pane icons, check boxes, and symbols
Each table, view, user-defined function, or subquery appears as a separate window in the Diagram pane. The icon in the title bar of each rectangle indicates what type of object the rectangle represents, as illustrated in the following table.
| Icon | Object type |
|---|---|
 |
Table |
 |
View |
 |
In-line Function |
 |
Subquery (in FROM clause) |
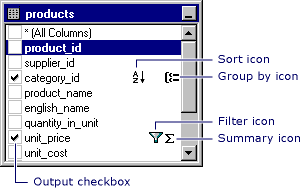
The following table lists the check boxes and symbols used in the rectangle for each table, view, or user-defined function.
| Check box or symbol | Description |
|---|---|
    |
Specifies whether a data column appears in the query result set (Select query) or is used in an Update, Append, Make- Table, or Append Values query. Select the column to add it to the results. If (All Columns) is selected, all data columns appear in the output.
The icon used with the check box changes according to the type of query you are creating. When creating a Delete query, you cannot select individual columns. |
  |
Indicates that the data column is being used to order the query results (is part of an ORDER BY clause). The icon appears as A-Z if the sort order is ascending or Z-A if sort order is descending. |
 |
Indicates that the data column is being used to create a grouped result set (is part of a GROUP BY clause) in an aggregate query. |
 |
Indicates that the data column is included in a search condition for the query (is part of a WHERE or HAVING clause). |
 |
Indicates that the contents of the data column are being summarized for output (are included in a SUM, AVG, or other aggregate function). |
Note The Query Designer will not display data columns for a table, view, or user-defined function if you do not have sufficient access rights to it or if the database driver cannot return information about it. In such cases, the Query Designer displays only a title bar for the table, view, or user-defined function.
Joined tables on the Diagram pane
If the query involves a join, a join line appears between the data columns involved in the join. If the joined data columns are not displayed (for example, the table, view, user-defined function, or subquery window is minimized or the join involves an expression), the Query Designer places the join line in the title bar of the rectangle representing the table, view, user-defined function, or subquery. The Query Designer displays one join line for each join condition.

The shape of the icon in the middle of the join line indicates how the tables or table-structured objects are joined. If the join clause uses an operator other than equal (=), the operator is displayed in the join line icon. The following table lists the icons that can be displayed in a join line.
| Join line icon | Description |
|---|---|
 |
Inner join (created using equal sign). |
 |
Inner join based on the "greater than" operator. (The operator displayed in the join line icon reflects the operator used in the join.) |
 |
Outer join in which all rows from the table represented on the left will be included, even if they do not have matches in the related table. |
 |
Outer join in which all rows from the table represented on the right will be included, even if they do not have matches in the related table. |
 |
A full outer join in which all rows from both tables will be included, even if they do not have matches in the related table, view, user-defined function, or subquery. |
Icons on the ends of the join line indicate the type of join. The following table lists the types of joins and the icons that can be displayed on the ends of the join line.
| Icon on ends of join line | Description |
|---|---|
 |
One-to-one join |
 |
One-to-many join |
 |
Query Designer cannot determine join type |
The Grid pane allows you to specify query options
- Columns to display and column name aliases.
- The table that a column belongs to.
- Expressions for calculated columns.
- The sort order for the query.
- Search conditions.
- Grouping criteria, including aggregate functions to use for summary reports.
- New values for Update or Append Values queries.
- Target column names for Append queries.
Changes you make in the Grid pane are automatically reflected in the Diagram pane and SQL pane. Similarly, the Grid pane is updated automatically to reflect changes made in the other panes.
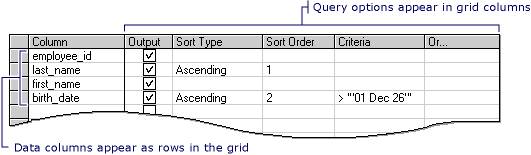
The rows in the Grid pane display the data columns used in your query; columns in the Grid pane display query options.
The specific information that appears in the Grid pane depends on the type of query you are creating. If you are creating a Select query, the Grid pane contains different columns than if you are creating an Update query.
The following table lists the grid columns that can appear in the Grid pane.
| Column | Query type | Description |
|---|---|---|
| Column | All | Displays either the name of a data column used for the query or the expression for a computed column. This column is locked so that it is always visible as you scroll horizontally. |
| Alias | Select, Append, Update, Make-Table | Specifies either an alternate name for a column or the name you can use for a computed column. |
| Table | Select, Append, Update, Make-Table | Specifies the name of the table, view, user-defined function, or subquery for the associated data column. This column is blank for computed columns. |
| Output | Select, Append, Make-Table | Specifies whether a data column appears in the query output.
Note If the database allows, you can use a data column for sort or search clauses without displaying it in the result set. |
| Sort Type | Select, Append | Specifies that the associated data column is used to sort the query results and whether the sort is ascending or descending. |
| Sort Order | Select, Append | Specifies the sort priority for data columns used to sort the result set. When you change the sort order for a data column, the sort order for all other columns is updated accordingly. |
| Group By | Select, Append, Make-Table | Specifies that the associated data column is being used to create an aggregate query. This grid column appears only if you have chosen Group By from the Tools menu or have added a GROUP BY clause to the SQL pane.
By default, the value of this column is set to Group By, and the column becomes part of the GROUP BY clause. When you move to a cell in this column and select an aggregate function to apply to the associated data column, by default the resulting expression is added as an output column for the result set. |
| Criteria | All | Specifies a search condition (filter) for the associated data column. Enter an operator (the default is "=") and the value to search for. Enclose text values in single quotation marks.
If the associated data column is part of a GROUP BY clause, the expression you enter is used for a HAVING clause. If you enter values for more than one cell in the Criteria grid column, the resulting search conditions are automatically linked with a logical AND. To specify multiple search condition expressions for a single database column (for example, |
| Or … | All | Specifies an additional search condition expression for the data column, linked to previous expressions with a logical OR. You can add more Or … grid columns by pressing the TAB key in the rightmost Or … column. |
| Append | Append | Specifies the name of the target data column for the associated data column. When you create an Append query, the Query Designer attempts to match the source to an appropriate target data column. If the Query Designer cannot choose a match, you must provide the column name. |
| New Value | Update, Append Values | Specifies the value to place into the associated column. Enter a literal value or an expression. |
The SQL pane displays the SQL statement for the current query. As you build your query, the SQL pane automatically updates and reformats to be easy to read.
In the SQL pane you can:
- Create new queries by entering SQL statements.
- Modify the SQL statement created by the Query Designer based on settings you make in the Diagram and Grid panes.
- Enter statements that take advantage of features specific to Microsoft SQL Server.
You can edit the current query directly in the SQL pane. When you move to another pane, the Query Designer automatically formats your statement, and then changes the Diagram and Grid panes to match your statement.
Note You can enter optimizer hints for SQL statements, but the Query Designer might reformat them.
If your statement cannot be represented in the Diagram and Grid panes, and if those panes are visible, the Query Designer displays an error and then offers you two choices:
- Return to the SQL pane and edit the statement.
- Discard your changes and revert to the most recent version of the SQL statement.
If you return to the SQL pane and continue editing the statement, the Query Designer dims the other panes to indicate that they no longer reflect the contents of the SQL pane.
You can also use the SQL pane to enter SQL statements that cannot be represented graphically in the Query Designer. In such cases, the Query Designer displays the same behavior as it does when it detects an error
Note If you enter an SQL statement, but then make further changes to the query by changing the Diagram and Grid panes, the Query Designer rebuilds and redisplays the SQL statement. In some cases, this action results in an SQL statement that is constructed differently from the one you originally entered (though it will always yield the same results). This difference is particularly likely when you are working with search conditions that involve several clauses linked with AND and OR.