- Open a form or report in Design view.
- To select the controls that you want to align, hold down the SHIFT key and click each control, or click the Select Objects tool
 in the toolbox and then click and drag a rectangle over the controls.
Select only controls that are in the same row or in the same column.
- On the Format menu, point to Align, and then click one of the following commands:
- Left Aligns the left edges of the controls with the left edge of the leftmost control.
- Right Aligns the right edges of the controls with the right edge of the rightmost control.
- Top Aligns the top edges of the controls with the top edge of the highest control.
- Bottom Aligns the bottom edges of the controls with the bottom edge of the lowest control.
Note If any of the selected controls would overlap after being aligned, Microsoft Access places them with their edges next to each other instead.
 Align controls to each other in a data access page
In a data access page, how you align controls to each other depends on whether you have Microsoft Internet Explorer 5.5 or 5 installed.
- Open the data access page in Design view, and do one of the following.
If you have Internet Explorer 5.5 installed
- Select the controls that you want to align by holding down the SHIFT key and clicking each control.
Make sure that the control that you want to align the other controls to is the last control you select and that its sizing handles are white. This control is the primary selection.

 The sizing handles of the primary selection are white.
 - On the Format menu, point to Align, and then click one of the following commands:
- Left Aligns the left edges of the controls with the left edge of the primary selection.
- Right Aligns the right edges of the controls with the right edge of the primary selection.
- Top Aligns the top edges of the controls with the top edge of the primary selection.
- Bottom Aligns the bottom edges of the controls with the bottom edge of the primary selection.
- Align Middle Aligns the controls so that they are centered horizontally relative to the primary selection.
- Align Center Aligns the controls so that they are centered vertically relative to the primary selection.
If you have Internet Explorer 5 installed- On the Format menu, click Alignment and Sizing to display the Alignment and Sizing toolbar.
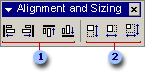 Align Left, Align Right, Align Top, and Align Bottom buttons
 Size Height, Size Width, and Size Height and Width buttons
 - Make sure the control that is aligned the way you want is selected.
- Do one of the following:
- To align just one control, click the button that you want on the Alignment and Sizing toolbar, and then click the control that you want to align to the selected control.
- To align several controls, lock the button that you want on the Alignment and Sizing toolbar by double-clicking it, and then click the controls that you want to align to the selected control.
- To release the lock, click the same or a different button on the Alignment and Sizing toolbar or press ESC.
- Select the controls that you want to align by holding down the SHIFT key and clicking each control.
Align controls to each other by using the grid
- Open a form, report, or data access page in Design view.
- If the grid isn't already displayed, click Grid on the View menu.
- Select the control or controls that you want to align. To select more than one control, hold down the SHIFT key and click each control, or drag a rectangle over the controls.
Note To select more than one control in a data access page, you must have Microsoft Internet Explorer 5.5 installed.
- On the Format menu, point to Align, and then click To Grid.