You can group records in a report based on the values in one or more fields. For example, to look at all the orders shipped on a specific date, you could group records on the values in the ShippedDate field and sort on the values in the Country and Company fields.
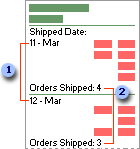
A new group is started for each date, so you can skim the report to quickly find the records for a particular date.
You can also calculate totals and other values for each group. This report prints the number of orders shipped each day.
You create groups by setting properties in the Sorting and Grouping dialog box. You can set properties to display a header and footer for the group.
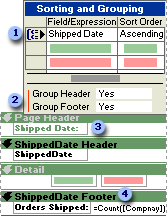
 This symbol indicates that records are grouped on ShippedDate.
 You create a group by setting either GroupHeader or GroupFooter or both to Yes.
 Place a text box that identifies the group in the new group header.
 Place a text box that calculates a total for the group in the group footer section.
You can group on up to 10 fields or expressions in a report. When you group on more than one field or expression, Microsoft Access nests the groups according to their group level. The first field or expression you group on is the first and most significant group level; the second field or expression you group on is the next group level; and so on.
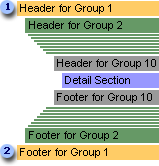
 A header on a group level ...
 ... is paired with a footer on the same level.
Grouping records on a data access page is similar to grouping records in a report: You can create a hierarchy that groups records from general categories to specific details.
The following illustration shows how the sample data access page, Orders by Date
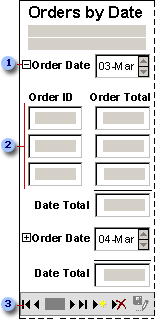
 Click the expand indicator ...
 ... to display the data in the next lower group.
 Use the record navigation toolbar to move between records, to sort and filter records, and to get Help.
 Parts of a grouped data access page
The body is the basic design surface of a data access page. On a grouped page, you can use the body to display informational text and sections. By default, the positions of text, sections, and other elements in the body are relative. That is, elements flow one after another in the same order as they appear in the HTML source. The position of an element in the body is determined by the preceding content. When viewed in Page view or Microsoft Internet Explorer, the content in the body adjusts itself to fit the size of the Web browser.
Use sections to display text, data from a database, and toolbars. The position of controls and other elements within a section is absolute by default. That is, the position of each control or element is fixed relative to the top and left coordinates of the section. Controls that have an absolute position within a section keep the same position even when you resize the browser.
Four types of sections are available on a grouped data access page: group header, group footer, caption, and record navigation. You can use just the sections you need for a group level.
-
The group header is used primarily to display data and calculate totals. To group data, you must have at least two group levels. The group header at the lowest group level is like the detail section of a report: It repeats until all the records are printed for the current group.
-
The group footer is used primarily to calculate totals. It appears before the record navigation section for the group level. A group footer is not available for the lowest group level on a data access page.
-
The caption section is used to display captions for columns of data. It appears immediately before the group header. This section is displayed only when the next-higher group level is expanded. You can't place bound controls in a caption section.
-
The record navigation section is used to display the record navigation control for the group level. A record navigation section for a group appears after the group header if there is no footer for the group level, and appears after the footer if there is a footer for the group level. You can't place bound controls in a record navigation section.
 A grouped data access page in Design view
Each group level has a record source. The name of the record source is displayed on the section bar for each section used for a group level. The following illustration shows the Orders by Date data access page in Design view.
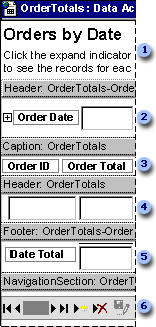
 Page title and instructions in the body of the page
 Group header for the OrderTotals-OrderDate group level
 Caption section for the OrderTotals group level
 Group header for the OrderTotals group level
 Group footer for the OrderTotals-OrderDate group level
 Record navigation section for the OrderTotals-OrderDate group level
 A grouped data access page in Page view or Internet Explorer
The following illustration shows how the sections look on the same data access page when it's open in Page view or in Microsoft Internet Explorer 5.01 with Service Pack 2 (SP2) or later. You can specify how many records you want displayed on the page for each group level. In the example page, the outer group level (OrderTotals-OrderDate) shows two records at a time, whereas the inner group level (OrderTotals) shows all the records.
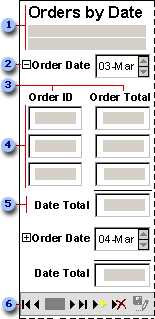
 Title and instructions in the body of the page
 Group header for the OrderTotals-OrderDate group level
 Caption section for the OrderTotals group level
 Group header for the OrderTotals group level
 Group footer for the OrderTotals-OrderDate group level
 Record navigation section for the OrderTotals-OrderDate group level
 About grouping records on intervals of autonumbered, currency, or numeric values on a page
When you group records by autonumbered, currency, or numeric values, the control you group on must be bound to a field with one of the following data types: Autonumber, Currency, or Numeric in a Microsoft Access database; decimal, numeric, int, or any other data type that supports autonumbered, currency, or numeric values in a Microsoft Access project.
To group records on an interval, you need two controls bound to the field you want to group on. You use one control to group the records and display the field values as intervals. You use the other control, which is placed in the next lower group level, to display the full value of the field. In the following example, the records come from a query named Sales. The records are grouped in intervals of 100 in a control bound to the SaleAmount field. In the next lower group level, the page displays, and sorts the records by, the actual values in the SaleAmount field.
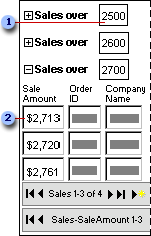
 This control, bound to the SaleAmount field, shows the values in the field in intervals of $100.
 This control, bound to the SaleAmount field, displays the actual values in the field.
 How a page that groups records on intervals of $100 looks in Design view
The following illustration shows the layout of the example page in Design view.
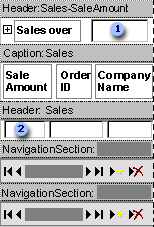
 The control that groups records in intervals of $100 is in the first, or highest, group level.
 The control that displays the actual sale amount is in the next lower group level.
The following table lists the properties that are set for the group levels.
| Property | Sales-SaleAmount | Sales |
|---|---|---|
| GroupInterval | 100 | 1.0 |
| GroupOn | dscInterval | dscEachValue |
| DefaultSort | GroupOfSaleAmount ASC | SaleAmount ASC |
Notes
- When you group on a control, Access creates an alias for the control by adding the prefix "GroupOf" to the control's name in the ControlSource property; for example, GroupOfSaleAmount: SaleAmount. When you reference this control in an expression or property, you must use the alias.
- In the DefaultSort property, ASC stands for ascending order and DESC stands for descending order.
 About grouping records on intervals of date or time values on a page
When you group records on date or time intervals, the control you group on must be bound to a field with one of the following data types: Date/Time in a Microsoft Access database; datetime, smalldatetime, or any other data type that stores date and time values, in a Microsoft Access project.
 How a page that groups records by month looks in Page view or in Microsoft Internet Explorer
To group records on an interval of date or time values, you need two controls that are bound to the field that contains the date or time values. One of them is used to group the records and is hidden. The other control is placed in the next lower group level and shows the individual values. In the group level that contains the hidden control, you also create a control that is bound to an expression that returns the month equivalent of the dates grouped in the hidden control.
The following illustration shows the page in Page view. The hidden control is not shown in the illustration.
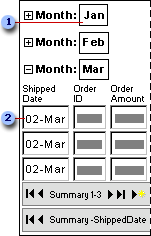
 This control is bound to an expression that returns the month portion of the values in the ShippedDate field.
 This control, bound to the ShippedDate field, sorts the records by shipped date.
 How a page that groups records by month looks in Design view
In Design view of the example page, you can see the hidden control that is used to group the records in the first group level.
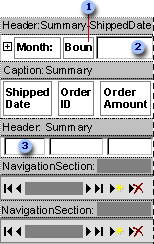
 This control, visible in Page view or Microsoft Internet Explorer, is bound to an expression that returns the month portion of the values in the ShippedDate field.
 This control, not visible in Page view or Internet Explorer, is bound to the ShippedDate field and is used to group the records by month.
 This control, also bound to the ShippedDate field, sorts the records by shipped date.
The following table lists the properties that are set for the group levels.
| Property | Sales-SaleAmount | Sales |
|---|---|---|
| GroupInterval | 1.0 | 1.0 |
| GroupOn | dscMonth | dscEachValue |
| DefaultSort | GroupOfShippedDate ASC | ShippedDate ASC |
Notes
- When you group on a control, Access creates an alias for the control by adding the prefix "GroupOf" to the control's name in the ControlSource property; for example, GroupOfShippedDate: ShippedDate. When you reference this control in an expression or property, you must use the alias.
- In the DefaultSort property, ASC stands for ascending order and DESC stands for descending order.
 About grouping records on the first n characters in a text value on a page
When you group records on the first n (or prefix) characters in a text field, the control you group on must be bound to a field of one of the following data types: Text in a Microsoft Access database; char, varchar, nchar, or any other data type that can store text, in a Microsoft Access project.
To group records on the first n characters, you need two controls bound to the field you want to group on. You use one control to group the records by the specified number of prefix characters, and then display the prefix characters. You use the other control, which is in the next lower group level, to sort records and display the actual value of the field.
In the following example, the records come from the Products table. In the first group level, the records are grouped on the first character of the values in the ProductName field. In the next lower group level, the page displays and sorts the records by the actual values in the ProductName field.
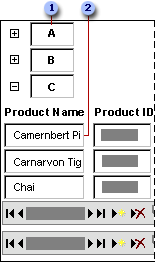
 This control is bound to the ProductName field and shows just the first character of the field's values.
 This control, also bound to the ProductName field, displays the actual values in the field.
 How a page that groups records on the first characters in a field looks in Design view
The following illustration shows the layout of the example page in Design view.
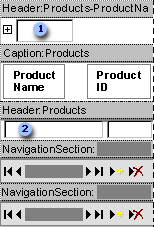
 The control that groups records by the first character of each product name is in the first, or highest, group level.
 The control that displays the actual product names is in the next lower group level.
The following table lists the properties that are set for the group levels.
| Property | Products-ProductName | Products |
|---|---|---|
| GroupInterval | 1.0 | 1.0 |
| GroupOn | dscPrefix | dscEachValue |
| DefaultSort | GroupOfProductName ASC | ProductName ASC |
Notes
- When you group on a field, Access creates an alias for the control by adding the prefix "GroupOf" to the control's name in the ControlSource property; for example, GroupOfProductName: Product Name. When you reference this control in an expression or property, you must use the alias.
- In the DefaultSort property, ASC stands for ascending order and DESC stands for descending order.
 About grouping records on multiple fields
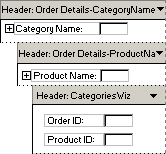
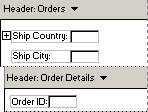
You can group records on a page based on more than one field. You can either create nested group levels or add the grouping fields to a single group level.
The following illustration shows a data access page that has three group levels in Design view.
The following illustration shows a data access page where the outermost group level that has two grouping fields.
Regardless of which technique you use to create a grouped page, you can set GroupOn and GroupInterval properties for each grouping field. You can also set the DefaultSort property to sort on multiple fields at each group level.
 On a datasheet or form in PivotTable or PivotChart view
 Grouping on intervals in PivotTable and PivotChart view
You can group items by specifying the type of interval and the size of the interval. For example, you can group a field with date values into different months, and specify the interval as 2, to create groups such as Jan-Feb, Mar-Apr, and so on.
The type of interval you can specify for a field depends on the data type of the field.
- Numeric fields You can group in intervals of any integer, such as 1, 2, 5, 100, and so on. For example, you can group the EmployeeID field into groups of 1-100, 101-200, and so on.
- Date and time fields You can group in intervals such as days, weeks, and quarters. For example, you can group the values in the ShippedDate field into months to show data for orders shipped in January, orders shipped in February, and so on.
- Text fields You can group based on the first n characters of the individual items. For example, you can group the LastName field by first letter to create groups, such as A, B, and so on.
You can specify the start and end values for the grouping range. For example, if you specify the start range as 01-Jul-1999 while grouping the ShippedDate field in weekly intervals, the following groups will be created:
<01-Jul-1999, 01-Jul-1999, 08-Jul-1999, ...
Dates prior to 01-Jul-1999 are grouped into a single group titled <01-Jul-1999.
If you also specify the end value as 31-Dec-1999, the following groups will be created:
<01-Jul-1999, 01-Jul-1999, 08-Jul-1999, ... 31-Dec-1999, >31-Dec-1999
Dates that fall after 31-Dec-1999 are grouped into a single group titled >31-Dec-1999.
 Custom grouping in PivotTable view
You can randomly select items from a row or column field and group them into higher-level groups. For example, you can select from the Promotions row field all the promotions that run for a specific period and create a group. This would add a new row field named Promotions 2 above the Promotions row field with two members: Group1 and Other. You can change the caption of Group1 to Fixed and Promotions 2 to Category in the Properties dialog box.
The Other group will contain all items that you did not include in the Fixed custom group. You can then select all the popular promotions from the Other group and create a new custom group that will be captioned Popular. After you do this, the Category field will have three members: Fixed, Popular, and Other.
The following illustration shows how the PivotTable view will look after the captions of the custom group field and custom groups have been changed.
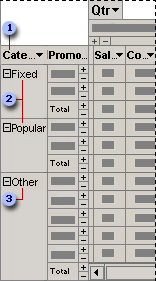
 A custom group field. Contains custom groups as its items and appears as the parent of the field whose items you grouped.
 Custom groups. Appear as the parents of items you explicitly selected to create the groups.
 The Other group is the parent of the items you did not assign to any specific custom group.
 Creating and deleting custom groups and custom group fields
-
You cannot group items that belong to different fields or items that belong to parent items into a custom group.
-
When you create the first custom group for a field, a custom group field is automatically added as the field's parent. Similarly, when you delete the last custom group for a field, the custom group field is automatically deleted.
-
When you delete a custom group that is not the last custom group in the field, the deleted group's members automatically move to the Other group.
-
The groups you create do not affect source data.
 Moving a field whose parent is a custom group field
When you move a field that has custom groups between row and column areas, the custom group fields that are based on the field move with the field.
If you move the field to the filter area, the custom group fields are hidden. However, the bound field will show the custom group hierarchy in the drop-down list, so you can filter data by selecting custom groups or individual values. When you move the field back to a row or column area, the custom group fields will appear again.
You cannot move a field with custom groups to the detail area.
 Adding and removing nested custom groups
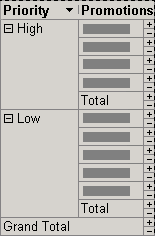
You can select two or more custom groups to create a higher-level grouping. For example, you can group the members of the Category field into two groups: high priority promotions and low priority promotions.
The following illustration shows how the row area will look with nested custom groups.
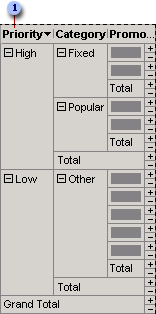
 A custom group field that appears as the parent of the Category custom group field.
You can also remove a lower-level custom group. The following illustration shows what the data will look like after the Category field has been removed.
