You can use a Microsoft Access 2000 database or Access 2000 project in both Access 2003 and Access 2000
 Use a one-file Access database with several versions of Microsoft Access
If your Microsoft Access database is in one file, and you want to use it in several versions of Microsoft Access, convert it to a front-end/back-end application. The data remains in the oldest version of Access, and you use a front end that has been converted to Access 2000 or Access 2003.
- Convert the Access database to Access 2000 or Access 2002-2003 file format. When converting, specify a new name for the file.
- Make a backup copy of the Microsoft Access file you're going to convert.
- If possible, compile the Access file in the previous version of Access. This reduces the possibility of errors during conversion.
- Close the Access file. If the file is a multiuser Access database located on a server or in a shared folder, make sure that no one else has it open.
- Start Access 2003.
- On the Tools menu, point to Database Utilities, point to Convert Database, and then click the file format you want for the new file.
- In the Database To Convert From dialog box, select the database you want to convert and then click Convert.
- In the Convert Database Into dialog box, do one of the following:
- Type a name for the new file.
- Select a different location for the new file. (You can keep the same name, or change it.)
You cannot convert an Access database into a file with the same name and location as the original database.
- Click Save.
- On the Tools menu, point to Database Utilities and use the Database Splitter to split the converted database into a front-end/back-end application.
- Delete the back-end database that the Database Splitter created.
You want your data to remain in the original database, so you will use the original database as the back-end database. The back-end database should be in the oldest version of Microsoft Access that is being used.
- On the Tools menu, point to Database Utilities and use the Linked Table Manager to link the new front-end database to the tables in the previous-version database.
You can then enhance the new front-end database to support new features for users that have upgraded to Microsoft Access 2000 or Access 2003. Users of previous versions can continue to use the previous-version database. For example, if the back-end tables are in Microsoft Access version 2.0 format, you can use up to four versions of Microsoft Access: Microsoft Access version 2.0 (using the original database), Microsoft Access 95 and 97 (using an enabled version of the original database or a converted front-end database), and Microsoft Access 2000 or Access 2003 (using a converted front-end database).
 Use a front-end/back-end application with several versions of Microsoft Access
If your Microsoft Access database is already a front-end/back-end application, you only need to convert the front end to Access 2000 or Access 2002-2003 file format.
- Leave the back-end database alone.
- Convert the front-end database to Access 2000 or Access 2002-2003 file format.
- Make a backup copy of the Microsoft Access file you're going to convert.
- If possible, compile the Access file in the previous version of Access. This reduces the possibility of errors during conversion.
- Close the Access file. If the file is a multiuser Access database located on a server or in a shared folder, make sure that no one else has it open.
- Start Access 2003.
- On the Tools menu, point to Database Utilities, point to Convert Database, and then click the file format you want for the new file.
- In the Database To Convert From dialog box, select the database you want to convert and then click Convert.
- In the Convert Database Into dialog box, do one of the following:
- Type a name for the new file.
- Select a different location for the new file. (You can keep the same name, or change it.)
You cannot convert an Access database into a file with the same name and location as the original database.
- Click Save.
- On the Tools menu, point to Database Utilities and use the Linked Table Manager to link the new Access 2000 or Access 2003 front-end database to the tables in the previous-version back-end database. You can then enhance the Access 2000 or Access 2003 front-end database to support new features for users that have upgraded to Access 2000 or Access 2003.
 Open a database created in Access 97 or earlier without converting it
You can open a Microsoft Access database created in Access 97 or earlier without converting it.
- Make sure that the Access database you're going to enable is closed. If the file is a multiuser Access database located on a server or in a shared folder, make sure that no one else has it open.
- Click Open
 on the Database toolbar.
 - In the Open dialog box, click the previous-version Access database you want to enable and click Open.
- In the Convert/Open Database dialog box, click Open Database.
Microsoft Access enables the previous-version database by storing additional information in the file to accommodate the default file format specified on the Advanced tab of the Options dialog box. An enabled database can still be opened with its original version of Microsoft Access.
 Use a security-enabled Access database with multiple versions of Access
With one exception, the issues involved when sharing a security-enabled database across more than one version of Microsoft Access are the same as the issues for sharing an unsecured database across more than one version. The one exception concerns how to handle the workgroup information files that are used with the security-enabled database.
-
Do one of the following:
- If you want to share a security-enabled database from Access 95 or 97, tell users who will be upgrading to Access 2003 to join the appropriate workgroup information file with the oldest version of Access that will be sharing the security-enabled database.
Important If you are setting up user-level security and need to make sure that your workgroup and its permissions can't be duplicated, you should make sure the workgroup information file that defines the workgroup you're joining has been created with a unique workgroup ID (WID). If such a workgroup information file doesn't exist, you should create one.
- Start Microsoft Access.
- On the Tools menu, point to Security, and then click Workgroup Administrator.
- In the Workgroup Administrator dialog box, click Join.
- Type the path and name of the workgroup information file that defines the Microsoft Access workgroup you want to join, and then click OK, or click Browse and then use the Select Workgroup Information File dialog box to locate the workgroup information file.
The next time you start Microsoft Access, it uses the user and group accounts and passwords stored in the workgroup information file for the workgroup you joined.
Access 2003 can use workgroup information files that have been created with any previous version. With one exception, a previous version of Access can't use a workgroup information that was created in a later version. The exception is Access 2000, which can use a workgroup information file that was created in Access 2003 if that workgroup information file is in Access 2000 file format.
Important If users will be sharing a security-enabled database from Microsoft Access 95 or 97, you should compact the current workgroup information file with Access 2003 before using it. Compacting the file by using Access 2003 does not change the file format, so the file can continue to be used by any Microsoft Access 95 or 97 users who are not upgrading.
- If the shared database is Microsoft Access version 2.0, convert the workgroup information file that will be used with the security-enabled database.
You do not need to convert a Microsoft Access 2000 workgroup information file to Access 2003. However, to take advantage of security and performance improvements, you should re-create workgroup information files from Access 97 or earlier as described below.
- Create a new workgroup information file, making sure to enter the exact, case-sensitive name, company name, and workgroup ID that was used to create the original file. Failure to re-enter the exact entries that were used to create the original file will create an invalid Admins group.
A Microsoft Access workgroup information file contains a list of users who share data, also know as a workgroup. Users' passwords are also stored in the workgroup information file. To control who has access to your database, you must create a new workgroup information file.
- Start Microsoft Access.
- On the Tools menu, point to Security, and then click Workgroup Administrator.
- In the Workgroup Administrator dialog box, click Create.
- In the Workgroup Owner Information dialog box, type your name and organization, and then type any combination of up to 20 numbers and letters for the workgroup ID (WID).
Caution Be sure to write down your exact name, organization, and workgroup ID
— including whether letters are uppercase or lowercase (for all three entries) — and keep them in a secure place. If you have to re-create the workgroup information file, you must supply exactly the same name, organization, and workgroup ID. If you forget or lose these entries, you can't recover them and might lose access to your databases. - Type a new name for the new workgroup information file. By default, the workgroup information file is saved in the language folder. To save in a different location, type a new path or click Browse to specify the new path.
- Click OK.
The new workgroup information file is used the next time you start Microsoft Access. Any user and group accounts or passwords that you create are saved in the new workgroup information file. To have others join the workgroup defined by your new workgroup information file, copy the file to a shared folder (if you didn't already save it in a shared folder in step 5), and then have each user run the Workgroup Administrator to join the new workgroup information file.
- Re-create any group accounts, making sure to enter the exact, case-sensitive group name and personal ID (PID) for each group.
As part of securing a database, you can create group accounts in your Microsoft Access workgroup that you use to assign a common set of permissions to multiple users.
To complete this procedure, you must be logged on as a member of the Admins group.
- Start Microsoft Access by using the workgroup in which you want to use the account.
Important The accounts you create for users must be stored in the workgroup information file that those users will use. If you're using a different workgroup to create the database, change your workgroup before creating the accounts. You can change workgroups by using the Workgroup Administrator.
- Open a database.
- On the Tools menu, point to Security, and then click User And Group Accounts.
- On the Groups tab, click New.
- In the New User/Group dialog box, type the name of the new account and a personal ID (PID).
Caution Be sure to write down the exact account name and PID, including whether letters are uppercase or lowercase, and keep them in a secure place. If you have to re-create an account that has been deleted or created in a different workgroup, you must supply the same name and PID entries. If you forget or lose these entries, you can't recover them.
Note A user account name cannot be same as an existing group account name, and visa versa.
- Click OK to create the new group account.
Note The PID entered in step 5 is not a password. Microsoft Access uses the PID and the user name as seeds for an encryption algorithm to generate an encrypted identifier for the user account.
- Start Microsoft Access by using the workgroup in which you want to use the account.
- Re-create each user account, making sure to enter the exact, case-sensitive user name and PID for each user.
To complete this procedure, you must be logged on as a member of the Admins group.
Note It is usually easier to manage security if you organize users into groups, and then assign permissions to groups rather than to individual users.
- Start Microsoft Access by using the workgroup in which you want to use the account.
Important The accounts you create for users must be stored in the workgroup information file that those users will use. If you're using a different workgroup to create the database, change your workgroup before creating the accounts.
- Open a database.
- On the Tools menu, point to Security, and then click User And Group Accounts.
- On the Users tab, click New.
- In the New User/Group dialog box, type the name of the new account and a personal ID (PID), and then click OK to create the new account, which is automatically added to the Users group.
Caution Be sure to write down the exact account name and PID, including whether letters are uppercase or lowercase, and keep them in a secure place. If you ever have to re-create an account that has been deleted or created in a different workgroup, you must supply the same name and PID entries. If you forget or lose these entries, you can't recover them.
Notes
- A user account name cannot be same as an existing group account name, and visa versa.
- The PID entered in step 5 is not a password. Microsoft Access uses the PID and the user name as seeds for an encryption algorithm to generate an encrypted identifier for the user account.
- Start Microsoft Access by using the workgroup in which you want to use the account.
Tell only users who are upgrading to Microsoft Access 2000 or Access 2003 to join the converted workgroup information file. All users who are not upgrading from version 2.0 must continue to use the workgroup information file produced with their original version.
- Create a new workgroup information file, making sure to enter the exact, case-sensitive name, company name, and workgroup ID that was used to create the original file. Failure to re-enter the exact entries that were used to create the original file will create an invalid Admins group.
- If you want to share a security-enabled database from Access 95 or 97, tell users who will be upgrading to Access 2003 to join the appropriate workgroup information file with the oldest version of Access that will be sharing the security-enabled database.
 Already familiar with other database or spreadsheet applications
If you are familiar with other database or spreadsheet applications, then you probably know the basics of how these applications work and what databases are used for. Microsoft Access differs from many other database applications by allowing you to create relational databases. Access also provides many options for working with other database programs such as Microsoft SQL Server.
After you've set up different tables for each subject in your Microsoft Access database, you need a way of telling Microsoft Access how to bring that information back together again. The first step in this process is to define relationships between your tables. After you've done that, you can create queries, forms, and reports to display information from several tables at once. For example, this form includes information from four tables:
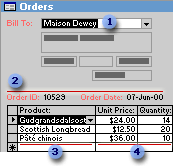
 The Customers table
 The Orders table
 The Products table
 The Order Details table
In the previous example, the fields in four tables must be coordinated so that they show information about the same order. This coordination is accomplished with relationships between tables. A relationship works by matching data in key fields
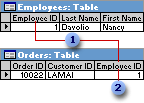
 EmployeeID appears in both tables
 ... and as a foreign key.
A one-to-many relationship is the most common type of relationship. In a one-to-many relationship, a record in Table A can have many matching records in Table B, but a record in Table B has only one matching record in Table A.
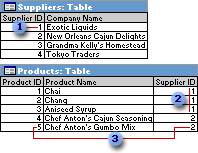
 One supplier ...
 ... can supply more than one product ...
 ... but each product has only one supplier.
In a many-to-many relationship, a record in Table A can have many matching records in Table B, and a record in Table B can have many matching records in Table A. This type of relationship is only possible by defining a third table (called a junction table) whose primary key consists of two fields
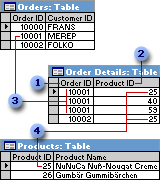
 Primary key from the Orders table
 Primary key from the Products table
 One order can have many products ...
 ... and each product can appear on many orders.
In a one-to-one relationship, each record in Table A can have only one matching record in Table B, and each record in Table B can have only one matching record in Table A. This type of relationship is not common, because most information related in this way would be in one table. You might use a one-to-one relationship to divide a table with many fields, to isolate part of a table for security reasons, or to store information that applies only to a subset of the main table. For example, you might want to create a table to track employees participating in a fundraising soccer game. Each soccer player in the Soccer Players table has one matching record in the Employees table.
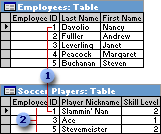
 Each soccer player has one matching record in the Employees table.
 This set of values is a subset of the EmployeeID field and the Employees table.
The kind of relationship that Microsoft Access creates depends on how the related fields are defined:
- A one-to-many relationship is created if only one of the related fields is a primary key or has a unique index.
- A one-to-one relationship is created if both of the related fields are primary keys or have unique indexes.
- A many-to-many relationship is really two one-to-many relationships with a third table whose primary key consists of two fields
— the foreign keys from the two other tables.
You can also create a relationship between a table and itself. This is useful in situations where you need to perform a Lookup within the same table. In the Employees table, for example, you can define a relationship between the EmployeeID and ReportsTo fields, so that the ReportsTo field can display employee data from a matching EmployeeID.
Note If you drag a field that isn't a primary key and doesn't have a unique index to another field that isn't a primary key and doesn't have a unique index, an indeterminate relationship is created. In queries containing tables with an indeterminate relationship, Microsoft Access displays a default join line between the tables, but referential integrity won't be enforced, and there's no guarantee that records are unique in either table.
Referential integrity is a system of rules that Microsoft Access uses to ensure that relationships between records in related tables are valid, and that you don't accidentally delete or change related data. You can set referential integrity when all of the following conditions are met:
- The matching field from the primary table is a primary key or has a unique index.
- The related fields have the same data type. There are two exceptions. An AutoNumber field can be related to a Number field with a FieldSize property setting of Long Integer, and an AutoNumber field with a FieldSize property setting of Replication ID can be related to a Number field with a FieldSize property setting of Replication ID.
- Both tables belong to the same Microsoft Access database. If the tables are linked tables, they must be tables in Microsoft Access format, and you must open the database in which they are stored to set referential integrity. Referential integrity can't be enforced for linked tables from databases in other formats.
The following rules apply when you use referential integrity:
- You can't enter a value in the foreign key field of the related table that doesn't exist in the primary key of the primary table. However, you can enter a Null value in the foreign key, specifying that the records are unrelated. For example, you can't have an order that is assigned to a customer that doesn't exist, but you can have an order that is assigned to no one by entering a Null value in the CustomerID field.
- You can't delete a record from a primary table if matching records exist in a related table. For example, you can't delete an employee record from the Employees table if there are orders assigned to the employee in the Orders table.
- You can't change a primary key value in the primary table, if that record has related records. For example, you can't change an employee's ID in the Employees table if there are orders assigned to that employee in the Orders table.
For relationships in which referential integrity is enforced, you can specify whether you want Microsoft Access to automatically cascade update and cascade delete related records. If you set these options, delete and update operations that would normally be prevented by referential integrity rules are allowed. When you delete records or change primary key values in a primary table, Microsoft Access makes necessary changes to related tables to preserve referential integrity.
If you select the Cascade Update Related Fields check box when defining a relationship, any time you change the primary key of a record in the primary table, Microsoft Access automatically updates the primary key to the new value in all related records. For example, if you change a customer's ID in the Customers table, the CustomerID field in the Orders table is automatically updated for every one of that customer's orders so that the relationship isn't broken. Microsoft Access cascades updates without displaying any message.
Note If the primary key in the primary table is an AutoNumber field, setting the Cascade Update Related Fields check box will have no effect, because you can't change the value in an AutoNumber field.
If you select the Cascade Delete Related Records check box when defining a relationship, any time you delete records in the primary table, Microsoft Access automatically deletes related records in the related table. For example, if you delete a customer record from the Customers table, all the customer's orders are automatically deleted from the Orders table (this includes records in the Order Details table related to the Orders records). When you delete records from a form or datasheet with the Cascade Delete Related Records check box selected, Microsoft Access warns you that related records may also be deleted. However, when you delete records using a delete query, Microsoft Access automatically deletes the records in related tables without displaying a warning.
 Working with other applications
Microsoft Access 2003 provides features for working with other programs.
- Work with Microsoft SQL Server You can create a Microsoft Access project that is easy to connect to a Microsoft SQL Server database, or use the Microsoft SQL Server Database Wizard to quickly create a SQL Server database and an Access project at the same time. Working with an Access project is similar to working with a Microsoft Access database
— the process of creating forms, reports, data access pages, macros, and modules is the same. Once you connect to a SQL Server database, you can view, create, modify, and delete tables, views, stored procedures, and database diagrams using the Microsoft SQL Server Design Tools. - Create a new Access database from data in another file format You can open a file that is in another file format
— such as text, dBASE, Paradox, or spreadsheet format — in Access; Microsoft Access automatically creates an Access database and links the file for you. - Import or link data from Microsoft Outlook or Microsoft Exchange You can use the Exchange Import Wizard or the Outlook Import Wizard to import or link data from Microsoft Outlook and Microsoft Exchange Server. For example, you might want to link to your Microsoft Outlook Contacts folder and then create form letters and mailing labels by merging the data with the Microsoft Word Mail Merge Wizard.
- Export to other sources You can export data to a number of formats and applications from Access.
 Data formats you can export to
Application Version or format supported Microsoft Access database 2.0, 7.0/95, 8.0/97, 9.0/2000, 10.0/Access 2002-2003 Microsoft Access project 9.0/2000, 10.0/Access 2002-2003 dBASE III, IV, and 5; and 7 (Requires Borland Database Engine 4.x or later. Updated drivers may be available from Microsoft Technical Support) Paradox, Paradox for Microsoft Windows 3.x, 4.x, and 5.0; and 8.0 (Requires Borland Database Engine 4.x or later. Updated drivers may be available from Microsoft Technical Support) Microsoft Excel 3.0, 4.0, 5.0, 7.0/95, 8.0/97, 9.0/2000, and 10.0/Excel 2003 Microsoft Word, Rich Text Format All Lotus 1-2-3 .wj2, .wk1 and .wk3 formats Delimited text files All character sets Fixed-width text files All character sets HTML and IDC/HTX 1.0 (if a list)
2.0, 3.x, 4.x (if a table or list)Microsoft Active Server Pages All XML Documents All SQL tables, Microsoft Visual FoxPro, and programs and databases that support the ODBC protocol Visual FoxPro 3.0, 5.0, and 6.x For an up-to-date list of supported ODBC drivers, see the Microsoft Knowledge Base.
- Import or link data to an Access database Just as you can export to a number of formats and applications, you can also work with the data from other sources and applications.
 Data formats you can import or link to
Data source Version or format supported Microsoft Access database 2.0, 7.0/95, 8.0/97, 9.0/2000, 10.0/Access 2002-2003 Microsoft Access project 9.0/2000, 10.0/Access 2002-2003 dBASE III, IV, and 5; and 7 (Linking requires updated ISAM drivers available from Microsoft Technical Support) Paradox, Paradox for Microsoft Windows 3.x, 4.x, and 5.0; and 8.0 (Linking requires updated ISAM drivers available from Microsoft Technical Support) Microsoft Excel spreadsheets 3.0, 4.0, 5.0, 7.0/95, 8.0/97, 9.0/2000, and 10.0/Excel 2003 Lotus 1-2-3 spreadsheets (Linking is read-only) .wks, .wk1, .wk3, and .wk4 Microsoft Exchange All versions Delimited text files All character sets Fixed-width text files All character sets HTML 1.0 (if a list)
2.0, 3.x (if a table or list)XML Documents All versions SQL tables, Microsoft Visual FoxPro, and data from other programs and databases that support the ODBC protocol Visual FoxPro 2.x, 3.0, 5.0, and 6.x (import only) For an up-to-date list of supported ODBC drivers, see the Microsoft Knowledge Base.
 Using a database for the first time
Working with databases and database objects can be a daunting task when you first get started. The following information should help you become more familiar with the components that make up a Microsoft Access database.
 Databases: What they are and how they work
A database is a collection of information that's related to a particular subject or purpose, such as tracking customer orders or maintaining a music collection. If your database isn't stored on a computer, or only parts of it are, you may be tracking information from a variety of sources that you're having to coordinate and organize yourself.
For example, suppose the phone numbers of your suppliers are stored in various locations: in a card file containing supplier phone numbers, in product information files in a file cabinet, and in a spreadsheet containing order information. If a supplier's phone number changes, you might have to update that information in all three places. In a database, however, you only have to update that information in one place
Using Microsoft Access, you can manage all your information from a single database file. Within the file, you can use:
- Tables to store your data.
- Queries to find and retrieve just the data you want.
- Forms to view, add, and update data in tables.
- Reports to analyze or print data in a specific layout.
- Data access pages to view, update, or analyze the database's data from the Internet or an intranet.
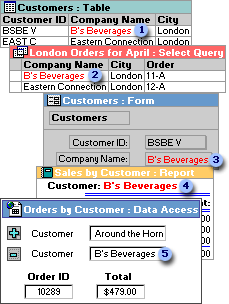
 Store data once in one table, but view it from multiple locations. When you update the data, it's automatically updated everywhere it appears.
 Display data in a query
 Display data in a form
 Display data in a report
 Display data in a data access page
To store your data, create one table for each type of information that you track. To bring the data from multiple tables together in a query, form, report, or data access page, define relationships between the tables.
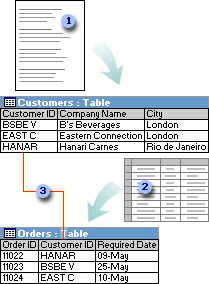
 Customer information that once existed in a mailing list now resides in the Customers table.
 Order information that once existed in a spreadsheet now resides in the Orders table.
 A unique ID, such as a Customer ID, distinguishes one record from another within a table. By adding one table's unique ID field to another table and defining a relationship, Microsoft Access can match related records from both tables so that you can bring them together in a form, report, or query.
To find and retrieve just the data that meets conditions that you specify, including data from multiple tables, create a query. A query can also update or delete multiple records at the same time, and perform predefined or custom calculations on your data.
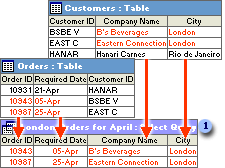
 This query accesses separate tables to retrieve the Order ID, Required Date, Company Name, and City information for customers in London whose orders were required in April.
To easily view, enter, and change data directly in a table, create a form. When you open a form, Microsoft Access retrieves the data from one or more tables, and displays it on the screen with the layout you choose in the Form Wizard, or with the layout that you created on your own in Design view.
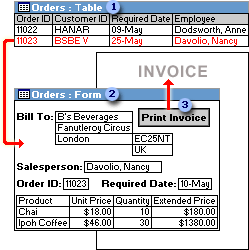
 A table displays many records at the same time, but you might have to scroll to see all of the data in a single record. Also, when viewing a table, you can't update data from more than one table at the same time.
 A form focuses on one record at a time, and it can display fields from more than one table. It can also display pictures and other objects.
 A form can contain a button that prints, opens other objects, or otherwise automates tasks.
To analyze your data or present it a certain way in print, create a report. For example, you might print one report that groups data and calculates totals, and another report with different data formatted for printing mailing labels.
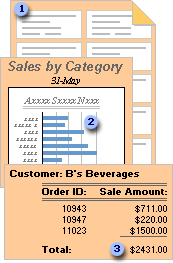
 Use a report to create mailing labels.
 Use a report to show totals in a chart.
 Use a report to calculate totals.
To make data available on the Internet or an intranet for interactive reporting, data entry, or data analysis, use a data access page. Microsoft Access retrieves the data from one or more tables and displays it on the screen with the layout that you created on your own in Design view, or with the layout you chose in the Page Wizard.
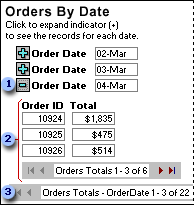
 Click the expand indicator ...
 ... to display the data and record navigation toolbar for the next level of detail.
 Use the record navigation toolbars to move to, sort, and filter records, and to get Help.
 Tables: Store and manage your data
A table is a collection of data about a specific topic, such as products or suppliers. Using a separate table for each topic means that you store that data only once. This results in a more efficient database and fewer data-entry errors.
 How data is organized in tables
Tables organize data into columns (called fields) and rows (called records).
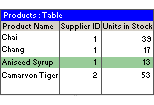
For example, each field in a Products table contains the same type of information for every product, such as the product's name. Each record in that table contains all the information about one product, such as the product's name, supplier ID number, units in stock, and so on.
In table Design view, you can create an entire table from scratch, or add, delete, or customize the fields in an existing table.
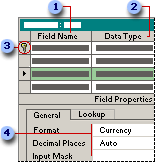
 If you want to track additional data in a table, add more fields. If an existing field name isn't descriptive enough, you can rename the field.
 Setting a field's data type defines what kind of values you can enter in a field. For example, if you want a field to store numerical values that you can use in calculations, set its data type to Number or Currency.
 You use a unique tag, called a primary key, to identify each record in your table. A table's primary key is used to refer to related records in other tables.
 Field properties are a set of characteristics that provide additional control over how the data in a field is stored, entered, or displayed. Which properties are available depends on a field's data type.
A common field relates two tables so that Microsoft Access can bring together the data from the two tables for viewing, editing, or printing. In one table, the field is a primary key that you set in table Design view. That same field also exists in the related table as a foreign key.
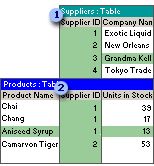
 In the Suppliers table, you enter a supplier ID, company name, and so on, for each supplier. SupplierID is the primary key that you set in table Design view.
 In the Products table, you include the SupplierID field, so that when you enter a new product, you can identify its supplier by entering that supplier's unique ID number. SupplierID is the foreign key in the Products table.
In a table or query, Datasheet view provides the tools you need to work with data.
 Using the Table Datasheet and Query Datasheet toolbars
The Table Datasheet and Query Datasheet toolbars provide many of the tools you need to find, edit, and print records.
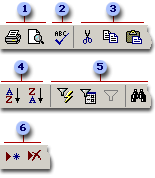
 Print or preview data
 Check spelling
 Cut, copy, or paste selected text, fields, whole records, or the entire datasheet
 Sort records
 Filter records, and find or replace values
 Add or delete records
 Working with columns, rows, and subdatasheets
You can find tools for working with columns, rows, and subdatasheets in the datasheet itself, or by right-clicking a column selector.
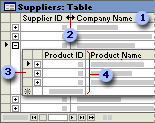
 Use the column selector to move, hide, or rename a column.
 Resize columns or rows.
 Use subdatasheets to view related data.
 Freeze the leftmost column so that it is displayed as you scroll to the right.
You can use the navigation toolbar to move through the records in a datasheet.

 Go to the first record.
 Go to the previous record.
 Type a record number to move to.
 Go to the next record.
 Go to the last record.
 Go to a blank (new) record.
 Queries: Getting answers to your questions
You use queries to view, change, and analyze data in different ways. You can also use them as a source of records for forms, reports, and data access pages. There are several types of queries in Microsoft Access.
A select query is the most common type of query. It retrieves data from one or more tables and displays the results in a datasheet where you can update the records (with some restrictions). You can also use a select query to group records and calculate sums, counts, averages, and other types of totals.
A parameter query is a query that when run displays its own dialog box prompting you for information, such as criteria for retrieving records or a value you want to insert in a field. You can design the query to prompt you for more than one piece of information; for example, you can design it to prompt you for two dates. Access can then retrieve all records that fall between those two dates.
Parameter queries are also handy when used as the basis for forms, reports, and data access pages. For example, you can create a monthly earnings report based on a parameter query. When you print the report, Access displays a dialog box asking for the month that you want the report to cover. You enter a month and Access prints the appropriate report.
You use crosstab queries to calculate and restructure data for easier analysis of your data. Crosstab queries calculate a sum, average, count, or other type of total for data that is grouped by two types of information
An action query is a query that makes changes to or moves many records in just one operation. There are four types of action queries:
- Delete Queries A delete query deletes a group of records from one or more tables. For example, you could use a delete query to remove products that are discontinued or for which there are no orders. With delete queries, you always delete entire records, not just selected fields within records.
-
Update Queries An update query makes global changes to a group of records in one or more tables. For example, you can raise prices by 10 percent for all dairy products, or you can raise salaries by 5 percent for the people within a certain job category. With an update query, you can change data in existing tables.
-
Append Queries An append query adds a group of records from one or more tables to the end of one or more tables. For example, suppose that you acquire some new customers and a database containing a table of information on those customers. To avoid typing all this information into your own database, you'd like to append it to your Customers table.
- Make-Table Queries A make-table query creates a new table from all or part of the data in one or more tables. Make-table queries are helpful for creating a table to export to other Microsoft Access databases or a history table that contains old records.
An SQL query is a query you create by using an SQL statement. You can use Structured Query Language (SQL) to query, update, and manage relational databases such as Access.
When you create a query in query Design view, Access constructs the equivalent SQL statements behind the scenes for you. In fact, most query properties in the property sheet in query Design view have equivalent clauses and options available in SQL view. If you want, you can view or edit the SQL statement in SQL view. However, after you make changes to a query in SQL view, the query might not be displayed the way it was previously in Design view.
Some SQL queries, called SQL-specific queries, can't be created in the design grid. For pass-through, data-definition, and union queries, you must create the SQL statements directly in SQL view. For subqueries, you enter the SQL in the Field row or the Criteria row of the query design grid.
 Forms: Putting a friendly face on your data
A form is a type of a database object that is primarily used to enter or display data in a database. You can also use a form as a switchboard that opens other forms and reports in the database, or as a custom dialog box that accepts user input and carries out an action based on the input.
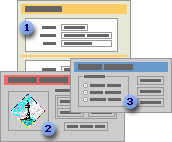
 A data-entry form
 A switchboard form
 A custom dialog box
Most forms are bound to one or more tables and queries in the database. A form's record source refers to the fields in the underlying tables and queries. A form need not contain all the fields from each of the tables or queries that it is based on.
A bound form stores or retrieves data from its underlying record source. Other information on the form, such as the title, date, and page number, is stored in the form's design.
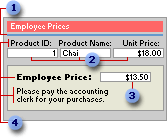
 Graphic elements, such as lines and rectangles, are stored in the form's design.
 Data comes from the fields in the underlying record source.
 A calculation comes from an expression, which is stored in the form's design.
 Descriptive text is stored in the form's design.
You create a link between a form and its record source by using graphical objects called controls. The most common type of control used to display and enter data is a text box.
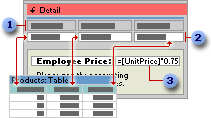
 Labels display descriptive text.
 Text boxes display data from and enter data into the Products table.
 A text box uses an expression to calculate a total.
You can also open a form in PivotTable view or PivotChart view to analyze data. In these views, you can dynamically change the layout of a form to present data in different ways. You can rearrange row headings, column headings, and filter fields until you achieve the desired layout. Each time you change the layout, the form immediately recalculates the data based on the new arrangement.
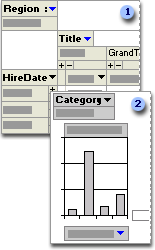
 In PivotTable view, you can view detail or summarized data by arranging fields in the filter, row, column, and detail areas.
 In PivotChart view, you can display data visually by selecting a chart type and viewing data by arranging fields in the filter, series, category, and data areas.
You can create a form quickly by using the AutoForm command or a wizard. AutoForm creates a form that displays all fields and records in the underlying table or query. A wizard asks you questions and creates a form based on your answers. You can then customize the form the way you want it in Design view.
You can customize a form in Design view in the following ways:
Record source Change the tables and queries that a form is based on.
Controlling and assisting the user You can set form properties to allow or prevent users from adding, deleting, or editing records displayed in a form. You can also add custom Help to a form to assist your users with using the form.
Form window You can add or remove Maximize and Minimize buttons, short cut menus, and other Form window elements.
Sections You can add, remove, hide, or resize the header, footer, and details sections of a form. You can also set section properties to control the appearance and printing of a form.
Controls You can move, resize, or set the font properties of a control. You can also add controls to display calculated values, totals, current date and time, and other useful information on a form.
 In PivotTable or PivotChart view
You can customize a form in PivotTable or PivotChart view in the following ways:
Add, move, or remove fields You can add fields to the filter, row, column, and detail areas in PivotTable view, and to the filter, category, series, and data areas in PivotChart view. You can also move fields from one area to another and remove fields from the view.
Filter records You can filter data displayed in the view by adding or moving a field to the filter area. You can also filter a field in the row and column area.
Sort records You can sort items in row or column fields in ascending or descending order. You can also sort items in custom order in PivotTable view.
Group records You can group items in row or column fields on intervals, or create custom groups.
Format elements and change captions In PivotTable view, you can change the font settings, alignment, background color, and number format of a field. You can also change the captions of fields and custom groups. In PivotChart view, you can change the chart type, format data markers, and more.
 Reports: Presenting your data to the world
A report is an effective way to present your data in a printed format. Because you have control over the size and appearance of everything on a report, you can display the information the way you want to see it.
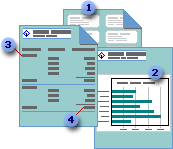
 Create mailing labels.
 Show totals in a chart.
 Group records into categories.
 Calculate totals.
Most reports are bound to one or more table and query in the database. A report's record source refers to the fields in the underlying tables and queries. A report need not contain all the fields from each of the tables or queries that it is based on.
A bound report gets its data from its underlying record source. Other information on the form, such as the title, date, and page number, is stored in the report's design.
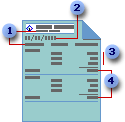
 The report title and column headings are stored in the report's design.
 The date comes from an expression stored in the report's design.
 Data comes from fields in the underlying table, query, or SQL statement.
 Totals come from expressions, which are stored in the report's design.
You create the link between a report and its record source by using graphical objects called controls. Controls can be text boxes that display names and numbers, labels that display titles, or decorative lines that graphically organize the data and make the report more attractive.
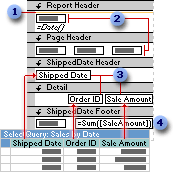
 Lines are decorative.
 Labels display descriptive text.
 Text boxes display data from the Sales by Date query.
 A text box uses an expression to calculate a total.
You can create different types of reports quickly by using wizards. Use the Label Wizard to create mailing labels, the Chart Wizard to create charts, or the Report Wizard to create a standard report. The wizard asks you questions and creates a report based on your answers. You can then customize the report the way you want it in Design view.
You can customize a report in the following ways:
Record source Change the tables and queries that a report is based on.Sorting and grouping data You can sort data in ascending or descending order. You can also group records on one or more fields, and display subtotals and grand totals on a report.
Report window You can add or remove Maximize and Minimize buttons, change the title bar text, and other Report window elements.
Sections You can add, remove, hide, or resize the header, footer, and details sections of a report. You can also set section properties to control the appearance and printing of a report.
Controls You can move, resize, or set the font properties of a control. You can also add controls to display calculated values, totals, current date and time, and other useful information on a report.
 Data access pages: Publishing your data to the Web
A data access page is a special type of Web page designed for viewing and working with data from the Internet or an intranet
 A page in Page view or Microsoft Internet Explorer 5.01 with Service Pack 2 (SP2) or later
Using a data access page is similar to using a form: You can view, enter, edit, and delete data in a database. However, you can also use a page outside a Microsoft Access database, so users can update or view data over the Internet or an intranet.
The following illustration shows how the Product data access page, which is used for entering and updating product information, looks in Page view or in Microsoft Internet Explorer 5.01 with Service Pack 2 (SP2) or later.
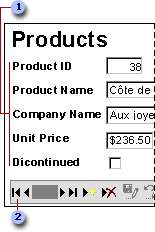
 Enter product information in the text boxes, drop-down list box, and check box.
 Use the record navigation toolbar to navigate, add, delete, save, sort, and filter records, and to get Help.
The following illustration shows the Products data access page in Design view.
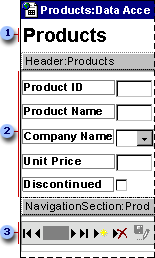
 Title in the body of the page
 Group header for the Products group level
 Record navigation section for the Products group level
The body The body is the basic design surface of a data access page. On a page that supports data entry, you can use it to display informational text, controls bound to data, and sections.
Sections You use sections to display text, data from a database, and toolbars.
Two types of sections are typically used on pages that support data entry: group header and record navigation sections. A page can also have footer and caption sections.
- Group header and footer Used to display data and calculate values.
- Record navigation Used to display the record navigation control for the group level. A record navigation section for a group appears after the group header section. You can't place bound controls in a record navigation section.
- Caption Used to display captions for text boxes and other controls. It appears immediately before the group header. You can't place bound controls in a caption section.
Each group level in a data access page has a record source. The name of the record source is displayed on the section bar for each section used for a group level.
 Designing different types of data access pages
You design data access pages in Design view in Microsoft Access. The page is a separate file that is stored outside Access; however, when you create the file, Access automatically adds a shortcut to the file in the Database window. Designing a data access page is similar to designing forms and reports
- Interactive reporting This type of data access page is often used to consolidate and group information that is stored in the database, and then publish summaries of the data. For example, a page might publish the sales performance for each region in which you do business. Using expand indicators, you can go from a general summary of the information, such as a list of all the regions and their combined sales total, to specific details on individual sales within each region. The data access page might provide toolbar buttons for sorting and filtering the data, as well as for adding, editing, and deleting the data in some or all group levels.
- Data analysis This type of data access page may include a PivotTable list, similar to a Microsoft Excel PivotTable report, that lets you reorganize the data to analyze it in different ways. The page might contain a chart that you can use to analyze trends, detect patterns, and compare data in your database. Or it might contain a spreadsheet, in which you can enter and edit data and use formulas to calculate as you do in Excel.
 Using data access pages in Internet Explorer
A data access page is connected directly to a database. When users display the data access page in Internet Explorer, they are viewing their own copy of the page. That means any filtering, sorting, and other changes they make to the way the data is displayed
Users get Help on how to work with the page in Internet Explorer by clicking the Help
 button on the record navigation toolbar. The Help file that appears is automatically included with any data access page that's published with a record navigation toolbar. If you delete the record navigation toolbar or if you disable its Help button, you should provide instructions for using the page to those who will use the page.
Note To view and work with the data access page on the Internet or an intranet, users need Microsoft Internet Explorer 5.01 with Service Pack 2 (SP2) or later.
 Using data access pages in Microsoft Access
You can also work with a data access page in Page view in Access. Data access pages can supplement the forms and reports that you use in your database application. When deciding whether to design a data access page, form, or report, consider the tasks that you want to perform.
You get Help on how to work with the page in Page view by clicking the Help
 button on the Page View toolbar to display Access Help. Clicking the Help button on a record navigation toolbar on the page displays Help for working with the page in Microsoft Internet Explorer. As mentioned previously, this Help file is automatically included with any data access page that's published with a record navigation toolbar. You can delete the Help button on pages that are used only within Access, or you can modify the button to provide custom Help.
 Where a data access page gets its data
 Types of data sources for a data access page
Microsoft Access database, or a Microsoft SQL Server database version 6.5 or later. To design a page using data from one of these databases, the page must be connected to the database. If you have already opened an Access database or an Access project that's connected to a SQL Server database, the data access page you create automatically connects to the current database and stores that path in the ConnectionString property of the data access page. When a user browses to the page in Microsoft Internet Explorer 5.01 with Service Pack 2 (SP2) or later or displays the page in Page view, it displays current data from the underlying database by using the path defined in the ConnectionString property. If you design the data access page while the database is on a local drive, Access will use the local path, which means the data won't be accessible to others. For this reason, it's important that you move or copy the database to a network location that's accessible to users of your page. Once the database is on the network share, open the database using the UNC address. If you move or copy the database after you've already designed the page, you'll have to update the path in the ConnectionString property to point to the new location.
Instead of having to update the ConnectionString property of each page in the database separately, you can choose to create a connection file. A connection file stores the connection information for a data access page, and can be shared between multiple data access pages. When you open a data access page that uses a connection file, the page reads the connection file and connects to the appropriate database. After creating the connection file, if you move or copy the database, all you have to do is edit the connection information in the connection file.
 Types of data sources for Microsoft Office Web Components on a data access page
Although the data access page gets its data from a Microsoft Access database or Microsoft SQL Server database, Microsoft Office Web Component controls on the page can display data from either of these databases or from other sources. For example, the page may contain a PivotTable list, spreadsheet, or chart with data from a Microsoft Excel worksheet or a database other than Access or SQL Server. Depending on the data source, the data in these controls may be a snapshot of the original data or it may be live data displayed through a separate connection that the control has with its data source.
To create an Office Web Component with data from a source other than the current database, you might have to use a program other than Access to first publish the data to a Web page. For example, to create a PivotTable list that contains data from an Excel worksheet, you have to publish the data from Excel. Then, in Access, you can open the Web page and turn it into a data access page by adding controls that are bound to an Access or SQL Server database. You can further customize the page by adding labels, pictures, or other features to enhance the page's appearance. From within Access, you can create a PivotTable list that uses data from an external source other than Excel.
 Macros: Putting your data to work
Macros are a set of actions that you can create to help you to automate common tasks. By using groups of macros, you can perform several tasks at once.
A macro is a set of one or more actions that each perform a particular operation, such as opening a form or printing a report. Macros can help you to automate common tasks. For example, you can run a macro that prints a report when a user clicks a command button.
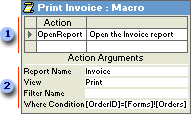
 When you create a macro, you enter the actions you want to carry out in this portion of the Macro window.
 You can specify arguments for an action in this portion of the window.
A macro can be one macro composed of a sequence of actions, or it can be a macro group. You can also use a conditional expression to determine whether in some cases an action will be carried out when a macro runs.
The following macro is composed of a series of actions. Microsoft Access carries out these actions each time the macro runs. To run this macro, you refer to the macro name Review Products.

If you have numerous macros, grouping related macros in macro groups can help you to manage your database more easily.
For example, the following macro group, named Buttons, is made up of three related macros: Employees, Products, and Reps. Each macro carries out the OpenForm action, and the Products macro also carries out the MoveSize action.

The name in the Macro Name column identifies each macro. When you run a macro in a macro group, Microsoft Access carries out the action in the action column and any actions that immediately follow with a blank Macro Name column.
You can run a macro in a macro group in an event or event procedure by typing the macro group name followed by a period and then the macro name. In the preceding example, to refer to the Employees macro in the Buttons macro group, you would type Buttons.Employees.
In some cases, you may want to carry out an action or series of actions in a macro only if a particular condition is true. For example, if you're using a macro to validate data in a form, you might want to display one message in response to one set of values entered in a record and another message in response to a different set of values. In cases like these, you can use conditions to control the flow of the macro.
A condition is a logical expression that evaluates to True/False or Yes/No. The macro follows different paths depending on whether the condition is true or false.
When you run the macro, Microsoft Access evaluates the first conditional expression. If the condition is true, Microsoft Access carries out the action in that row and any of the immediately following actions that are preceded by an ellipsis (...) in the Condition column.
Microsoft Access then runs any additional actions in the macro that have a blank Condition column until it reaches another expression, a macro name, or the end of the macro.
If the condition is false, Microsoft Access ignores the action and any immediately following actions that are preceded by an ellipsis in the Condition column and moves to the next action row that contains another condition or a blank Condition column.
The following macro runs the MsgBox and the StopMacro actions only when the expression in the Condition column is true (when there is a Null value in the SupplierID field).

Action arguments are additional information required by some macro actions
Tips for setting action arguments:
- In general, it's a good idea to set action arguments in the order they're listed, because choices for one argument may determine those for arguments that follow.
- If you add an action to your macro by dragging a database object from the Database window, Microsoft Access automatically sets appropriate arguments for that action.
- If an action has an argument that calls for the name of a database object, you can set the argument and the corresponding object type argument automatically by dragging the object from the Database window to the argument box.
- You can use an expression preceded by an equal sign (=) to set many action arguments.
 Modules: Automate routine tasks and create business solutions
A module is essentially a collection of declarations, statements, and procedures stored together as one named unit to organize your Microsoft Visual Basic code. Microsoft Access has two types of modules: standard modules and class modules.
A module is a collection of Visual Basic declarations and procedures that are stored together as a unit.
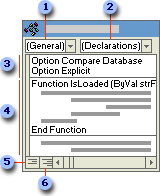
 Object box
 Procedure box
 Declarations
 Procedures
 Procedure View button
 Full Module View button
Form and report modules are class modules that are associated with a particular form or report. Form and report modules often contain event procedures that run in response to an event on the form or report. You can use event procedures to control the behavior of your forms and reports, and their response to user actions, such as clicking a command button.
When you create the first event procedure for a form or report, Microsoft Access automatically creates an associated form or report module.

 To view or add a form procedure, choose one of the form's objects from the Object box ...
 ... and then choose an event from the Procedure box. Names of events that already have procedures are bold.
Procedures in your form and report modules can call procedures you have added to standard modules.
In Access 97 or later, class modules can also exist independent of a form or report, and this type of class module is listed in the Database window. You can use a class module to create a definition for a custom object. In Access 95, class modules exist in association only with a form or report.
Standard modules contain general procedures that aren't associated with any other object, and frequently used procedures that can be run from anywhere within your database. The major difference between a standard module and a class module that is not associated with a particular object is one of scope and lifetime. The value of any variables or constants that are declared or exist in a class module without an associated object are available for use only while that code is running and only from that object.
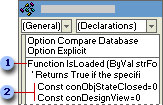
 Function name and arguments
 Visual Basic declarations and code statements
Standard modules are listed in Modules under Objects in the Database window. Form, report, and standard modules are also listed in the Object Browser.
After you've set up different tables for each subject in your Microsoft Access database, you need a way of telling Microsoft Access how to bring that information back together again. The first step in this process is to define relationships between your tables. After you've done that, you can create queries, forms, and reports to display information from several tables at once. For example, this form includes information from four tables:

 The Customers table
 The Orders table
 The Products table
 The Order Details table
In the previous example, the fields in four tables must be coordinated so that they show information about the same order. This coordination is accomplished with relationships between tables. A relationship works by matching data in key fields

 EmployeeID appears in both tables
 ... and as a foreign key.
A one-to-many relationship is the most common type of relationship. In a one-to-many relationship, a record in Table A can have many matching records in Table B, but a record in Table B has only one matching record in Table A.

 One supplier ...
 ... can supply more than one product ...
 ... but each product has only one supplier.
In a many-to-many relationship, a record in Table A can have many matching records in Table B, and a record in Table B can have many matching records in Table A. This type of relationship is only possible by defining a third table (called a junction table) whose primary key consists of two fields

 Primary key from the Orders table
 Primary key from the Products table
 One order can have many products ...
 ... and each product can appear on many orders.
In a one-to-one relationship, each record in Table A can have only one matching record in Table B, and each record in Table B can have only one matching record in Table A. This type of relationship is not common, because most information related in this way would be in one table. You might use a one-to-one relationship to divide a table with many fields, to isolate part of a table for security reasons, or to store information that applies only to a subset of the main table. For example, you might want to create a table to track employees participating in a fundraising soccer game. Each soccer player in the Soccer Players table has one matching record in the Employees table.

 Each soccer player has one matching record in the Employees table.
 This set of values is a subset of the EmployeeID field and the Employees table.
The kind of relationship that Microsoft Access creates depends on how the related fields are defined:
- A one-to-many relationship is created if only one of the related fields is a primary key or has a unique index.
- A one-to-one relationship is created if both of the related fields are primary keys or have unique indexes.
- A many-to-many relationship is really two one-to-many relationships with a third table whose primary key consists of two fields
— the foreign keys from the two other tables.
You can also create a relationship between a table and itself. This is useful in situations where you need to perform a Lookup within the same table. In the Employees table, for example, you can define a relationship between the EmployeeID and ReportsTo fields, so that the ReportsTo field can display employee data from a matching EmployeeID.
Note If you drag a field that isn't a primary key and doesn't have a unique index to another field that isn't a primary key and doesn't have a unique index, an indeterminate relationship is created. In queries containing tables with an indeterminate relationship, Microsoft Access displays a default join line between the tables, but referential integrity won't be enforced, and there's no guarantee that records are unique in either table.
Referential integrity is a system of rules that Microsoft Access uses to ensure that relationships between records in related tables are valid, and that you don't accidentally delete or change related data. You can set referential integrity when all of the following conditions are met:
- The matching field from the primary table is a primary key or has a unique index.
- The related fields have the same data type. There are two exceptions. An AutoNumber field can be related to a Number field with a FieldSize property setting of Long Integer, and an AutoNumber field with a FieldSize property setting of Replication ID can be related to a Number field with a FieldSize property setting of Replication ID.
- Both tables belong to the same Microsoft Access database. If the tables are linked tables, they must be tables in Microsoft Access format, and you must open the database in which they are stored to set referential integrity. Referential integrity can't be enforced for linked tables from databases in other formats.
The following rules apply when you use referential integrity:
- You can't enter a value in the foreign key field of the related table that doesn't exist in the primary key of the primary table. However, you can enter a Null value in the foreign key, specifying that the records are unrelated. For example, you can't have an order that is assigned to a customer that doesn't exist, but you can have an order that is assigned to no one by entering a Null value in the CustomerID field.
- You can't delete a record from a primary table if matching records exist in a related table. For example, you can't delete an employee record from the Employees table if there are orders assigned to the employee in the Orders table.
- You can't change a primary key value in the primary table, if that record has related records. For example, you can't change an employee's ID in the Employees table if there are orders assigned to that employee in the Orders table.
For relationships in which referential integrity is enforced, you can specify whether you want Microsoft Access to automatically cascade update and cascade delete related records. If you set these options, delete and update operations that would normally be prevented by referential integrity rules are allowed. When you delete records or change primary key values in a primary table, Microsoft Access makes necessary changes to related tables to preserve referential integrity.
If you select the Cascade Update Related Fields check box when defining a relationship, any time you change the primary key of a record in the primary table, Microsoft Access automatically updates the primary key to the new value in all related records. For example, if you change a customer's ID in the Customers table, the CustomerID field in the Orders table is automatically updated for every one of that customer's orders so that the relationship isn't broken. Microsoft Access cascades updates without displaying any message.
Note If the primary key in the primary table is an AutoNumber field, setting the Cascade Update Related Fields check box will have no effect, because you can't change the value in an AutoNumber field.
If you select the Cascade Delete Related Records check box when defining a relationship, any time you delete records in the primary table, Microsoft Access automatically deletes related records in the related table. For example, if you delete a customer record from the Customers table, all the customer's orders are automatically deleted from the Orders table (this includes records in the Order Details table related to the Orders records). When you delete records from a form or datasheet with the Cascade Delete Related Records check box selected, Microsoft Access warns you that related records may also be deleted. However, when you delete records using a delete query, Microsoft Access automatically deletes the records in related tables without displaying a warning.