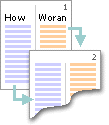
Text in newsletter-style columns flows continuously from the bottom of one column to the top of the next column.

You can specify the number of newsletter-style columns you want, adjust their width, and add vertical lines between columns. You can also add a banner heading that spans the width of the page.
 Create linked text boxes to continue a story elsewhere in the document
Suppose you're creating a newsletter, and you want a story that begins on page 1 to continue on page 4. To make this happen, you place the text in text boxes, and then create text box links so that the story will flow from one text box to another in the order you want. In this example, the text box on page 1 is linked to a text box on page 4.

When you add lines of text to a linked text box, the text flows forward into the next text box. When you delete lines of text from a text box, the text in the next text box moves backward. You can link several text boxes in a story, and you can have multiple stories in a document. However, all the linked text boxes must be contained in a single document. The links don't have to occur in a forward direction.
Instead of the rectangular or square containers that text boxes provide for your story, you can use circles, banners, flow chart shapes, and other AutoShapes as containers. After you've created the linked text boxes and inserted the text, you can change the shape of the container for your story.
 Flow stories in parallel, or side-by-side, columns from page to page
You can use linked text boxes to have text from column 1 flow to column 1 on the next page. The text beside it in column 2 can flow to column 2 on the next page, parallel to column 1. This technique is useful if you need to pair two similar stories or articles

This method gives different results from using the Columns command on the Format menu, which causes text in column 1 to flow or "snake" to column 2 on the same page. You can also use tables to create side-by-side columns, but linked text boxes give you more control over the text flow.