Microsoft Excel provides the following ways to view your worksheet and adjust how it will look printed.
- Normal view The default view is best for on-screen viewing and working.
- Print preview Shows you the printed page so you can adjust columns and margins. The way pages appear in the preview window depends on the available fonts, the resolution of the printer, and the available colors.
- Page break preview Shows you what data will go on each page so you can adjust the print area and page breaks.
As you make settings that affect how your worksheet will print, you can switch between the different views to see the effects before you send the data to the printer.
Excel provides many optional settings so you can adjust the appearance of the printed page. To make sure you've checked everything likely to affect your printout, do the following:
 Change the format and layout of the worksheet on-screen
You can set the orientation of the printed worksheet to portrait or landscape.

When to use landscape Switch to landscape when you need to print many more columns of data than will fit on a portrait page. If you don't want to use landscape, you can change the layout of the printed worksheet to fit the data to the available space, or adjust the margins.
Making the data fit the page You can make the printed image fit the page or paper size by shrinking or expanding the image. Other changes you can make to the layout of the printed worksheet include setting the paper size, centering the data on the printed page, and controlling how the pages are numbered. These changes affect only the worksheet's printed appearance, not how it looks on the screen.
Print partial data To print only selected parts of the data on a worksheet, you can specify which areas to print.
To put page numbers or other text above or below the worksheet data on each page, you can add headers or footers to your printed worksheet. Headers print at the top of every page; footers print at the bottom of every page. You can use built-in headers or footers or create your own.
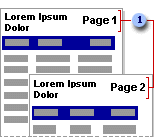
 Headers
Headers and footers are separate from the data on your worksheet and appear only when you preview and print. In addition to headers and footers, you can repeat worksheet data as print titles on every page.
To see each page exactly as it will print, click Print Preview
 . In print preview, you can see headers, footers, and print titles.
When to adjust margins Adjust the margins or columns when your data is too wide to fit across the page and you don't want to shrink it to fit. In print preview, you can change the width of the margins and columns on the worksheet by dragging the sizing handles. Click the Margins button to display the handles.
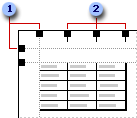
 Margin sizing handles
 Column sizing handles
Change the size of individual columns and rows Move the gridlines in the row numbers and column letters areas.
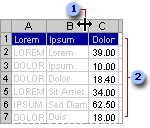
 Column sizing
 Row sizing
Gridlines, page order, and other settings In print preview, you can change the way your worksheet prints. With the Setup button, you can turn gridlines on or off, print a draft copy of your worksheet, and change the order in which pages are printed.
Page break preview shows where page breaks occur on the worksheet and which area of the worksheet will be printed. Page breaks you set are solid blue lines, and automatic page breaks set by Excel are dashed blue lines.
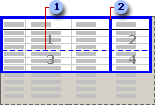
 Automatic page breaks
 Manual page breaks
When to move page breaks To fit more rows or columns on the current page, move a horizontal or vertical page break. In Page break preview, this automatically shrinks the data to fit on the page. You may want to preview the page again to make sure the font size isn't too small.
Forcing page breaks To end a page at a particular point and start a new page, you can set a new page break.
Repeat row and column labels If the data on your worksheet has column or row labels (also called print titles), you can have Excel repeat these labels on every page of the printed worksheet.
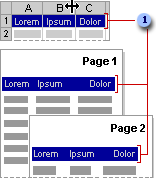
 Column labels
The labels don't have to be in the first rows or columns of the worksheet, but they don't begin repeating until after the row or column they originally appeared in has been printed.
Repeat row and column headings You can also print the row numbers or column letters for a worksheet (don't confuse these headings with the labels in your data).

 Row numbers
 Column letters
You can use any combination of headers and footers, repeating labels, and row and column headings.
 Previewing specific sheets or pages
Range of pages You can preview a specific range of pages.
Embedded chart If a worksheet contains an embedded chart, print preview displays both the worksheet and the chart. You can move or resize the chart in normal view or page break preview. If you select an embedded chart before you click Print Preview
 , Excel displays only the embedded chart.
Page number and total pages The status bar at the bottom of the screen shows the current page number and the total number of pages to be printed.
Printing a draft You can speed up the time it takes to print a worksheet by temporarily changing the print quality. If you know the printer resolution you want to use, you can change the print quality for the printer. If you are unsure of the resolution (or quality), you can print the document in draft quality, which increases printing speed by ignoring formatting and most graphics.
Printing in black and white On black-and-white printers, Excel prints colors as gray shades. You can reduce the amount of time it takes Excel to print a worksheet that contains colors by printing colors in black and white. When you print a worksheet by using only black and white, Excel prints fonts and borders formatted in color as black, not as gray shades. Excel also prints cell and AutoShape backgrounds as white and prints other graphics and charts in shades of gray.
Printing without gridlines Large worksheets print faster if gridlines are not printed.
 Using the Report Manager Add-in
You can combine worksheets, views, and scenarios into reports that can be printed by using the Report Manager add-in. When you add a report, it is saved with the workbook so that you can print the report later.
For example, if you have a Best Case scenario, a Worst Case scenario, and two different custom views
 Printing to fit a paper width or a certain number of pages
If your work doesn't fit exactly on the number of printed pages you want, you can adjust, or scale, your printed work to fit on more or fewer pages than it would at normal size. You can also specify that you want to print your work on a certain number of pages.