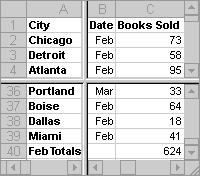
Split a worksheet To view and scroll independently in different parts of a worksheet, you can split a worksheet horizontally and vertically into separate panes. Splitting a worksheet into panes allows you to view different parts of the same worksheet side by side and is useful, for example, when you want to paste data between different areas of a large worksheet. In the following example, you can view the rows for different cities in the upper panes while keeping the February totals visible in the lower panes.
The two right panes scroll together, as do the two lower panes.
Keep labels or data visible To keep row and column labels or other data visible as you scroll through a sheet, you can "freeze" the top rows and/or left columns. The frozen rows and columns don't scroll but remain visible as you move through the rest of the worksheet.

The labels in the first row remain fixed while you scroll the rest of the worksheet vertically.
You cannot both split a worksheet and freeze parts of a worksheet at the same time.
Note Split or frozen panes do not automatically show up on each page when the sheet is printed. You must specify any labels you want to print.
You can save a set of display and print settings as a custom view, then apply your custom view at any time. For example, you have a worksheet that contains data about four different sales regions. You can set up a view of each region's data and then save them. When you open the worksheet you can then request a certain view and the data is displayed.
What can be stored in custom views? The stored settings include display options, window size and position on the screen, window splits or frozen panes, the sheet that is active, and the cells that are selected at the time the view is created. You can also optionally save hidden rows, hidden columns, filter settings, and print settings.
The custom view includes the entire workbook. If you hide a sheet before a view is added, Excel hides the sheet when you show the view.
 Hiding all or part of a workbook
When you hide parts of a workbook, the data is removed from view but is not deleted from the workbook. If you save and close the workbook, the hidden data remains hidden the next time the workbook is opened. If you print the workbook, Microsoft Excel does not print the hidden parts. To prevent others from displaying hidden sheets, rows, or columns, you can protect the workbook or sheet with a password.
Hide workbooks and sheets You can hide workbooks and sheets to reduce the number of windows and sheets on the screen and to prevent unwanted changes. For example, you can hide sheets that contain sensitive data, or you can hide a workbook containing macros so that the macros are available to run but no window appears for the macro workbook. The hidden workbook or sheet data is accessible, and other documents can use the information.
Hide rows and columns You can also hide selected rows and columns of data that you aren't using or that you don't want others to see.
Hide window elements You can hide most window elements in order to use as much of your screen as possible to display worksheet data. These window elements include the Microsoft Windows taskbar and the Excel title bar, toolbars, formula bar, and status bar. These elements remain hidden only as long as the workbook is open; they are redisplayed when you close the workbook and open it again.