When you're creating art or designs with Microsoft Office programs, it's helpful to know which types
Bitmap pictures (also called paint-type or raster images) are made from a series of small dots, much like a piece of graph paper with specific squares filled in to form an image. Bitmaps are created with and edited in paint programs, such as Microsoft Paint. All scanned graphics and photographs are bitmaps. When they are resized, they lose definition, and the individual dots that make up the picture become visible.
You can change the way colors look in a bitmap picture by adjusting the brightness and contrast, converting color to black and white or grayscale, or creating transparent areas. To change specific colors in a bitmap, you need to use a photo editing program.
Bitmap pictures are often saved with a .bmp, .png, .jpg, or .gif extension.
Drawn pictures (also called vector drawings) are created from lines, curves, rectangles, and other objects. The individual lines can be edited, moved, and rearranged. When a drawn picture is resized, the computer redraws the lines and shapes so that they retain their original definition and perspective. AutoShapes are drawn pictures.
Because a drawn picture is made of lines and shapes, you can group and ungroup, reorder, and change the color of one or all parts of the picture.
Drawn pictures are saved in the format of the application that created them. For example, Microsoft Windows Metafiles are saved with a .wmf extension.
 About reducing a picture's file size
When you insert a picture with a file size that is greater than a certain threshold, your Microsoft Office program presents you with the option to compress the picture before inserting it. The program automatically selects the type of compression that best suits the type of picture.
By compressing the picture's file size, you will help control the size of the file you are inserting it into. However, the picture might lose some quality.
To save room on your hard disk or to reduce download time, when you're formatting a picture you can use the Compress Pictures feature to do the following:
- Reduce resolution (to 96 dots per inch (dpi) for Web and 200 dpi for print), and unnecessary information is discarded.
- Discard extra information. For example, when a picture has been cropped or resized, the "hidden" parts of the picture are stored in the file.
- Compress the picture, if possible.
Finding clips
The Microsoft Clip Organizer contains drawings, photographs, sounds, videos, and other media files
In an Office program, you can find, add, and organize media clips by using:
Insert Clip Art This command opens a task pane where you can search for clips. Although this task pane resembles the Office Basic Search task pane, you use it to find media clips, not documents. You can search for media files based on descriptive keywords, file name, file format, and clip collections.Microsoft Clip Organizer This link can be found at the bottom of the Insert Clip Art task pane and opens the main Clip Organizer window. You can use Clip Organizer to browse through clip collections, add clips, or catalog clips in ways that make sense to you. For example, you can create a collection to group the clips you use most frequently, or let Clip Organizer automatically add and catalog media files on your hard disk.
Clip Organizer Online If you have an Internet connection open, clip art search results will automatically include content from Clip Organizer Online. Or, you can visit the site yourself by clicking the link at the bottom of the task pane.
Microsoft Office Online If you have an Internet connection, you can use the Office on the Web tools to purchase a variety of clip-related options.
Using the Insert Clip Art
task pane, you can quickly and easily find photographs, drawings, sound effects, music, videos, and other media files
You can search for clips by entering search keywords or phrases in normal, everyday language
If you want to narrow your search, you can specify the clip collections you want to search or ignore, or choose to search only for certain types of media files.
As soon as you start a search, the Insert Clip Art task pane begins listing thumbnails of drawings, photos, sounds, and other media files.
If a clip isn't installed on your computer, you'll see an icon in the lower-left corner of the thumbnail that tells you where the clip can be found.
| Icon | Clip location |
|---|---|
 |
CD-ROM or DVD |
 |
Microsoft Clip Organizer Online site |
 |
Microsoft Provider Web site (free) |
 |
Microsoft Partner Web site (available for purchase) |
 |
Unavailable |
If a clip is an animated GIF, you'll see this icon in the lower-right corner of the thumbnail: 
You can use everyday language to describe the clip you want to find. The following guidelines can help you refine keyword searches.
| Type this keyword | To find |
|---|---|
| car | Clips with "car" as the exact search keyword |
| blue car | Clips with the search key words "blue" and "car" |
| "blue car" | Clips with the phrase "blue car" |
| blue, car | Clips with the search key word "blue" or "car" |
You can also search by entering the file name of the media clip you want to find. If you don't know the exact file name, you can substitute wildcard characters for one or more real characters.
-
Use the asterisk (*) as a substitute for zero or more characters in a file name. For example, type car*.jpg to locate file names like "cardboard.jpg" or "carton.jpg".
-
Use the question mark (?) as a substitute for a single character in a file name. For example, type car?.jpg to locate file names like "car1.jpg" or "car2.jpg", but not "carton.jpg".
The Microsoft Clip Organizer window
If you don't find what you need by using the Insert Clip Art task pane, you can open the main Clip Organizer window, where you can browse through organized collections of media clips. The clips in Clip Organizer are sorted into collections
Clip Organizer has its own Help system, where you'll find such information as how to organize your clips in collections, how to assign keywords to clips for easy searching, and how to work with the Clip Organizer by using shortcut keys.
Shapes
Shapes can be resized, rotated, flipped, colored, and combined to make more complex shapes. Many have an adjustment handle that you can use to change the most prominent feature of a shape
The AutoShapes available on the Drawing toolbar include several categories of shapes: lines, connectors, basic shapes, flowchart elements, stars and banners, and callouts. More shapes can be found in the Clip Organizer as well.
You can add text to shapes. The text you add becomes part of the shape
Text boxes can be treated as shapes. They are formatted in many of the same ways shapes are formatted, including adding colors, fills, and borders.
About positioning text in shapes
Some types of shapes can include associated text. Shapes with this feature include most AutoShapes (except lines, connectors, and freeforms), text boxes, and WordArt.
When you type text directly into an AutoShape or text box, the text is attached to the shape, and you can:
-
Adjust and position the text within it.
-
Make the text wrap in the shape or place it in the top, bottom, or middle of the shape.
-
Change the margins between the text and the edge of the shape.
-
Resize the shape to fit the text precisely.
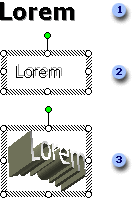
If the shape is WordArt, you can create shadowed, skewed, rotated, and stretched text, as well as text that has been fitted to predefined shapes. Text in WordArt does not wrap or need margin settings, because the text is an object.
About text shadows and 3-D effects
Depending on the effect you want, you can shadow or emboss text in three different ways:
-
Add a shadow or embossed effect directly to the text. When you use this method, you can't change such shadow features as offset or color.
-
Add a shadow or embossed effect to an unfilled object that contains text. With this method, the text takes on the same shadow options as the object, and you can control and change shadow features.
-
Insert WordArt
— a drawing object that contains special text effects such as shadowing and perspective.
 Add shadow directly to text
 Add shadow to a text box (unfilled object)
 Add WordArt
There are three types of connector lines to connect objects
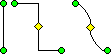
After you choose a connector AutoShape, blue connector sites appear on objects as you move the mouse pointer over them. These points indicate where you can attach a connector line.

When you rearrange objects that are joined with a connector line, the connectors remain attached to the objects and move with the objects. If you move either end of a connector, that end unlocks or detaches from the object. You can then lock it to another connection site on the same object, or you can lock it to another object. Once the connector locks on a connection site, the connector stays connected to the objects, no matter how you move each object.

Locked connector
Unlocked connector
After you rearrange connected objects, some connectors might need to be rerouted to make the most direct connections and keep connectors from crossing objects.
Changing drawing objects or graphics
About resizing or cropping an object
There are two ways that you can change the size of a picture
Resizing changes the dimensions of the picture by stretching or shrinking it.
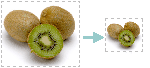
Cropping reduces the size of the picture by removing the vertical or horizontal edges. Cropping is often used to hide or trim a part of a picture, either for emphasis or to remove unwanted portions.
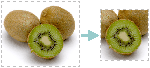
You can also outcrop, which adds a margin around a picture.
You can always restore a resized or a cropped picture to its original size. If you're certain you won't want to undo your work, then after you crop the picture, use the Optimize Pictures feature to delete the cropped parts of the picture from the file completely.
When printed, transparent areas in pictures are the same color as the paper on which they're printed. In an electronic display
Although you cannot change the transparency of an animated GIF picture by using the Picture toolbar, you can make these changes in an animated GIF editing program, and then insert the file.
Objects automatically stack in individual layers as you add them. You see the stacking order when objects overlap
You can move individual objects or groups of objects in a stack. For example, you can move objects up or down within a stack one layer at a time, or you can move them to the top or bottom of a stack in one move. You can overlap objects when you draw to create different effects.
About grouping and ungrouping objects
When you group objects, you combine them so you can work with them as though they were a single object. You can flip, rotate, and resize or scale all objects in a group as a single unit. You can also change the attributes of all objects in a group at one time
You can ungroup a group of objects at any time and then regroup them later.
Excel applications for graphics
Using graphics as data markers
You can add graphic objects to embedded charts and chart sheets, and you can also use graphics as data markers.
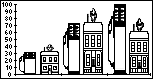
You can make graphics and buttons "hot" by using them as hyperlinks. When you click the graphic, you go to a specified location in the current document or Web page, to a different Microsoft Excel workbook or Web page, or to a file that was created in a different program. For example, you can insert a graphic that represents your company's stock symbol and then use it as a hyperlink to go to a page that contains your company's current stock prices.
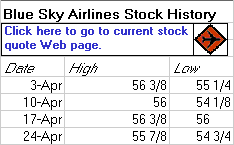
Hyperlinked graphic
You can assign a macro
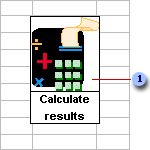
Graphic assigned a macro
Creating pictures of cells, charts, and other objects
You can create pictures of worksheet data, charts, and other objects and use them as illustrations on a worksheet or in a document created in another program. You can resize, move, and change a picture as you can any drawing object.
You can also create a linked picture of worksheet data so that the picture can be updated when the source data changes.