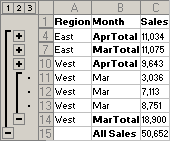
Create an outline

This outline lets you show and hide the detail rows for monthly sales.
-
If your summary rows are above the detail rows, or your summary columns are to the left of the detail columns, change the direction setting.
- On the Data menu, point to Group and Outline, and then click Settings.
- Clear the Summary rows below detail check box, the Summary columns to right of detail check box, or both check boxes.
-
If you want to set outline styles that will be applied automatically when the outline is created, set the Automatic styles option.
- On the Data menu, point to Group and Outline, and then click Settings.
- Select the Automatic styles check box.
Note If you don't want to apply automatic styles before you begin, you can apply them after you create the outline.
-
Decide whether to outline the worksheet automatically or manually.
-
You can outline any worksheet manually.
-
You can outline worksheets automatically if they have summary formulas that reference cells in the detail data. All columns containing summary formulas must be either to the right or to the left of the detail data, or rows containing summary formulas must be either below or above the detail data.
If you aren't sure whether your worksheet meets these requirements, try outlining automatically, and if the results aren't as you expect, undo the operation and outline manually instead.
-
- Do one of the following:
 Outline the data automatically
- Select the range of cells you want to outline.
To outline the entire worksheet, click any cell on the worksheet.
-
On the Data menu, point to Group and Outline, and then click Auto Outline.
- Select the rows or columns that contain detail data.
Detail rows or columns are usually adjacent to the row or column that contains the summary formula or a heading. For example, if row 6 contains totals for rows 3 through 5, select rows 3 through 5. If row 8 contains a heading that describes rows 9 through 12, select rows 9 through 12.
- On the Data menu, point to Group and Outline, and then click Group.
The outline symbols appear beside the group on the screen.
- Continue selecting and grouping detail rows or columns until you have created all of the levels you want in the outline.
- Select the range of cells you want to outline.
-
If you didn't select automatic styles, you can apply styles now.
- Select the cells that you want to apply outline styles to.
- On the Data menu, point to Group and Outline, and then click Settings.
- Select the Automatic styles check box.
- Click Apply Styles.
