Troubleshoot printing
From Microsoft Office Excel 2003
Check your printer setup in Windows Printing from your computer is primarily controlled by settings in Windows. Determine whether your printer setup in Windows is correct by using the Windows Print Troubleshooter.
-
On the Windows Start menu, click Help.
-
Click Contents, and click Files and Printers.
-
Click Printing, and then follow the instructions in the Troubleshooting topic.
Check the Microsoft Excel printer settings If the Windows printer setup looks correct, check the Excel printer settings to make sure that the selected printer matches the printer you're using.
On the File menu, click Print, and then click the name of the printer you want in the Name box under Printer.
Excel prints only a portion of my worksheet.
Check whether a print area is defined If the worksheet contains a print area, Excel prints only the print area. To determine whether your worksheet contains a print area, click Page Break Preview on the View menu. The area of the worksheet that appears with a white background is the area that is printed.
Excel prints too many rows or columns
- Define a print area
-
On the View menu, click Page Break Preview.
-
Select the area you want to print.
-
On the File menu, point to Print Area, and then click Set Print Area.
-
When you save the document, your print area selection is also saved.
Excel added extra rows to my worksheet.
Excel formats empty cells out to the bottom row or last column if you select an entire row or column (click the row number or column letter) before applying formatting. Excel then stores the formatting information for all of the otherwise empty cells and the file gets very large.
To fix this problem, do one of the following:
- If you don't want to start a new worksheet, press F5, click Special in the Go to dialog box, and then click Last cell. Delete all the rows up to your actual data and save the workbook.
- Insert a blank worksheet. On the worksheet you want to print, select only the cells you want to print and copy them to the new blank worksheet.
The printout doesn't look right.
My printed header or footer doesn't look the way I want.
You can choose from several headers and footers or create your own. Headers and footers cannot contain graphics or links to specific cells.
Use black and white only The text in headers and footers always prints in black. You cannot apply color to the text in headers or footers, even if you have a color printer.
Use print titles to repeat graphics and linked information If you want to repeat graphics or linked information at the top of every page, use print titles instead of a header. For example, to print a company logo and address at the top of every page:
-
Place the logo and address information in the first few rows of the worksheet.
-
On the File menu, click Page Setup, click the Sheet tab, and then enter the rows that contain the logo and address in the Rows to repeat at top box.
If you're printing a wide worksheet on multiple pages, be sure to copy the repeating information to additional rows or columns as needed.
Use two ampersand (&) characters to print an ampersand Microsoft Excel uses the ampersand to initiate codes for special formatting in the headers and footers. Therefore, to enter an ampersand in the header or footer, you must enter &&. For example, to include "Subcontractors & Services" in a header, enter Subcontractors && Services.
My header and footer margins don't look right.
Use the existing left and right margins The left and right header and footer margins are three-quarters (.75) of an inch, regardless of the left and right margins on the page. You can simulate wider margins on a single line header or footer by typing spaces before the text in the Left section edit box and after the text in the Right section edit box. (To locate these edit boxes, click Custom Header or Custom Footer in the Page Setup dialog box.) The spaces you type in the Right section edit box won't appear in the edit box, but will appear in the printed worksheet.
Adjust the space for the header and footer You can adjust the distance between the top or bottom of the page and the header or footer. You can also change the distance between the data printed on a page and the header or footer. Click Print Preview
![]() , click the Margins button, and drag the margin handles to adjust the spacing.
, click the Margins button, and drag the margin handles to adjust the spacing.
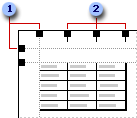
![]() Margin sizing handles
Margin sizing handles
![]() Column sizing handles
Column sizing handles
I want my sheet to print one page wide (or tall).
You can prevent columns or rows from spilling over the edge of a page by shrinking the sheet so that it is one page wide or tall.
-
Click the worksheet.
-
On the File menu, click Page Setup, and then click the Page tab.
-
Under Scaling, click Fit to.
-
Do one of the following:
Print a worksheet to fit a paper width
In the first box beside Fit to, enter 1 (for 1 page wide).
In the second box beside Fit to, delete the value so that the number of pages tall is unspecified.
Print a worksheet on a specified number of pages
In the boxes beside Fit to, enter the number of pages on which you want to print the work.
Notes
-
Microsoft Excel ignores manual page breaks when you use the Fit to option.
-
When you change the values for Fit to, Excel shrinks the printed image or expands it up to 100 percent, as necessary. To see the how much the image will be adjusted for your new values, click OK, and then click Page Setup on the File menu. The Adjust to box on the Page tab shows the percentage that the printed size will be adjusted.
-
Printed data does not exceed the specified number of pages. Excel does not enlarge the data to fill the pages.
I can't scale a chart to print the size I want or print multiple charts on a single page.
For chart sheets, set the print size If the chart is on a chart sheet, you can scale it when you print it.
-
Activate the chart sheet, click Page Setup on the File menu, and then click the Chart tab.
-
Under Printed chart size, click the scaling option you want.
If you click Custom, the chart will be printed at the size you make it when you drag its selection handles.
For embedded charts, drag to resize If the chart is an embedded chart on a worksheet, resize the chart by clicking it and then dragging its selection handles.
To print charts together on a page, embed them You cannot print multiple chart sheets on a single page. To print two or more charts on a page, create embedded charts, and then resize them to fit on a single page. You can use the Page Break Preview command on the View menu to examine the location of the charts in the print area.
My print titles don't appear on some pages.
Excel prints repeating row and column labels only on the pages that include the labeled rows or columns. For example, if you select cells A1:A5 as repeating row labels, Excel does not print these labels on pages that contain only rows below row 5. If you select cells A1:E1 as repeating column labels, Excel does not print these labels on pages that contain only columns to the right of column E. To have Excel print labels on the additional pages, copy the labels to the additional rows or columns.
Copy row labels to the additional rows
-
Select the cells you want to repeat as row labels, and then click Copy
 on the Standard
toolbar.
on the Standard
toolbar. -
Select cells in the same columns of the additional rows where you want the row labels to print, and then click Paste
 .
. -
On the File menu, click Page Setup, and then click the Sheet tab.
-
Click Columns to repeat at left, and then enter the entire columns that contain the row labels. For example, to repeat row labels that you copied to cells in column A, enter $A:$A.
Copy column labels to the additional columns
-
Select the cells you want to repeat as column labels, and then click Copy
on the Standard
toolbar. -
Select cells in the same rows of the additional columns where you want the column labels to print, and then click Paste
. -
On the File menu, click Page Setup, and then click the Sheet tab.
-
Click Rows to repeat at top, and then enter the rows that contain the column labels. For example, to repeat column labels that you copied to cells in rows 1 and 2, enter $1:$2.
The worksheet background did not print.
Background patterns that are added to worksheets by using the Background command on the Format menu are not printed. However, graphics added to a worksheet by using the Picture command on the Insert menu are printed, as are cells with patterns or shading that are added by using the Cells command on the Format menu.
Pagination is wrong.
Excel ignores the page breaks I set.
If your workbook is set up so that Excel fits your printed work on a specific number of pages, Excel ignores the manual page breaks you've set and reduces the size of the printed worksheet. (To see whether this is the case, click Page Setup on the File menu, click the Page tab, and check the Fit to option under Scaling.)
Use Adjust To instead of Fit To To fit the worksheet to the specified number of pages and use the manual page breaks you inserted, click Page Setup on the File menu, click the Page tab, and then click Adjust to.
Set each page as a separate print range If Adjust to doesn't produce the results you want, you can set a print area with each page selected as a separate range. Excel prints nonadjacent ranges in a print area on separate pages.
- Insert a blank row or column in each location where you want a manual page break.
- Select the range you want to include as the entire first page, omitting the blank row or column.
- Hold down CTRL and select the range for the second page, omitting the blank rows or columns. Continue until you've selected all pages that you want to print.
- On the File menu, point to Print Area, and then click Set Print Area.
- On the File menu, click Page Setup, click the Page tab, click Fit to, and enter the number of pages you want.
Some columns and rows printed on the wrong page.
Column widths, row heights, page margins, and page breaks determine the number of columns and rows that print on a page.
Make margins smaller If some columns or rows print on the next page, try decreasing the size of the Top, Bottom, Left, and Right margins.
-
Select the worksheet or worksheets you want to print.
When you enter or change data, the changes affect all selected sheets. These changes may replace data on the active sheet and other selected sheets.
To select Do this A single sheet Click the sheet tab. 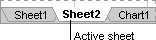
If you don't see the tab you want, click the tab scrolling buttons to display the tab, and then click the tab.
Two or more adjacent sheets Click the tab for the first sheet, and then hold down SHIFT and click the tab for the last sheet. Two or more nonadjacent sheets Click the tab for the first sheet, and then hold down CTRL and click the tabs for the other sheets. All sheets in a workbook Right-click a sheet tab, and then click Select All Sheets on the shortcut menu. Note If sheet tabs have been color-coded, the sheet tab name will be underlined in a user-specified color when selected. If the sheet tab is displayed with a background color, the sheet has not been selected.
Cancel a selection of multiple sheets
To cancel a selection of multiple sheets in a workbook, click any unselected sheet.
If no unselected sheet is visible, right-click the tab of a selected sheet. Then click Ungroup Sheets on the shortcut menu.
-
On the File menu, click Page Setup, and then click the Margins tab.
-
Do one of the following:
-
In the Top, Bottom, Left, and Right boxes, enter the margin size you want.
To apply the same page margins to new worksheets or workbooks, you can create a worksheet or workbook template.
-
To change the distance from the top edge to the header, enter a new margin size in the Header box.
-
To change the distance from the bottom edge to the footer, enter a new margin size in the Footer box.
These settings should be smaller than your top and bottom margin settings, and larger than or equal to the minimum printer margins.
-
To see how the margins will affect the printed document, click Print Preview
![]() before the document is printed. To adjust the margins in print preview, click Margins, and then drag the black margin handles on either side and at the top of the page.
before the document is printed. To adjust the margins in print preview, click Margins, and then drag the black margin handles on either side and at the top of the page.
Adjust page breaks You can move page breaks before you print your document. On the View menu, click Page Break Preview. Excel displays manual page breaks as thick blue lines; automatic page breaks appear as dashed lines. You can move page breaks by dragging them left, right, up, or down.
If a column prints on the wrong page
Make the sheet print one page wide If you want the worksheet to be only one page wide, regardless of the number of pages, you can restrict it to the width of a single page.
-
Click the worksheet.
-
On the File menu, click Page Setup, and then click the Page tab.
-
Under Scaling, click Fit to.
-
Do one of the following:
Print a worksheet to fit a paper width
In the first box beside Fit to, enter 1 (for 1 page wide).
In the second box beside Fit to, delete the value so that the number of pages tall is unspecified.
Print a worksheet on a specified number of pages
In the boxes beside Fit to, enter the number of pages on which you want to print the work.
Notes
-
Microsoft Excel ignores manual page breaks when you use the Fit to option.
-
When you change the values for Fit to, Excel shrinks the printed image or expands it up to 100 percent, as necessary. To see the how much the image will be adjusted for your new values, click OK, and then click Page Setup on the File menu. The Adjust to box on the Page tab shows the percentage that the printed size will be adjusted.
-
Printed data does not exceed the specified number of pages. Excel does not enlarge the data to fill the pages.
Change the paper orientation If you need a few more columns to print on the same page, change the orientation to landscape.
-
Click the worksheet.
-
On the File menu, click Page Setup, and then click the Page tab.
-
Under Orientation, click Portrait or Landscape.
-
Click Print.
Excel won't print multiple print areas on the same page.
If a print area contains nonadjacent areas of a worksheet, Excel prints each area on a separate page by default. However, you can specify that separate parts of a worksheet print on the same page by using one of the following methods.
Print nonadjacent columns side by side
-
Select the columns you don't want to print, point to Column on the Format menu, and then click Hide.
-
Set one print area that contains all of the columns, including the hidden columns.
Print nonadjacent rows above and below each other
-
Select the rows you don't want to print, point to Row on the Format menu, and then click Hide.
-
Set one print area that contains all of the rows, including the hidden rows.