When you click a PivotTable report, blue drop area guidelines appear along with the PivotTable toolbar and the PivotTable Field List window, so that you can customize the report.
To add a field, you can drag it from the field list to the area of the report where you want it, or use the Add To button and dropdown in the field list. To remove a field, drag it out of the report or drag it back onto the field list. Fields that you remove remain available in the field list.
You can use fields with  icons in the field list only as row, column, or page fields, and fields with
  icons only as data fields. If your fields have these icons, each field can be used in the report only once.
If your fields have  icons, you can use any field in any area, and you can add a field to both to the data area and to one of the row, column, or page areas, or display it more than once in the data area, as long as you report doesn't have any calculated items.
You can change the order in which fields appear by dragging them, or in the case of multiple data fields, by using the Order commands on the PivotTable menu.
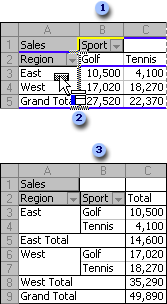
 Click a column field
 Drag it to the row area
 Sport becomes a row field like Region
When you move a field, it retains most settings you've made using the  arrow in the field or the Field Settings command, including page field options and layout settings. For example, if you set page field settings and move the field to the row area, then later move the field back to the page area, the settings remain in effect.
 Indented and nonindented formats
You can display a PivotTable report in an indented format similar to traditional banded or formatted database reports, in which the summarized data from each data field appears in a single column. New reports are displayed in a nonindented or crosstabulated format, with data field values in a grid. Switching to indented format may change the layout of the report, and it applies an autoformat to the report.
Use Format Report
 on the PivotTable toolbar to select an indented or nonindented format. The autoformats available for other worksheet areas are not available for PivotTable reports.
Indented formats Formats Report 1 through Report 10 are indented formats. Applying these formats moves all column fields in the report to the row area. Data fields move to the right of row fields, and the field names change to omit the summary function name. For example, Sum of Sales becomes Sales. After you apply a format, you can rearrange the fields as in any PivotTable report.
Setting indented format manually If you don't want to apply an autoformat, you can move all column fields to the row area, double-click each row field, click Layout, and then click Show items in outline form. This setting is retained if you move the field to another area, but the field is displayed in indented format only when it is in the row area.
Nonindented formats Formats PivotTable Classic and Table 1 through Table 10 are nonindented, for use with PivotTable reports that have column fields. Table 1 through Table 10 move the leftmost row field to the column area. Table 1 through Table 5 and Table 7 also add a blank line after each item in the outermost row field.
Character, cell, and number formats
You can change cell formats in a PivotTable report, such as font, background color, and alignment, as you do for other worksheet cells. You can set number formats for individual cells or for all cells of a data field.
Most formatting is retained when you refresh a report or change its layout, provided the Preserve formatting check box in the PivotTable Options dialog box is selected. Cell border changes, however, aren't retained.
Changing what's displayed for errors and empty cells Instead of displaying error values, such as #REF! or #N/A, and blanks for empty cells, you can specify different values for these cells in a PivotTable report.
Using merged cells By default, the labels for items in outer row and column fields appear left justified at the top of the item group. You can center the items horizontally and vertically by selecting the Merge labels check box in the PivotTable Options dialog box.
Adding blank rows between item groups For outer row fields, you can add a blank line after each item or its total row.
Removing formats To remove all character and cell formats in a report, use the None format available from the Format Report command.
In a new report, the items in each field appear either in the order received from the source database, or in ascending order. Refreshing a report places new items at the ends of the rows or columns.
Microsoft Excel uses the following ascending sort order: numbers, text, logical values, error values such as #REF and #VALUE, and blank cells. When you sort in descending order, Excel sorts in the reverse order except for blank cells, which are always sorted last. If you want a sorting sequence such as Jan, Feb, Mar, and so forth, you can use a custom sort order, and you can also define your own sorting sequence.
If your report has fields organized in levels, you can sort lower-level items together by hiding the upper levels before you sort. For example, if you display both the Country and City levels, cities are sorted separately under each country, but if you hide the Country level, you can sort cities from different countries together.
You can manually reorder items by clicking and dragging the item labels.
Your options for varying the amount of detail displayed in a report depend on the type of source data the report is based on.
For OLAP source data ( and icons in the field list), fields are organized in levels of detail, and you can display and hide both individual items and entire levels. Summary values are usually calculated on the OLAP server, so underlying detail records for data values usually aren't available for display. However, your database may have other information available for items, called property fields, that you can display or hide. For example, if your database has a City field, you might be able to display population or climate figures for individual cities.
For other types of source data ( icons in the field list), you can display and hide individual items and also display underlying detail records for data values and items, if this option hasn't been disabled. You can't directly select multiple items in a page field, but you can move the field temporarily to the row or column area, hide some of the items, and move the field back to the page area, so that the (All) item then displays a summary that omits the hidden items.
For both types of source data, you can automatically display the top or bottom items in a field
You can use grouping to view less detailed summaries
For OLAP source data ( and icons in the field list), when you select and group individual items, the rest of the items in the field appear in a group named Other. The new group and the Other group become another level of detail that you can show or hide, so that you can still display the individual items that you've grouped. To group items in a page field, you can move the field temporarily to the row or column area, group the items, and then move the field back to the page area. You can also select multiple page field items to display as a combined summary.
For other types of source data ( icons in the field list), when you select and group individual items, the items are combined in a new item named Group1 (which you can rename). You can't display the individual items unless you ungroup them. The rest of the items in the field are unchanged by adding the group. While items in a field are grouped, you can't add calculated items to the field. To group items in a page field, you can move the field temporarily to the row or column area, group the items, and then move the field back to the page area.
Totals, calculations, and formulas
PivotTable and PivotChart reports provide several types of calculations. Data fields use summary functions to combine values from the underlying source data. You can also use custom calculations to compare data values, or add your own formulas that use elements of the report or other worksheet data.
How PivotTable and PivotChart reports summarize data
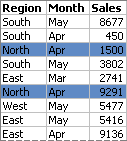
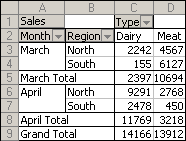
Source data
The values in the data area summarize the underlying source data in the report.
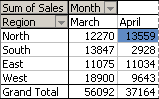
PivotTable report made from the above source data
The Month column field provides items March and April. The Region row field provides items North, South, East, and West. The value at the intersection of the April column and the North row is the total sales revenue from the records in the source data that have Month values of April and Region values of North.
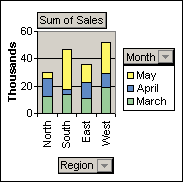
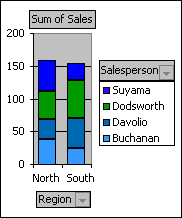
PivotChart report made from the example PivotTable report
In a PivotChart report, the Region field might be a category field that shows North, South, East, and West as categories. The Month field could be a series field that shows the items March, April, and May as series represented in the legend. A data field called Sum of Sales could contain data markers that represent the total revenue in each region for each month. For example, one data marker would represent, by its position on the value axis, the total sales for April in the North region.
Values and calculations in a PivotChart report reflect those in the associated PivotTable report, and vice versa.
Custom calculations A custom calculation shows values based on other items or cells in the data area. For example, you could display values in the Sum of Sales data field as a percentage of March sales, or as a running total of the items in the Month field.
Formulas If summary functions and custom calculations don't provide the results you want, you can create your own formulas in calculated fields and calculated items. For example, you could add a calculated item with the formula for the sales commission, which could be different for each region. The report would then automatically include the commission in the subtotals and grand totals.
How the type of source data affects calculations
Calculations and options available in a report depend on whether the source data came from an OLAP database or another type of database.
OLAP source data For reports that are created from OLAP cubes, the summarized values are precalculated on the OLAP server before Microsoft Excel displays the results. Therefore, you cannot change how these values are calculated from within the report. You cannot change the summary function used to calculate data fields or subtotals, or add calculated fields or calculated items. If the OLAP server provides calculated fields, known as calculated members, you'll see these fields in the PivotTable field list. You'll also see any calculated fields and calculated items that are created by macros that were written in Visual Basic for Applications and stored in your workbook, but you won't be able to change these fields or items. If you need additional types of calculations, contact your OLAP database administrator.
Other types of source data In reports based on other types of external data or on worksheet data, Microsoft Excel uses the Sum summary function to calculate data fields that contain numeric data, and the Count summary function to calculate data fields that contain text. You can choose a different summary function
Hidden items in totals For OLAP source data, you can include or exclude the values for hidden items when calculating subtotals and grand totals. For other types of source data, values for hidden items are excluded by default, but you can optionally include the hidden items from page fields.
You can create formulas only in reports that are not based on OLAP source data.
Formulas are available in PivotChart reports and use the same syntax as those in PivotTable reports. For best results when working in a PivotChart report, create and edit formulas in the associated PivotTable report, where you can see the individual values that make up your data, and then view the results in the PivotChart report.
Formula elements In formulas you create for calculated fields and calculated items, you can use operators and expressions as you do in other worksheet formulas. You can use constants and refer to data from the report, but you cannot use cell references or defined names. You cannot use worksheet functions that require cell references or defined names as arguments, and you cannot use array functions.
Names in reports Microsoft Excel provides names to identify the elements of a report in your formulas. The names are composed of the field and item names. In the following example, the data in range C3:C9 is named Dairy.
In a PivotChart report, the field names are displayed in the field buttons, and item names can be seen in each field drop-down list. Don't confuse these names with those you see in chart tips, which reflect series and data point names instead.
Examples A calculated field named Forecast could forecast future orders with a formula such as the following:
=Sales * 1.2
A calculated item in the Type field that estimates sales for a new product based on Dairy sales could use a formula such as the following:
=Dairy * 115%
Formulas operate on sum totals, not individual records Formulas for calculated fields operate on the sum of the underlying data for any fields in the formula. For example, the formula =Sales * 1.2 multiplies the sum of the sales for each type and region by 1.2; it does not multiply each individual sale by 1.2 and then sum the multiplied amounts. Formulas for calculated items, however, operate on the individual records; the calculated item formula =Dairy *115% multiplies each individual sale of Dairy times 115%, after which the multiplied amounts are summarized together in the data area.
Spaces, numbers, and symbols in names In a name that includes more than one field, the fields can be in any order. In the example above, cells C6:D6 can be 'April North' or 'North April'. Use single quotation marks around names that are more than one word or include numbers or symbols.
Totals Formulas cannot refer to totals (such as March Total, April Total, and Grand Total in the example).
Field names in item references You can include the field name in a reference to an item. The item name must be in square brackets
Referring to items by position You can refer to an item by its position in the report as currently sorted and displayed. Type[1] is Dairy, and Type[2] is Seafood. The item referred to in this way can change whenever the positions of items change or different items are displayed or hidden. Hidden items are not counted in this index.
You can use relative positions to refer to items. The positions are determined relative to the calculated item that contains the formula. If South is the current region, Region[-1] is North; if North is the current region, Region[+1] is South. For example, a calculated item could use the formula =Region[-1] * 3%. If the position you give is before the first item or after the last item in the field, the formula results in a #REF! error.
In calculated item formulas, if you refer to items by their position or relative position, any options you have set under Top 10 AutoShow and AutoSort options in the PivotTable Sort and Top 10 or PivotTable Field Advanced Options dialog boxes are reset to Off or Manual, and the options become unavailable.
Using formulas in PivotChart reports
The methods and rules used for creating formulas in PivotChart reports are the same as the rules for PivotTable reports. When you create a calculated field or calculated item in a PivotChart report, the calculations are reflected in the associated PivotTable report, and vice versa. For best results, create formulas for a PivotChart report in the associated PivotTable report, where you can see the individual values that make up your data, and then view the results graphically in the PivotChart report.
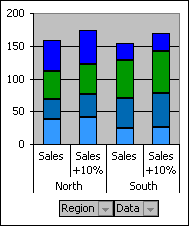
For example, the following PivotChart report shows sales for each salesperson per region:
To see what sales would look like if they were increased by 10 percent, you could create a calculated field with the following formula:
=Sales * 110%
The result would be reflected in the chart like this:
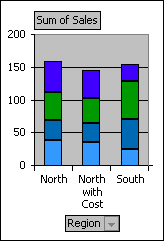
To see a separate data marker for sales in the North region minus a transportation cost of 8 percent, you could create a calculated item in the Region field with the following formula:
=North – (North * 8%)
The result would look like this:
A calculated item created in the Salesperson field, however, would appear as a series represented in the legend and appear in the chart as a data point in each category.