Change column width and row height
From Microsoft Office Excel 2003
Drag the boundary on the right side of the column heading until the column is the width you want.
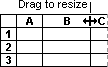
The displayed column width is the average number of digits 0 through 9 of the standard font that fit in a cell.
Select the columns you want to change, and then drag a boundary to the right of a selected column heading.
To do the same for all columns on the worksheet, click the Select All
 button, and then drag the boundary of any column heading.
Double-click the boundary to the right of the column heading.
To do the same for all columns on the worksheet, click the Select All
button, and then double-click a boundary to the right of one of the column headings.
Select the column, point to Column on the Format menu, click Width, and then enter a number.
- Select a cell in the column, click Copy
 on the Standard
toolbar, and then select the target column.
on the Standard
toolbar, and then select the target column. - On the Edit menu, click Paste Special, and then click Column widths.
Change the default width
- Right-click a sheet tab, and then click Select All Sheets on the shortcut menu.
- On the Format menu, point to Column, and then click Standard Width.
- Type a new measurement.
The number that appears in the Standard column width box is the average number of digits 0-9 of the standard font that fit in a cell.
To define the default column width for all new workbooks and worksheets, create a workbook template and a worksheet template.
Change the height
Drag the boundary below the row heading until the row is the height you want.
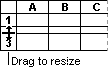
Select the rows you want to change, and drag a boundary below a selected row heading.
To change the row height for all rows on the worksheet, click the Select All
button, and then drag the boundary below any row heading.
Double-click the boundary below the row heading.
Select the column, point to Row on the Format menu, click Height, and then enter a number.