Change a motion path
- In normal view, display the slide that has the text or objects you want to change a motion path for.
- On the Slide Show menu, click Custom Animation, and in the Custom Animation list, select the motion path you want to change.
- Do one or more of the following:
- On the slide, right-click on the motion path and then click Edit Points.
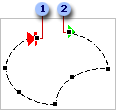
- Drag the start or end point to the new location.

 End point
 Start point
 - Right-click on the motion path and then click Exit Edit Points.
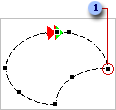
- Right-click the end point or the start point and then click Close Path.
- Position the mouse pointer over one of the sizing handles.
- To increase or decrease the size in one or more directions, drag the mouse and do one of the following:
- If you want to keep the center of the path in the same place, hold down CTRL while dragging.
- If you want to maintain proportions, hold down SHIFT while dragging.
-
If you want to maintain the proportions while keeping the center in the same place, hold down CTRL and SHIFT while dragging.
- Release the mouse, and then release CTRL or SHIFT.
- On the slide, right-click on the motion path and then click Edit Points, and drag an edit point on the motion path to adjust the shape.
- When you are finished, right-click on the motion path and then click Exit Edit Points.

 Edit point
- Position the mouse pointer over the motion path until the pointer changes to the cross-hair with arrows.
- Drag the motion path to the new location.
Note The text or object associated with this path will not move when you move the path. When the animation plays, the associated item will jump to the starting point and then follow the path.
- On the slide, right-click on the motion path and then click Reverse Path Direction.
 Change to a different motion path
- In the Custom Animation
task pane, click the down arrow on
 , point to
  Motion Paths, and then click an option.
