21.5 Deploy an external ActiveX control
Some LANSA applications will incorporate functionality provided by a 3rd-party ActiveX control. Visual LANSA supports all standard ActiveX Interfaces.
Some ActiveX controls have comprehensive installation programs to automatically register themselves on your PC (i.e. Microsoft Office ActiveX controls require Office to be installed on the target PC), however others are supplied as single .DLL or .OCX file. Shipping the single files to support an ActiveX control with your application means your distributable Package can be much smaller, however it can add complexity to the installation procedure. Alternatively you can instruct users how to manually install the ActiveX control as well as your application.
To include an ActiveX control with your deployment Package (this only works where a single file is required) you can define a Command to Execute After Install to automatically register the control for you.
The following example distributes the RICHTX32.OCX control with the deployment Package:
|
Step |
How to do it |
|
1. Create a batch file RICHTX32.BAT |
Create the batch file RICHTX32.BAT: Move RICHTX32.OCX %windir%\System32\ Regsvr32 %windir%\System32\Richtx32.OCX The first line of the batch file simply moves the Richtx32.OCX to the Windows System32 directory (using standard Windows Environment Variables). The second line registers the ActiveX using Regsvr32.exe |
|
2. Test the batch file |
Test the batch file on your own PC by placing the DLL/OCX in the same directory as the Batch file, then executing it. |
|
3. Create a deployment Package |
Create your deployment Package using the options relevant to your application. |
|
4. Include the ActiveX component |
Ensure your ActiveX component is included in the Package by directly selecting it or ensure it is included as a cross-reference object. |
|
5. Add non-LANSA objects to support your ActiveX component. |
Add the Non-LANSA objects: RICHTX32.OCX (this will most likely be in your Windows\System32 directory) RICHTX32.BAT (which you created in step 1) Modify the installation path for both objects to ensure they are installed in the 'Temp directory' |
|
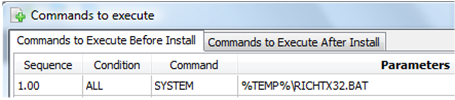
6. Set up command to execute after installation |
Select the Commands to execute and define the following command to execute after installation:
|
|
7. Deploy your Package. |
Save, build and release your Package then deploy as required. |
 It is your responsibility to conform to the licensing agreements of any ActiveX control you are distributing. Some controls require specific licenses if distributed with your application.