1.3 Upgrading a LANSA-developed Application previously deployed
If you have an existing Application which needs to be modified after upgrading your development environment to LANSA V13 you will need to:
Formulate a new deployment plan. Refer to 1.2 The Deployment Model.
Create an initial Version to install the complete application using Microsoft Windows Installer
Remove references to the old Application from desktop. Refer to Upgrade Options.
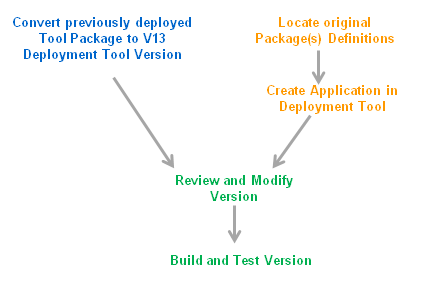
There are two different methods which can be used to upgrade a LANSA-developed application which was deployed using an earlier version of the Deployment Tool (pre-version 13).

|
Step |
How to do it |
|
1. Convert Package to Version |
Identify the base package to be used as a starting point for your new Application. You may not have all the details required in a single package so it is recommended to select the package which includes the main set of application objects (files, forms etc…) to be deployed. The package setting can be modified as required after conversion. Refer to Convert a Pre-V13 Package. |
|
1a. Locate original package definitions |
Locate the original package(s) used to deploy your Application. In this scenario you will not be copying the package but using the information to construct a Version definition. |
|
1b. Create Application in Deployment Tool |
Create an Application and Version in the Deployment Tool. Select an appropriate template to assist with the construction of your Application. |
|
2. Review and Modify Version |
Review the Version and ensure all required settings and objects have been included. Ensure ALL objects and settings are provided whether they relate to client, server, web-server or database. |
|
3. Build and test Version |
Build the Version and install into a clean environment, or into a test environment where previous package was installed (to test the upgrade options). |