Options Tab
From IPFX Administrator
Options Tab
Each extension can be configured independently based on the users requirements.

Users Can Receive Voicemail
Allows an extension to have voicemail or not.
Select from the drop down menu.
Note: If voicemail is set to 'NO' and a user forwards their phone to voicemail - the caller will route to the operator by default.
Quick Mail Entry
Allows users to listen to their new messages immediately after they have entered their password instead of having to listen to the VM Main Menu Options:
(i.e. 1 to Listen to Messages, 2 to Send a Message, 3 to change Locations etc.).
The default setting for this is ON.
Continuous Message Playback
If you do not want to hear the message options after each message is played, click on the checkbox to enable Continuous Message Playback. This will allow messages to be played back to back.
You can still use the message options for each message to save, delete etc but they won't be announced until all messages have been played. You will be able to save/delete all remaining messages.
The default setting for this is OFF.
Message Light Display
When a Voicemail message is left by a caller, the message light will show on your physical phone.
The default setting for this is ON.
Auto Logon
When this checkbox is selected, you will be able to push x1 (your code for voicemail i.e. 51 or 61) on your phone and instead of having to enter your password, you will be automatically logged on to voicemail.
Auto Answer Port Calls
When you want to record a Message Box, a Voicemail Message, etc, your phone rings and auto answers by default (on speaker phone). This option allows your phone to ring and the user to pick up the phone, instead of it auto answering, before timing out, i.e. for privacy.
Smart Greetings
Smart Greetings will inform your caller where you are and your expected return time for all locations other than Office. i.e. 'I'm sorry, John Smith is in a meeting until 3pm' (then your own personal location greeting is played).
If you do not use Smart Greetings, then you will need to re-record your greeting every time you are unavailable so your callers are kept informed of your current status.
The default setting for this is ON.
Transfer Message
This notifies the caller that they are being transferred. I.e. "Please hold while I transfer you now".
Record Instructions
Record Instructions are given to the caller after your greeting message. Voicemail will say 'Please record your message after the tone, at the end of your message press hash for further options'. The caller can then change the message options (ie, Urgent, Private, etc).
The default setting for this is OFF.
Inform caller of Busy / No Answer
If you are on a call or not answering your phone, the caller will be informed of your phone status. i.e. ' I'm sorry, that line is busy' or 'I'm sorry, there was no answer' (then your own personal standard or busy greeting is played).
The default setting for this is ON.
Personal Queuing
Personal Queuing is created when this setting is ON. The caller will be asked to Hold while you complete your current call or to press the hash (#) key to leave a message.
Retry on Busy will retry the extension after a set time ie. 30 seconds. If the line is still busy, the caller will be placed back on hold.
The default setting for this is OFF.
Click the Record Busy icon to record an announcement to be played to the caller on reaching your voicemail, if you are on the phone.
Click the Record Repeat button to record an announcement to be played to callers who are queuing.
The Record Busy and Record Repeat fields are "greyed out" when the Personal Queuing option is OFF.
Allow Callback
You must have Personal Queuing checked.
By setting Allow Callback to ON, the caller will be prompted for his phone number and the message/number played to you once your current call is completed.
The default setting for this is OFF.
Note: To enable Callback in a Call Centre scenario, you need the to purchase the IPFX Queue Callback module
Notification
Users can be advised by email when they have a voicemail message.
Check the Turn Email Delivery On box.
Select a Notification Type from the drop-down menu.
- System Default Providing you have Outlook 2000 (or later) Integration, the system default will be Notification with a .wav file.
- Notification This will send an email to your email client notifying you that you have a message in your message box.
- Notification with .wav file This will send an email to your email client notifying you that there is a message in your message box with the .wav file attached. You will still need to listen to the message through your Voicemail to delete it.
- VM Form This will send an e-mail to Outlook 2000 allowing the user to open and listen to the message through their phone. No .wav file is attached.
- VM Form with .wav file This will send an e-mail to Outlook 2000 allowing you to open and listen to the message through your phone or computer speakers. The attached .wav file can be saved and listened to at a later date if required.
- Notification with .psl file This will send email notification with a .psl attachment. This attachment is used by the IPFX Unified Messaging (Player only) player application. This is most often used with email clients other than Outlook or Lotus, such as Eudora or Pegasus.
Select a Delete on Send policy
- When you delete a .wav file attachment you can specify if you want the .wav file attachment to delete when you send a message. This will reduce the space used in your email client/exchange. Select Yes/No from the drop down menu (the default is No).
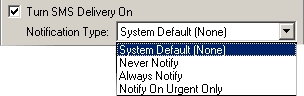
SMS Delivery
Users can be advised by text message when they have a voicemail message.
- Check the Turn SMS Delivery On box.
- Select Notification Type from the Drop down menu.
Forced Wrapup
These checkboxes when ticked will force wrapup codes onto all calls in the selected category for the extension selected.
An extension that has forced Wrapup codes on Queue calls will not be able to receive a second queue call until the first has been wrapped up.
Please ensure that if this is set, the extension has activated Wrapup Codes within the Call Popup screen (refer the IPFX Client Technical manual for instructions how to do this).
Refer to Config\Queues\Queue Item Types for setting Global Extension Settings and Config\Queues for setting Wrapups that apply to relevant queues.
Record Calls
(Requires IPFX Voice Capture Server or IPFX Voice Capture Solo Client)
Check this box to allow the extension's calls to be recorded/monitored by IPFX Voice Capture Solo Client or IPFX Voice Capture Server. Both inbound and outbound calls will be recorded.
Note: When a new extension is created this setting is turned off.
Advanced
- Click on the Advanced Button.
This will display the Advanced Extension Settings screen.
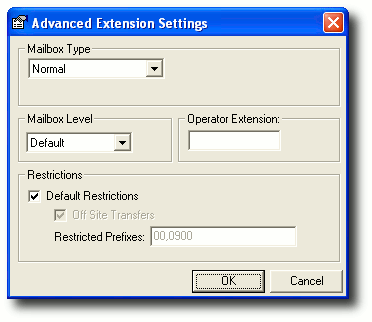
A description of the fields on this screen is set out below.
Click on the drop down menu button to display the menu below.
Mailbox Type
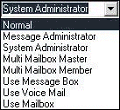
- Normal: This is the default Mailbox Type for every new extension if it is set to User (see User Level).
- Multi Mailbox Master: A feature that allows the Extension to be set up with mailboxes for more than one user. Not a commonly used feature.
- Multi Mailbox Member: A feature that allows multiple users to use the one phone to retrieve their messages. Ie. The caller would select 1 to speak to Angela Jones, 2 to speak to Bob Smith and so on. Not a commonly used feature.
- Use Message Box: This option does not let the caller leave a message. It is an option message box only. Ie. Angela Jones is currently on Maternity Leave. To speak to her replacement press 1, to transfer to the operator press 2. Thank you.
- Use Voicemail: This mailbox type allows multiple extensions to 'pool' their messages into one message box.
- Use Mailbox: Not currently used.
Mailbox Level

Mailbox Level controls the version of Voicemail that is at your company.
It is normally set to default based on the initial set up, however some extensions can be configured backwards. i.e. 100 does not include locations so therefore a queue extension may be changed to this to ensure people do not change a queue status.
Note: You cannot upgrade your version of Voicemail by changing the Mailbox Level.
Operator Extension
Set individually if there is a subset of operators. i.e. Press 0 for the operator can direct the call to a particular operator who is relevant for that department or group.
Restrictions
Default Restrictions
Default restrictions are decided by the customer at the point of install.
If the Company default allows Off Site Transfers, this option is available at the Company's discretion.
Off Site Transfers
The administrator can set individual extensions to have or not have access to Off Site Transfers.
To override the Default Restrictions clear the Default Restrictions box.
The offsite transfers option will automatically be enabled.
Restricted Prefixes
By default 00 (International) and 0900 (User Pay lines) are set to restricted transfers.
If you want to add more restrictions, click to clear the Default Restrictions checkbox.
You can limit the type of phone numbers that users can transfer calls to by adding more restrictions i.e. 021, 025, 027.
To add prefixes :-
Clear the Default Restrictions checkbox.
Add the prefixes to the Restricted Prefixes text box.
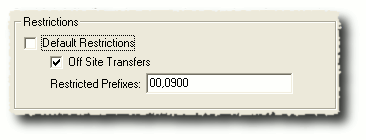
The example above shows Off Site Transfer calls do not include International, 0900 calls or mobile calls. Therefore a call could be transferred to an 0800 number or a National number.
Reset Message Light
If a message light stays on the phone after the user has retrieved all their messages, you can reset it for the user, by clicking on the Reset Message Light button.
Reset Mailbox
You can reset a Mailbox if one of your users leaves or agents need to be moved around.
You will be prompted to confirm the Mailbox Reset.
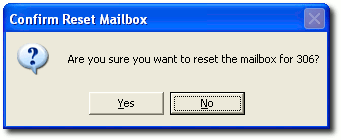
Click Yes to Reset or No to Cancel.
This will take the mailbox back to a first time setup.
Note: It is worth resetting the Password and clearing messages before resetting the mailbox to ensure customers have not been left unattended.
Reset Password
If a user forgets his/her password, you can click on the Reset Password Button and they can reset it next time they access their mailbox from Voicemail.
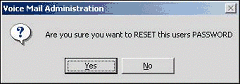
Click Yes to Reset or No to cancel.
To enter the new password, pick up your phone and access the voicemail mailbox (e.g. 51). ou will be asked to enter your new password.
Change Password
Passwords can be changed by clicking on the Change Password button. The screen below displays:
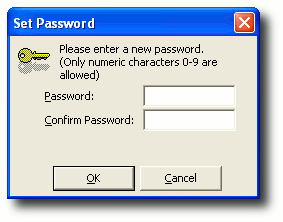
- Enter new password.
- Confirm new password.
- Click OK if correct, or cancel if not.
Directory Fields
Click on the Directory Fields button ![]() to display the Show fields screen.
to display the Show fields screen.
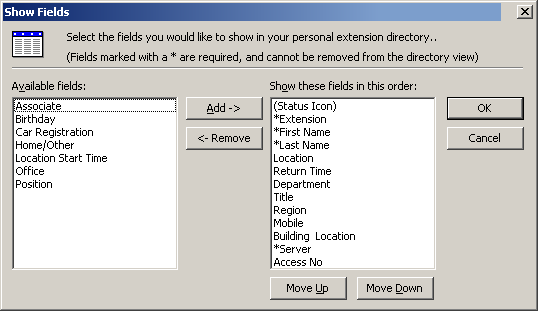
- Select fields required.
- Use Move UP/Move Down buttons to place selected fields in required order.
- Click OK when completed.
Note: This is for individual extensions only